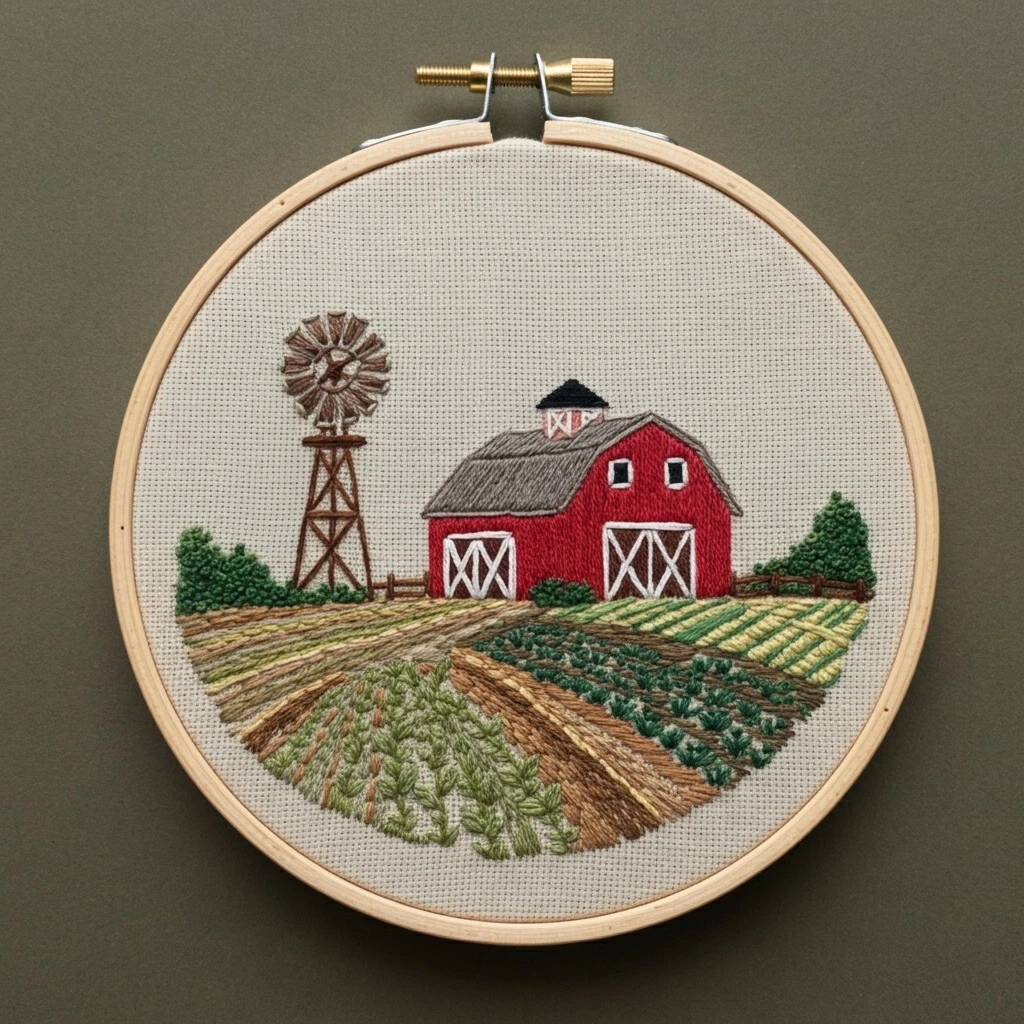
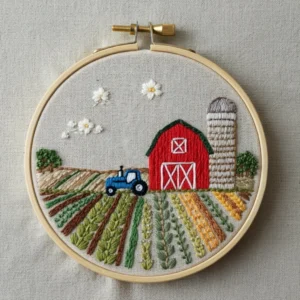
Hand-Embroidered Farm Landscape in Hoop | Hand Embroidery Pattern PDF

Original price was: $ 9,99.Current price is: $ 2,99.

Add Hand-Embroidered Farm Landscape in Hoop to your stitching queue for a project that’s relaxing and rewarding. The digital PDF includes 3–8″ hoop sizes, DMC color suggestions, stitch notes, and a finished reference image. Designed for beginner-friendly stitchers who like modern embroidery. Download and start stitching when you’re ready.

Guaranteed Safe Checkout

Hand-Embroidered Farm Landscape in Hoop — Hand Embroidery Pattern

Tools & materials

Most stitchers already have the essentials. Here’s a simple list:

  • Cotton or linen fabric (tightly woven works well)
  • Embroidery needles, scissors, and a transfer method
  • Optional: light source for tracing or stabilizer for extra support
  • 6‑strand embroidery floss (DMC or equivalent)

Ways to switch it up

  • Switch the color palette to match your space—pastels, jewel tones, or neutrals all work.
  • Vary strand count: thicker for bold texture, fewer strands for delicate shading.
  • Scale it smaller for a quick win, or larger for a longer, slower project.
  • Try a different fill stitch in one area to practice a technique you’ve been curious about.

The pattern gives you the roadmap; you decide how Hand-Embroidered Farm Landscape in Hoop looks when it’s finished.

Personalize the finish

  • Scale it smaller for a quick win, or larger for a longer, slower project.
  • Switch the color palette to match your space—pastels, jewel tones, or neutrals all work.
  • Use tinted fabric to change the mood without changing thread colors.
  • Vary strand count: thicker for bold texture, fewer strands for delicate shading.

The pattern gives you the roadmap; you decide how Hand-Embroidered Farm Landscape in Hoop looks when it’s finished.

Set your hoop down, pick a few strands of floss, and let the picture build. Hand-Embroidered Farm Landscape in Hoop translates into a creative piece of embroidery hoop art.

Why this pattern works

This pattern leans into hand embroidery project without feeling rigid. The linework is clear, and your stitch choices can change the whole vibe of the finished hoop.

There’s a mix of repeating elements and small details, so it stays engaging without becoming overwhelming.

Design notes

This pattern leans into printable hoop pattern without feeling rigid. The linework is clear, and your stitch choices can change the whole vibe of the finished hoop.

If you like neat outlines and satisfying fill areas, you’ll enjoy how the motif builds from simple shapes into a complete scene.

Setup steps

Use your favorite method—this is a straightforward approach:

  1. Print at 100% (no scaling) and choose your hoop size
  2. Transfer the lines to fabric using your preferred method
  3. Hoop the fabric with even tension
  4. Stitch outlines first, then fills/textures, then tiny details
  5. Finish the back neatly and display in the hoop or frame

At a glance

  • Format: digital PDF (printable)
  • Hoop sizing: 3″–8″
  • Skill level: beginner-friendly
  • Style: hand embroidery project
  • Includes: pattern pages, beginner guide, finished reference

What you’ll receive

After checkout, you’ll have the pattern ready to print plus guidance to keep things approachable.

  • Printable pattern pages you can size for 3″ to 8″ hoops
  • A DMC color guide to help you choose floss shades quickly
  • Stitch suggestions and placement notes to keep the process smooth
  • A beginner-friendly hand embroidery guide (plus a small sample pattern)
  • A reference photo of the finished piece so you can compare as you stitch

Materials to grab

No complicated setup—just a few embroidery staples:

  • 6‑strand embroidery floss (DMC or equivalent)
  • Embroidery needles, scissors, and a transfer method
  • Embroidery hoop (3″–8″)
  • Optional: light source for tracing or stabilizer for extra support
  • Cotton or linen fabric (tightly woven works well)

Where it looks great

  • Use it as a practice piece for new stitches before a bigger project
  • Gift it as a handmade keepsake (add initials or a date)
  • Frame it in the hoop and hang it as easy wall decor
  • Keep a few hoops ready and rotate designs seasonally
  • Stitch it onto a fabric panel for a tote, pillow front, or pouch

Setup steps

Use your favorite method—this is a straightforward approach:

  1. Print at 100% (no scaling) and choose your hoop size
  2. Transfer the lines to fabric using your preferred method
  3. Hoop the fabric with even tension
  4. Stitch outlines first, then fills/textures, then tiny details
  5. Finish the back neatly and display in the hoop or frame

Why this pattern works

This pattern leans into hand embroidery project without feeling rigid. The linework is clear, and your stitch choices can change the whole vibe of the finished hoop.

If you like neat outlines and satisfying fill areas, you’ll enjoy how the motif builds from simple shapes into a complete scene.

Tools & materials

Most stitchers already have the essentials. Here’s a simple list:

  • Embroidery needles, scissors, and a transfer method
  • Embroidery hoop (3″–8″)
  • Cotton or linen fabric (tightly woven works well)
  • 6‑strand embroidery floss (DMC or equivalent)

Finishing ideas

  • Frame it in the hoop and hang it as easy wall decor
  • Keep a few hoops ready and rotate designs seasonally
  • Gift it as a handmade keepsake (add initials or a date)
  • Stitch it onto a fabric panel for a tote, pillow front, or pouch

Printing & transfer tips

To keep the lines sharp, take a minute for setup:

  1. Print at 100% (no scaling) and choose your hoop size
  2. Transfer the lines to fabric using your preferred method
  3. Hoop the fabric with even tension
  4. Stitch outlines first, then fills/textures, then tiny details
  5. Finish the back neatly and display in the hoop or frame

Digital details: This listing is for a digital embroidery pattern PDF. Your files are delivered as a download—no physical item will be mailed.

Benefits

  • Hoop-ready pattern pages sized for 3″–8″ frames
  • DMC color guidance to speed up floss picking
  • Beginner guide included for a smoother first project
  • Works beautifully as embroidery hoop wall decor or a handmade gift
  • Easy to personalize with color swaps, initials, or small accents
  • Stitch suggestions so you’re not guessing your next step
  • Reference photo to help you check proportion and placement

FAQs

  • When do I get the download?
    Immediately after checkout. You’ll be able to download the PDF files from your order page or email.
  • What hoop sizes can I use?
    The pattern is provided so you can print it for hoops from 3″ to 8″.
  • Can I resize the design?
    Yes. The file includes sizes intended for 3″–8″ hoops. Printing at “actual size” helps keep scaling accurate.
  • Is it suitable for beginners?
    Yes—these patterns are written to be beginner-friendly, with guidance included. If you’re newer, start with the smaller hoop size and stitch at your own pace.

Reviews

There are no reviews yet.

Be the first to review “Hand-Embroidered Farm Landscape in Hoop | Hand Embroidery Pattern PDF”

Your email address will not be published. Required fields are marked *