How to start embroidery business – Essential Tips

What this means (and why it gets annoying fast)
If you’ve been searching how to start embroidery business, I’m guessing something went a little… off. Don’t worry—most embroidery “disasters” are just tiny, fixable problems (and not a personal failure).
Think of this as your how to start embroidery business tips that doesn’t assume you were born holding an embroidery hoop. We’ll go step-by-step, call out the common mistakes, and I’ll point out when to slow down so you don’t stretch needle holes or fray floss strands.
And if you’re in the mood for a cozy stitch session later, Whimsical Treehouse Garden Embroidery Art | Hand Embroidery Pattern PDF is calling your name.
- Quick fixes when things go sideways
- How to prep your fabric so it doesn’t fight you
- A step-by-step process you can repeat on any project
- How to avoid puckering, fraying, and messy backs
- Which tools make the job easier (and which ones are optional)
Tools + materials you’ll want nearby
Tools time. You don’t need a fancy craft room—just a few helpful bits so you’re not improvising with your teeth. If your design needs marks, washable fabric marking pens is a small thing that saves big headaches.

- Embroidery scissors (sharp enough to actually cut, not just bully the thread)
- Seam ripper (for clean undo work—no stabbing required)
- Tweezers (great for grabbing tiny thread tails)
- Needle threader (because eyes get tired)
- Embroidery hoop (stability = fewer stretched needle holes)
- Stabilizer (especially for knits or machine work)
- Thread conditioner (optional, but nice for smooth floss strands)
One more thing: if you’re on a machine, tension and bobbin thread choice matter more than people admit out loud.
How to start embroidery business: step-by-step
Let’s break it down into easy steps. Nothing fancy—just the stuff that actually works.

- Get clear on your goal and your materials first: fabric type, thread types, and whether this is hand or machine embroidery.
- Do a tiny test on scrap fabric. It’s the easiest way to avoid surprises (and it saves your main piece).
- Set up your workspace: good light, a comfy chair, and tools within reach. Your neck will thank you later.
- Work in small sections and keep your tension even. Too tight can distort fabric fibers; too loose can look messy.
- Pause often to check the front and the back. Catching an issue early beats fixing it after 200 stitches.
- If something looks wrong, undo a few stitches and reset. A seam ripper and tweezers are your best “oops” team.
- Finish by cleaning up thread tails, pressing the piece from the back, and giving it a final once-over for neatness.
Once you’re done, take a second to look at the front *and* the back. A quick tidy now saves annoyance later.
Troubleshooting + common mistakes
Embroidery has a few predictable ways it can get cranky. Let’s troubleshoot without spiraling.
- Fraying floss strands: shorten your thread length and consider a tiny bit of thread conditioner.
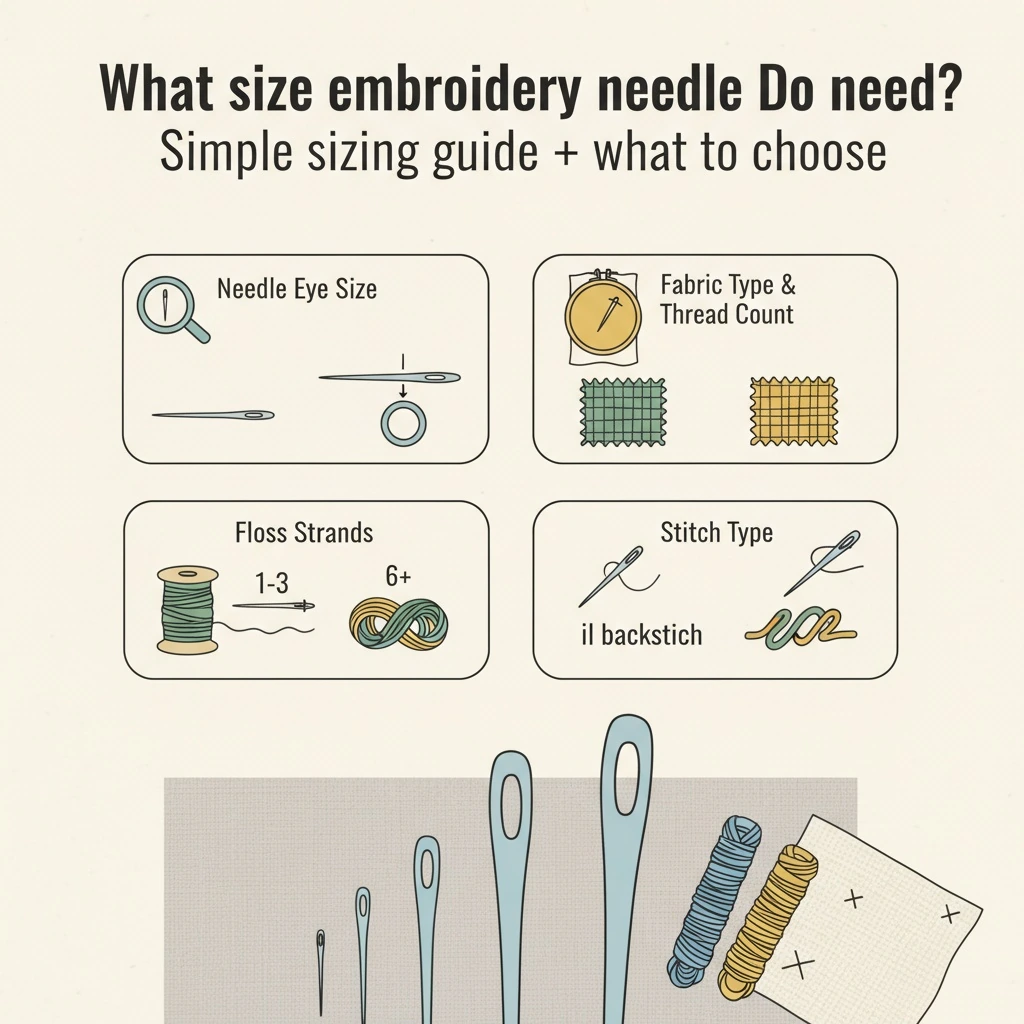
- Visible needle holes: use a smaller needle size and avoid pulling stitches too tight.
- Fabric puckering: loosen tension, use a hoop, and add stabilizer on stretchy fabrics.
- Messy back: secure thread tails and avoid long jumps—park the needle and re-enter nearby.
- Stitches look uneven: slow down and use consistent stitch lengths (a quick guideline mark helps).
If you’re switching between hand embroidery and machine embroidery, remember: the rules are similar, but the “fix” is often different.
You might also like: Whimsical Treehouse Garden Embroidery Art | Hand Embroidery Pattern PDF
Fabric, thread types, and when to avoid the “just force it” method
Different fabrics behave differently, and embroidery doesn’t always play nice with every material. A stable weave is usually the easiest place to start.
Denim and canvas are tough, but they can be hard on needles—use the right needle sizes and don’t force it.
When you want a new project to try this on, hand embroidery patterns is basically a rabbit hole (the good kind).
- Delicate fabrics: test first and keep tension relaxed
- Thick fabrics: choose a sturdy needle and go slower
- Knits: use stabilizer and avoid pulling tight
Bottom line: match your method to your fabric, and you’ll avoid 90% of the headaches.
Final thoughts on how to start embroidery business
At the end of the day, how to start embroidery business is mostly about patience and good habits. Keep your tools sharp, watch your tension, and don’t be afraid to undo a few stitches when something looks off.
You don’t need “perfect hands.” You just need a repeatable process and a little practice.
You might also like: Marking Pens for Sewing and Quilting • DMC step-by-step embroidery stitch guide
FAQ
FAQ time—because you’re not the only one wondering these:
Is how to start embroidery business beginner-friendly?
A quick sample stitch-out (or mini practice patch) saves a ton of frustration. Don’t be afraid to undo a few stitches—clean fixes always look better.
What tools do I need for how to start embroidery business?
Start simple, test on scrap fabric, and change one thing at a time. Don’t be afraid to undo a few stitches—clean fixes always look better.
How long does how to start embroidery business usually take?
Start simple, test on scrap fabric, and change one thing at a time. Don’t be afraid to undo a few stitches—clean fixes always look better.
What fabric works best for how to start embroidery business?
A quick sample stitch-out (or mini practice patch) saves a ton of frustration. If you’re unsure, ask a local shop or a more experienced stitcher for a quick second opinion.
How do I fix mistakes while doing how to start embroidery business?
Good light, sharp tools, and patience beat “natural talent” every single time. If you’re unsure, ask a local shop or a more experienced stitcher for a quick second opinion.
Can I do how to start embroidery business with both hand and machine embroidery?
Start simple, test on scrap fabric, and change one thing at a time. Don’t be afraid to undo a few stitches—clean fixes always look better.
Key Takeaways
If you forget everything else, remember these:
- Use stabilizer on stretchy or tricky fabrics
- Match needle size to thread so needle holes don’t get huge
- When it’s messy, undo a few stitches and reset calmly
- Test on scrap fabric before doing the real thing
- Support the fabric with a hoop so stitches stay neat
- Trim cleanly with embroidery scissors (not kitchen scissors)
- Keep tension even—no yanking, no slack spaghetti