
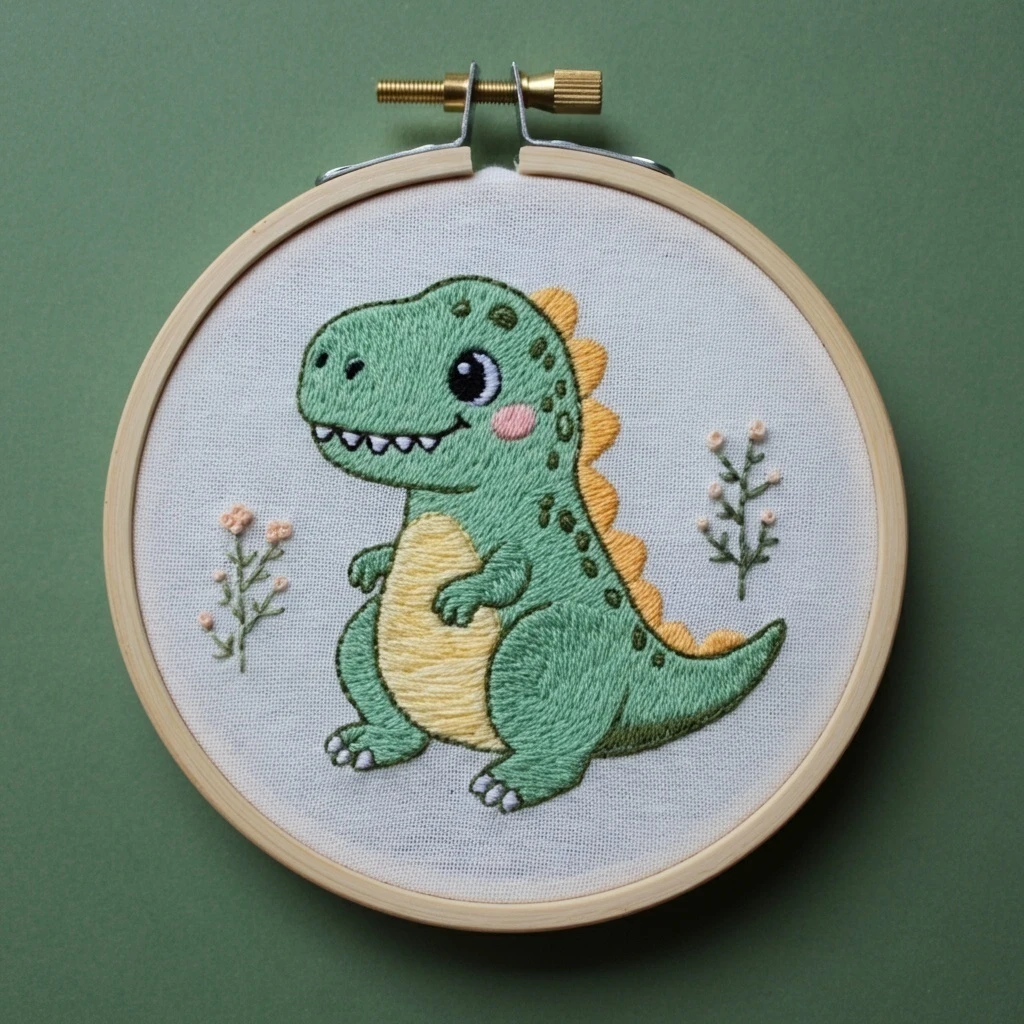
Cute Baby Dino
A cheerful nursery-style dinosaur with soft mint body shading, a buttery yellow belly, warm golden back spikes, tiny blush cheeks, dark embroidered features, and delicate wildflower sprigs. This guide translates the look into practical DMC choices and beginner-friendly stitching steps.
Suggested DMC Palette
The reference image reads as fresh spring green against natural linen, with a pale yellow belly and ochre-gold spikes. Keep the palette gentle rather than high contrast so the dinosaur stays sweet and baby-like.
Body midtone
Primary fill for the head, body, tail, legs, and arms. Work with long-and-short stitch following the curve of each shape.
Body highlight
Add light strokes on the upper snout, cheek, belly edge, and tail top where the fabric appears softly lit.
Body shadow
Use under the chin, lower tail, feet, arm bases, and along the back to create rounded plush dimension.
Deep green outlines
Clean outline for the dinosaur silhouette, mouth crease, spot details, and shadow accents around limbs.
Belly base
Soft fill for the oval belly. Stitch horizontally or slightly arced to mimic the reference’s cozy hand-filled texture.
Belly shadow
Blend around the lower belly and side seams; use single strands as fine ribbed texture lines.
Back spikes
Fill each triangular plate with satin stitch from base to tip. Add darker bases for separation between spikes.
Blush cheeks
Use soft satin stitch or tiny circular long-and-short strokes. Keep the cheek fluffy with a relaxed tension.
Eye & nostrils
Best for the pupil, nostrils, and a tiny mouth line. Use sparingly so the face remains bright and friendly.
Eye shine & teeth
Small satin triangles for teeth and one or two bright catchlights in the eye. Anchor carefully to avoid bulk.
Flower stems
Stem stitch for the thin sprigs; use one strand for the most delicate branches and two strands for the main stem.
Flower buds
French knots or colonial knots make the little peach blossoms look raised and sweet beside the dino.
Stitch Map & Texture Plan
Dinosaur body
Use long-and-short stitch as the main fill. Start with DMC 563, tuck DMC 954 into the upper face and shoulder, and shade with DMC 562 under the jaw, foot curves, and tail base. Keep stitch direction following the rounded anatomy: nose-to-cheek on the head, vertical curves on the body, and sweeping lines along the tail.
Belly panel
Work satin stitch or split stitch rows in DMC 745. Add DMC 3822 as gentle horizontal bands so the belly resembles soft embroidered ribbing. For beginners, outline the belly first with split stitch to create a neat boundary before filling.
Spikes and spots
Satin stitch each golden spike in DMC 728, angling stitches from the body edge toward the spike tip. Add a one-strand line of DMC 3822 at the base for depth. For the dark green spots, use small padded satin dots or dense seed stitches in DMC 986.
Face details
Fill the eye with padded satin stitch in DMC 310, then place a tiny DMC Blanc highlight last. The mouth works best as a one- or two-strand backstitch. Teeth can be satin stitched with one strand of Blanc, then edged lightly with 986 only if extra definition is needed.
Thread Count & Blending Guide
| Area | Strands | Recommended stitch | Practical note |
|---|---|---|---|
| Main body fill | 2 strands | Long-and-short, split stitch outline | Use shorter stitches near tight curves; blend 563 + 954 for highlight patches and 563 + 562 for soft shadows. |
| Large outlines | 1–2 strands | Split stitch or stem stitch | One strand looks delicate; two strands gives the plush storybook outline seen in the sample. |
| Belly texture | 2 strands fill, 1 strand detail | Satin stitch with fine straight stitch lines | Work the pale yellow first, then add the straw lines after the fill is smooth. |
| Spikes | 2 strands | Satin stitch | Keep each spike separate; avoid carrying dark green across pale yellow or it may show through light fabric. |
| Eye, nostrils, spots | 1–2 strands | Padded satin, French knots, tiny seed stitches | Use two strands for the eye, one strand for nostrils and tiny dot edges. |
| Flowers and stems | 1 strand stems, 2 strands knots | Stem stitch, lazy daisy, French knots | Thin stems keep the side florals airy and prevent them from competing with the dinosaur. |
Beginner-Friendly Working Order
1. Stabilize and outline
- Use medium-weight cotton or linen in a 6-inch hoop; tighten until the fabric sounds lightly drumlike.
- Trace the design with a water-soluble pen and stitch the main silhouette in split stitch before filling.
- Keep knots outside the visible dinosaur area where possible to avoid bumps under satin fill.
2. Fill from back to front
- Stitch tail and back shapes first, then body, belly, arms, face, and finally details.
- Park your needle direction like fur: follow the shape, not the edge of the hoop.
- After every few stitches, smooth the thread with your fingers to keep the soft toy-like finish.
3. Add expression last
- The eye highlight, cheek, teeth, nostrils, and smile should be the final layers so they sit crisp on top.
- Use a single strand for the mouth if your design is small; switch to two strands only for larger hoops.
- Test the blush color on scrap fabric first so it stays gentle, not too bright.
4. Finish cleanly
- Steam lightly from the back, never pressing directly on raised knots or padded satin stitches.
- If the pale belly picks up green fibers, lift them away with clean tape before framing.
- For a nursery finish, back the hoop with felt or cotton and trim the fabric neatly behind the hoop.
Extra Shading Ideas
For a more dimensional version, use blended needles rather than abrupt color changes. Thread one strand of DMC 563 with one strand of DMC 954 for the soft upper highlights. Blend one strand of DMC 563 with one strand of DMC 562 for the lower belly edge, feet, and underside of the tail. A few single-strand DMC 986 strokes at the jaw, back spots, and tail base will make the shape read clearly without turning the cute design too dark.


