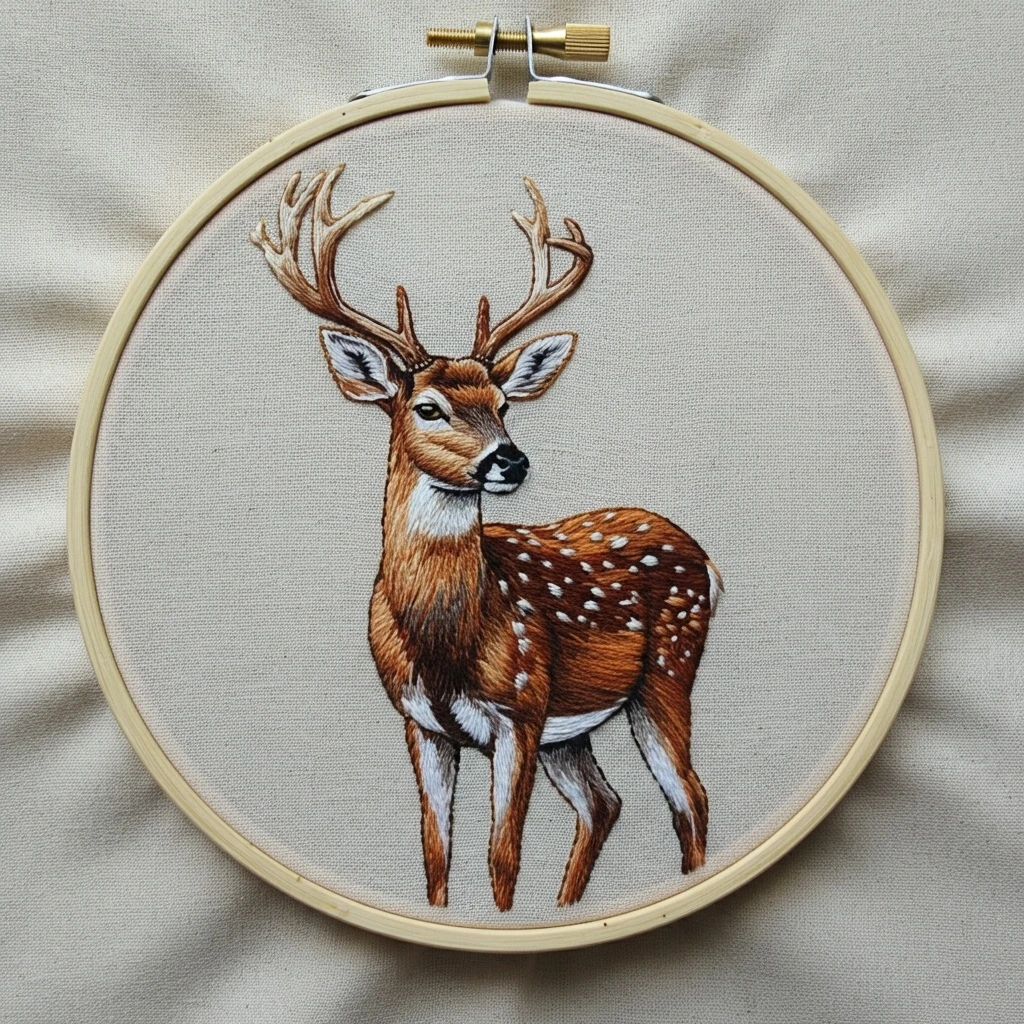

Graceful Woodland Deer
A refined thread-painting guide for a spotted woodland deer stitched on natural linen: warm chestnut fur, pale cream throat and belly, crisp black facial details, ivory antlers, and soft grey ear shading.
Image color read
The reference design is a centered deer portrait inside a hoop. The body is built from layered russet, cinnamon, amber, and dark chocolate browns, with bright white spots and underbelly accents. The face has precise black nose and eye markings, pale grey inner ears, and antlers shaded from tan to deep brown. The surrounding fabric is neutral, so the palette should stay natural, warm, and dimensional rather than overly bright.
chestnut coatcream throatwhite fawn spotsdark muzzletan antlerslinen groundSuggested DMC palette
DMC 938 – Ultra Dark Coffee Brown
Deepest fur shadows, chest center, legs, ear bases, and separation under the jaw.
DMC 433 – Medium Brown
Core body tone for the flank, neck, antler shadows, and warm contour lines.
DMC 434 – Light Brown
Bridge color for soft fur transitions across the shoulder, face, and haunch.
DMC 975 – Golden Brown
Sunlit russet areas on the back, cheek, forehead, and outside of the legs.
DMC 3826 – Golden Brown
Soft caramel highlights in the face, upper neck, and warm antler planes.
DMC 738 – Very Light Tan
Antler highlights, pale muzzle bridge, and tiny transition stitches beside cream areas.
DMC 3865 – Winter White
Spots, throat, belly, tail edge, eye glints, and the brightest ear edges.
DMC 762 – Very Light Pearl Grey
Cool shading in white fur, inner ears, and subtle shadow below the belly.
DMC 318 – Light Steel Grey
Fine ear shadows, muzzle modelling, and grey strokes inside the white markings.
DMC 310 – Black
Nose, eye, mouth line, hoof tips, and the smallest high-contrast facial accents.
DMC 801 – Dark Coffee Brown
Use instead of pure black for natural outlines around the body and antlers.
DMC 842 – Very Light Beige Brown
Gentle fabric-friendly highlights on antlers, ears, and the deer’s pale muzzle.
Stitch plan by design area
| Area | Recommended stitches | Thread guidance |
|---|---|---|
| Body and neck fur | Long-and-short stitch with directional layers; add scattered single straight stitches for hair texture. | 2 strands for base, 1 strand for final fur strokes. Blend 433 + 434 or 434 + 975 in the needle for soft transitions. |
| Face and muzzle | Short split stitch outlines, tiny satin stitches, and careful long-and-short shading. | Mostly 1 strand. Keep stitches short around the eyes and nose so the expression stays clean. |
| White spots and throat | Satin stitch for larger white patches; single seed stitches or French knots for tiny spots. | Use 3865, then tuck a few 762 shadow stitches along lower edges to stop the white from looking flat. |
| Antlers | Stem stitch along each branch, wrapped stem stitch for raised ridges, and 1-strand straight highlights. | Start with 842 or 738, shade one side with 433/801, and keep the tips light and delicate. |
| Ears | Fishbone stitch or long-and-short stitch radiating from the ear base; split stitch rim. | Use 3865 + 762 inside, then frame with 801 and warm browns on the outer edge. |
| Legs and hooves | Long vertical satin/straight stitches, split stitch for contours, tiny satin stitch for hooves. | Use darker browns toward the inner legs. Reserve 310 only for hoof tips or deepest slivers. |
Blending and shading notes
- Work the deer coat in the direction fur naturally grows: downward on the neck, sweeping back on the flank, and vertical on the legs.
- For a painterly coat, thread one needle with one strand 433 and one strand 434; use a second blend of 434 + 975 for warmer highlights.
- Keep shadows under the throat, belly, and rear leg in 938/801, but break them with a few medium-brown stitches so they do not become blocks.
- Place white spots after the brown coat is stitched. This keeps them crisp and lets you adjust sizes to match the body curve.
Texture suggestions
- Add a few random 1-strand fly stitches in the chest to mimic fluffy fur.
- Use slightly raised wrapped stem stitch on the main antler stems for a carved, dimensional look.
- For the nose, stitch a black satin base and add one tiny 3865 highlight stitch at the upper edge.
- Leave the linen background unstitched; negative space makes the deer feel elegant and hoop-ready.
Beginner-friendly workflow
Practical stitching tips
Thread-count rule: use 2 strands for broad coat coverage, 1 strand for facial details and final fur, and 3 strands only for a slightly raised chest tuft or bold antler base. For a 6–7 inch hoop, this balance keeps the deer detailed without becoming bulky.
Outlining details
Choose DMC 801 for most contour lines because it blends with the coat. Use DMC 310 sparingly on the nose, eye, and hoof tips. A single black stitch can define the expression better than a heavy outline.
Fabric and hoop care
Natural linen suits this design beautifully, but keep tension firm so long-and-short stitches lie smooth. If the linen is loose-weave, back it with lightweight cotton or stabilizer before stitching small face details.


