
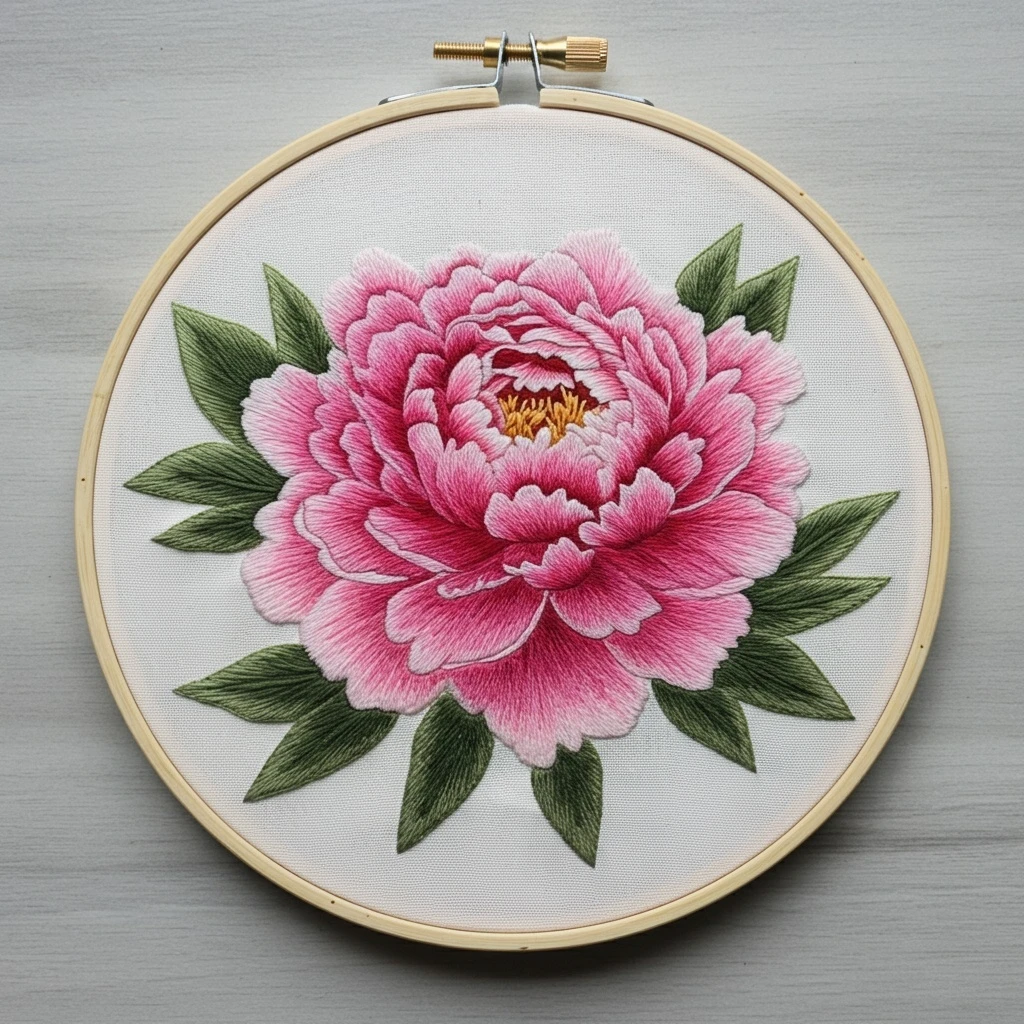
Pink Peony Bloom
A painterly embroidery plan for a full blush peony with layered ruffled petals, deep raspberry shadows, golden stamens, and dark leafy greenery. The palette below is chosen to preserve the soft fabric-art look while giving enough contrast for realistic petal depth.
Suggested DMC palette
Use these as close practical matches for the visible tones: pale petal highlights, mid pinks, raspberry shadows, leaf greens, and warm stamen golds.
DMC 818 — Baby Pink
Softest petal edges, outer ruffles, and areas that catch the light. Keep stitches airy so the flower stays pastel.
DMC 151 — Dusty Rose Very Light
Gentle transitions between highlight and midtone on broad petals; excellent for feathered long-and-short shading.
DMC 603 — Cranberry
Main bright pink body color for petal folds, especially on the lower and side petals.
DMC 602 — Cranberry Medium
Richer petal valleys, curved fold lines, and mid-shadow strokes radiating from the peony center.
DMC 601 — Cranberry Dark
Deep raspberry accents inside the bloom and under overlapping petals. Use sparingly for dimension.
DMC 819 — Baby Pink Light
Tiny edge glints, petal rims, and narrow separating lines where a pure white would look too stark.
DMC 783 — Topaz Medium
Golden stamen tips in the open center; French knots and short straight stitches give pollen texture.
DMC 780 — Topaz Ultra Very Dark
Small dark anchors at the stamen bases and warm shadow inside the flower cup.
DMC 934 — Avocado Green Black
Deep leaf veins, shaded leaf bases, and the darkest greenery tucked behind the flower.
DMC 3051 — Green Gray Dark
Primary mature leaf tone. Stitch in the direction of each leaf to create a ribbed botanical texture.
DMC 3052 — Green Gray Medium
Leaf midtones and soft blending between the dark veins and lighter edges.
DMC 3053 — Green Gray
Leaf highlights, thin edge strokes, and lifted tips on the upper leaves.
Stitch map
Work from the background leaves forward, then build the flower from the outer petals into the center.
Petals
- Long-and-short stitch: best for the realistic pink gradients across each petal.
- Satin stitch: use for small tucked petals and smooth scalloped rims.
- Split stitch outline: trace petal edges first with 1 strand in 819 or 151 to keep curves crisp.
- Directional strokes: angle stitches from the base of each petal toward the outer ruffled edge.
Leaves and center
- Fishbone stitch: ideal for pointed leaves; alternate 3051 and 3052 for a natural rib.
- Straight stitch veins: add final veins with 934 using 1 strand.
- French knots: make raised pollen dots with 783; add a few 780 knots for depth.
- Short seed stitches: scatter inside the cup to suggest tiny stamen filaments.
Thread-count guidance
Use fewer strands for painterly control; add strands only where you want bolder texture.
| Area | Recommended strands | Why it works |
|---|---|---|
| Fine petal outlines | 1 strand | Prevents heavy cartoon lines and keeps the peony soft. |
| Petal shading | 1–2 strands | One strand gives thread-painted realism; two strands fill faster on larger petals. |
| Leaf bodies | 2 strands | Enough coverage for the darker green shapes without becoming bulky. |
| Leaf veins and final accents | 1 strand | Crisp, controlled lines that sit neatly over filled leaves. |
| Stamens / pollen | 2 strands for knots, 1 strand for filaments | Raised texture in the center while keeping the surrounding filaments delicate. |
Blending and shading plan
The reference bloom has a pale pink perimeter, vibrant raspberry folds, and a shadowed inner bowl.
Practical beginner tips
Small habits make the finished peony cleaner and easier to stitch.
Before stitching
- Transfer only essential lines: petal edges, major folds, leaf veins, and the stamen circle.
- Hoop the fabric drum-tight; thread painting looks best when the ground fabric does not pucker.
- Cut floss to about 14–16 inches so pale pinks do not fuzz from over-handling.
While stitching
- Complete one petal at a time so color decisions stay consistent.
- Turn the hoop often; it is easier to stitch smooth petals when your needle follows the petal direction.
- Step back after every few petals. Add dark 601 accents only after the lighter layers are in place.
Finishing note: After stitching, press from the back over a towel so French knots and satin ridges are not flattened. Mount in a natural wood hoop to echo the warm floral sample style.


