
Design #138 · Timepiece & Steampunk
Steampunk Clock
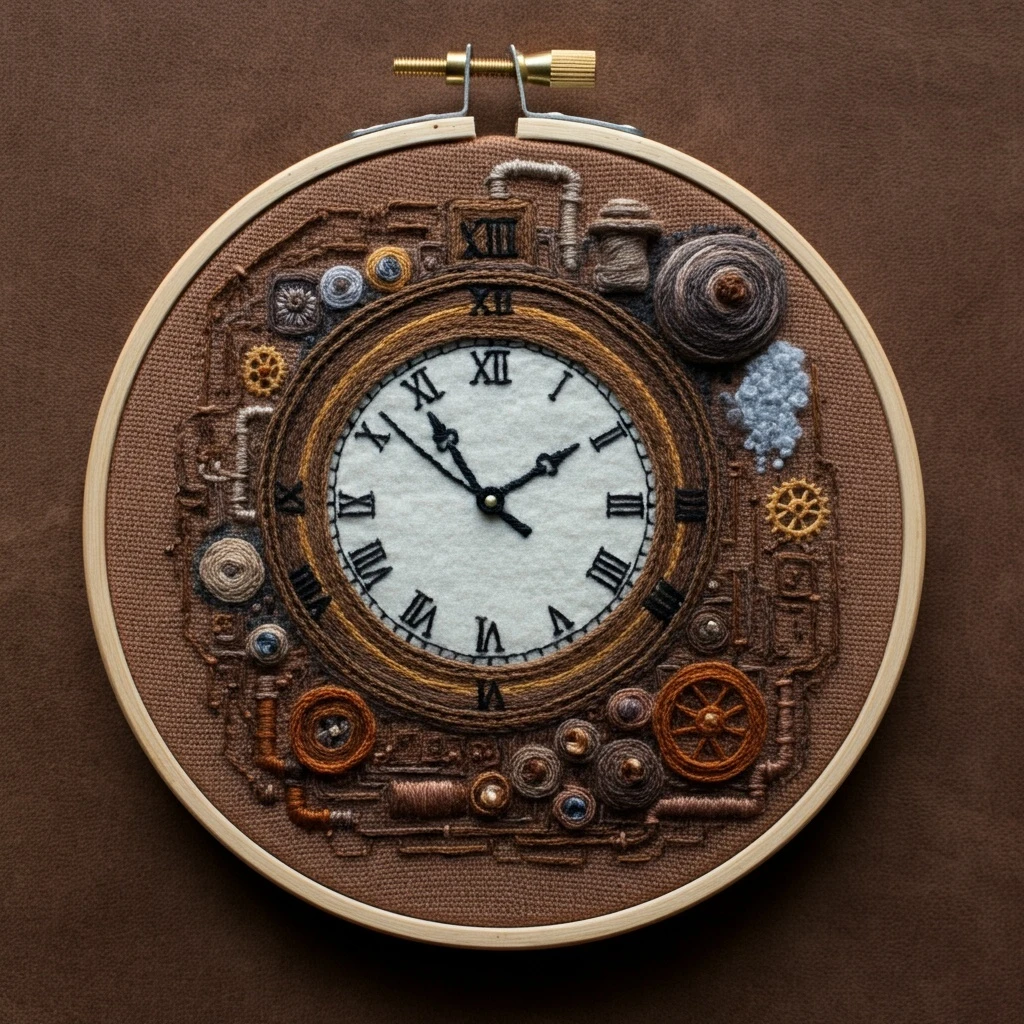
A warm, mechanical embroidery guide for the ornate hoop preview: a large vintage clock face surrounded by gears, pipes, coils, rivets, and layered bronze machinery on brown fabric.
Likely DMC Color Palette
Colors are estimated from the visible hoop preview and matched to practical DMC floss shades. The design is dominated by aged browns, brass golds, copper oranges, deep outlines, a pale clock face, and small cool steel-blue highlights.
Coverage is a visual estimate from the preview, not exact thread consumption. Keep 3371, 801, 975, and 3865 on hand as the core working colors.
Stitching Suggestions
| Design Element | Recommended Stitch | Practical Notes |
|---|---|---|
| Large clock face | Long and short stitch or padded satin | Fill with 3865 using smooth directional stitches. Add a whisper of 928 near the lower and side edges so the face feels aged rather than flat white. |
| Roman numerals | One-strand backstitch | Use 844 or 3371. Work slowly and keep stitches short, especially on the curved outer numbers, so the numerals stay crisp. |
| Clock hands | Backstitch with tiny satin accents | Stitch the hand stems in 3371, then thicken decorative ends with two or three satin stitches. Add one small French knot or satin dot at the center in 729. |
| Wooden/brass clock ring | Split stitch rows, stem stitch, couching | Build concentric rows in 801 and 975. Couch a brighter 729 or 782 strand along the inner curve for an antique brass gleam. |
| Gears and cogs | Satin stitch, woven wheel, backstitch | Use 782/729 for brass gears and 977 for copper gears. Outline every tooth in 3371 after filling to make the shapes read clearly. |
| Pipes and cylinders | Stem stitch, whipped backstitch, satin stitch | Use stem stitch for long pipes and satin stitch for caps. Whip selected dark lines with 975 to create rounded copper tubing. |
| Coils and round washers | Circular stem stitch or whipped spiral | Work from the outside inward in alternating browns and grays. A single bright stitch on the upper-left side of each circle gives a raised metal look. |
| Steam puff | French knots, seed stitch, detached chain | Cluster 928, 647, and 3768 loosely. Use mixed knot sizes so the puff looks airy instead of like a solid patch. |
| Background machinery | One-strand backstitch and seed stitch | Keep background details thinner than the clock face. Use 801 and 3371 for schematic lines, screws, rivets, and plate separations. |
Thread Count, Blending & Dimension
Thread-count guidance
- 1 strand: Roman numerals, tiny gear teeth, screw lines, delicate clock-face ticks, and fine pipe outlines.
- 2 strands: Most fills, clock rim rows, gear bodies, copper pipes, and medium mechanical details.
- 3 strands: Raised coils, bolder outer frame shadows, and any gear that needs extra weight against the brown fabric.
Blending ideas
- Blend 801 + 975 in the needle for warm aged wood or dark brass transitions.
- Blend 975 + 782 for antique gold edges on the main clock ring.
- Blend 647 + 648 for soft steel machinery and smoother pipe shading.
- Blend 3865 + 928 for a cool, timeworn clock face that still feels bright.
Outlining, Shading & Texture Notes
For this design, outlines are what separate the many small mechanical shapes. Stitch the major fills first, then return with 3371 or 844 for final backstitch outlines. Keep the central clock face the cleanest, brightest area; the surrounding machinery can be rougher and more textured.
Shade circular forms as if light is coming from the upper left: place lighter 729, 977, or 647 on upper-left edges, medium browns through the centers, and 3371 on lower-right edges. On gears, outline the tooth gaps after filling rather than before, because the dark final line will sharpen any slightly uneven satin stitches.
To create steampunk metal texture without metallic thread, use short staggered stitches in nearby browns and grays. Tiny French knots make convincing rivets, while whipped backstitch makes pipes appear rounded and polished.
Where to Start
Begin with the pale clock face so the central circle stays clean. Next stitch the clock hands and numerals, then build the large surrounding ring in concentric rows. After the clock is anchored, work the bigger gears and pipes, then fill the background machinery. Save rivets, glassy blue details, steam knots, and final outlines for the very end.
Beginner-Friendly Practical Tips
- Use a sharp pencil or water-soluble pen to mark the Roman numerals lightly; they are the most noticeable alignment detail.
- Short stitches look better than long stitches around tight curves. Break curves into small segments instead of forcing one long line.
- Do not overfill every machine plate. Leaving tiny spaces of brown fabric between parts helps the design look layered.
- Rotate the hoop while stitching circular gears so your hand always follows a comfortable curve.
- Finish by checking contrast: if a gear disappears, add a one-strand dark backstitch edge or a small gold highlight.
Encouraging Finish
This piece succeeds through contrast: a calm, readable clock face surrounded by busy, tactile machinery. Work slowly in layers, reserve the darkest thread for the final crisp details, and the finished hoop will have the rich brass-and-shadow depth of a miniature steampunk instrument.


