
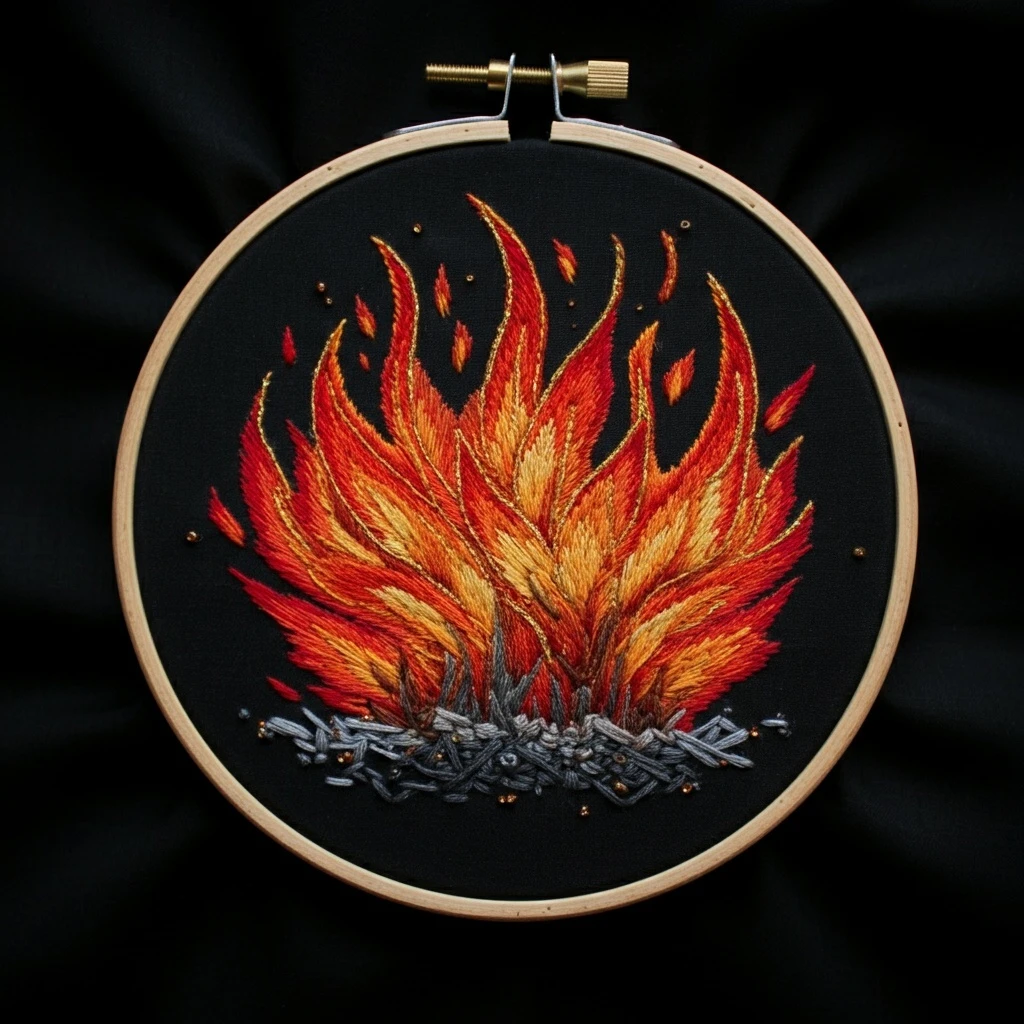
Vibrant Campfire
A dramatic hoop design worked on black fabric, featuring layered red, orange, gold, and pale-yellow flames rising from a base of silvery ash, charred sticks, and tiny ember sparks. The palette below is estimated from the visible preview and matched to practical DMC floss choices for hand embroidery.
Likely DMC Color Palette
The design relies on strong contrast: black fabric acts as night sky, while feathered flame shapes move from deep crimson outer edges to hot orange, golden yellow, and pale inner heat. The fire base is cooler, with gray ash, charcoal-black twigs, and scattered copper sparks.
Optional reinforcement for the darkest gaps between flames, charred stick shadows, and crisp silhouette correction on black fabric.
Deep outer flame shadows, lower red tongues, and the hottest dark folds where flames overlap.
Clear red flame bodies, pointed outer tips, and vivid mid-shadow transitions beside orange areas.
Strong orange-red shading, flame bases, and curved strokes that bridge red edges into bright orange centers.
Main orange flame fill, lively sweeping strands, and warm transitions through the center of each flame blade.
Golden-orange highlights, ember tips, and the brighter ridges along rising flame curves.
Yellow flame cores, central heat strokes, and small sparks floating above the fire.
Brightest inner flame flashes and tiny pinpoints where the fire looks almost white-hot.
Charcoal outlines, burnt twig undersides, and dark ash pockets along the base.
Medium ash, cool stick surfaces, and layered gray texture beneath the flames.
Ash highlights, pale edges on burned sticks, and small cool glints near the fire base.
Tiny copper embers, warm stick interiors, and scattered glowing dots around the base.
Stitching Suggestions
| Element | Best stitches | Practical notes |
|---|---|---|
| Large flame blades | Long-and-short stitch, split stitch | Follow the curve of each flame from base to pointed tip. Use short staggered stitches so red, orange, and yellow can feather together naturally. |
| Bright inner heat | Satin stitch, long straight stitch | Use 725 and 745 sparingly in the center of the fire. Small bright shapes look hotter than overfilled yellow blocks. |
| Outer red tips | Stem stitch, split stitch, long-and-short stitch | Outline curved tips with 814 or 666, then pull a few red stitches inward to connect with the orange body. |
| Thin flame wisps | Single-strand stem stitch, fly stitch, detached chain | Keep upper sparks and wisps delicate with 1 strand. Vary direction so the flame feels lively rather than symmetrical. |
| Ash and burned wood | Backstitch, couching, seed stitch | Layer 3799, 317, and 762 in short broken marks. Avoid perfect lines; crossed twig shapes should feel rough and charred. |
| Ember dots | French knots, colonial knots, tiny straight stitches | Use 975, 972, and 725. Place knots irregularly around the base and a few above the flames for movement. |
| Glow accents | Couching, whipped backstitch | Add a few fine golden lines over orange sections after the fill is complete to create shimmer and direction. |
Thread Count Guide
Because the design sits on black fabric, test each yellow and gray on a scrap first. Pale shades may need two strands to stay visible, while red outlines often look cleaner with one or two strands.
Use flame-direction stitchesWork dark to lightSave embers for last
Blending Ideas
- Outer flame: blend one strand 814 with one strand 666 for deep red edges that still glow on black fabric.
- Middle heat: combine 900 with 741 to create a smooth red-orange bridge between shadow and bright flame.
- Golden core: blend 972 with 725 for the central flicker; add tiny 745 strokes only at the brightest points.
- Ash base: mix 3799 and 317 for charred sticks, then add 762 highlights on the upper surfaces facing the fire.
Outlining Details
- Do not outline every flame in black; let the fabric form the negative-space edges wherever possible.
- Use split stitch in 814 on the outermost red curves when a flame needs definition against a neighboring orange section.
- Whip a few orange or gold backstitches over filled flames to make bright ridges look polished and smooth.
- Outline twigs with broken gray backstitches rather than continuous lines so the base remains smoky and textured.
Texture Suggestions
- Use long-and-short stitch with uneven stitch lengths to create flame movement and avoid a flat striped look.
- Add seed stitch in dark and medium gray around the base for ash dust and char fragments.
- Cluster French knots near the lower flame base, then scatter fewer knots upward to suggest rising sparks.
- For extra dimension, couch a few golden threads along flame curves after the filling stitches are finished.
Beginner-Friendly Stitch Order
Keep the pattern lines light on dark fabric. Mark the largest flame tongues, the ash base, and a few spark positions; smaller wisps can be added freehand.
Build the gray base first so the flames have a grounded edge. Use short stitches and crossed lines to create the pile of burned sticks.
Work from the outside inward using 814, 666, 900, and 741. Angle stitches upward so every section follows the fire’s motion.
Layer 972, 725, and small touches of 745 over the central curves. Keep the brightest stitches narrow and pointed.
Use French knots and single-strand stitches for embers above and around the fire. This final pass makes the campfire feel vibrant and alive.
Shading Guidance
Think of each flame as a leaf-shaped ribbon: darker along the outside, medium orange through the body, and yellow near the inner fold. Stagger your color changes rather than stopping one color in a hard line. A few red stitches can travel deep into orange areas, and a few yellow stitches can shoot upward into red areas; that interlacing is what gives the design its realistic fire movement.
At the base, keep the coolest grays slightly separated from the brightest yellows. The contrast between ash and flame makes the fire appear hotter. Small copper-brown knots can sit between the two zones to act as glowing coals.
Practical Tips
- Use a sharp embroidery needle and short thread lengths, especially on black fabric where fuzzy fibers show easily.
- Keep tension gentle; tight satin and long stitches can pucker the fabric around the flame points.
- Turn the hoop as you stitch so your hand follows the natural upward curve of each flame.
- If a flame looks too blocky, add a few single-strand split stitches in a neighboring color to soften the transition.
- Photograph the work in progress under good light; the camera will show whether the red-orange-yellow balance is clear from a distance.


