DMC palette & practical stitching notes
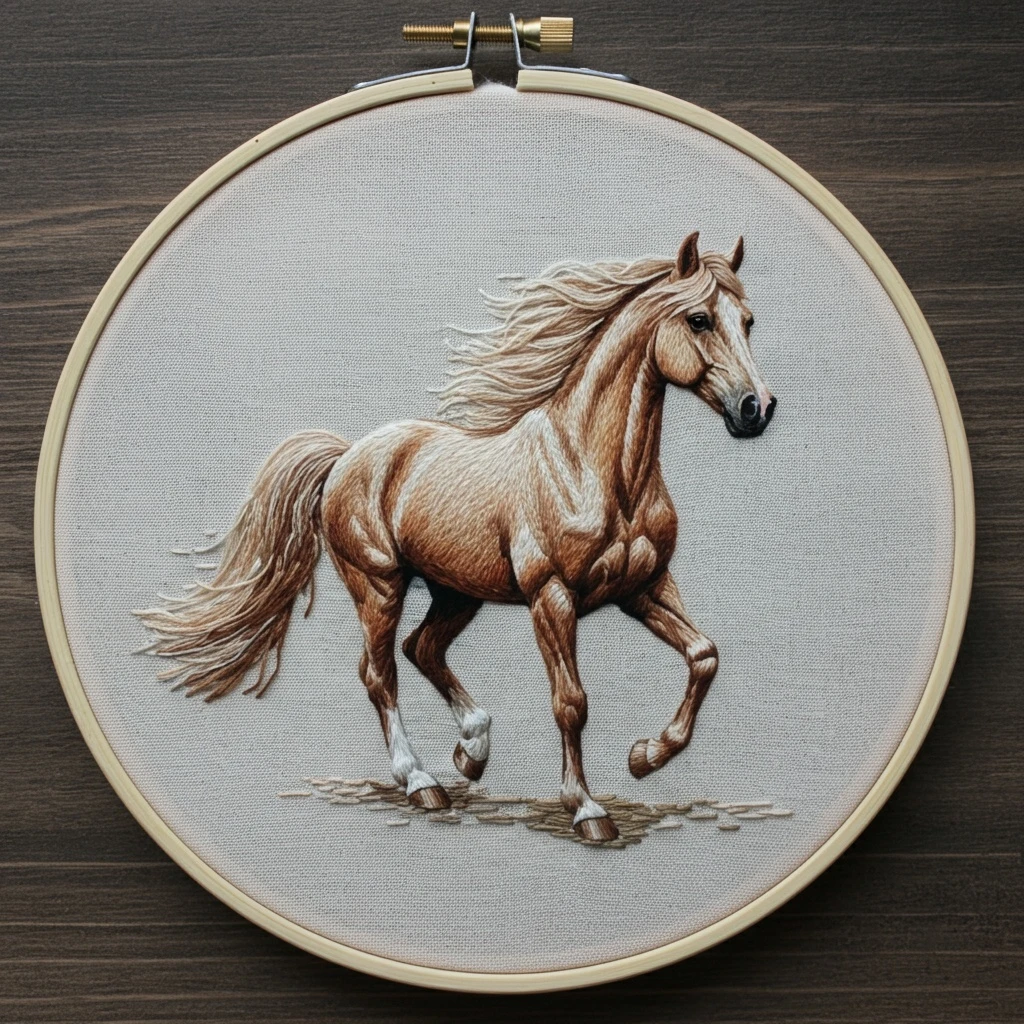
Embroidered Galloping Horse in Hoop
A warm chestnut horse design with flowing mane and tail, creamy highlights, dark facial definition, white socks, and a lightly textured ground shadow. The palette below is estimated from the visible hoop preview and matched to close DMC stranded cotton shades.
Likely DMC Color Palette
The design relies on layered browns rather than many bright colors. Keep the horse dimensional by reserving the darkest shades for the eye, muzzle, underside, leg folds, and deepest mane strands, then feather lighter tans over the body and neck.
Deep chestnut shadows under belly, leg creases, mane roots, and tail depth.
Main dark body contours, shoulder definition, flank shading, and ear interiors.
Warm midtone coat, neck muscles, rump, and curved leg forms.
Soft transitions across the chestnut coat and lighter tail strands.
Honey highlights on the face, ribs, front legs, and sunlit body planes.
Creamy coat highlights, pale mane wisps, and soft muzzle transitions.
Brightest mane highlights, white socks, blaze accents, and tiny catchlights.
Eye, nostril, mouth line, hoof bases, and strongest final outlines.
Hoof shading, ground strokes, and cool neutral shadow beneath the horse.
Dusty ground texture, hoof highlights, and softened outlines on the fabric.
Warm mane highlights, tail tips, and golden blends over the body.
Use sparingly for the pupil and deepest nostril only; too much will flatten the horse.
Coverage is a visual estimate from the preview, not exact floss usage. For a smaller hoop, reduce the number of brown shades by blending neighboring tones rather than omitting highlights.
Stitching Suggestions
| Element | Recommended stitch type and practical notes |
|---|---|
| Horse body | Use long and short stitch in the direction of the coat. Work the body in curved sections: rump, barrel, chest, neck, then legs. Begin with mid browns, add dark shadows, and finish with tan highlights. |
| Muscle lines | Use one-strand split stitch or very fine stem stitch. Keep lines broken and tapered so the anatomy looks dimensional rather than cartoon-outlined. |
| Mane | Use loose straight stitches and split stitch following the wind direction. Alternate 739, 422, 976, and 898 in uneven lengths for natural flowing hair. |
| Tail | Use long straight stitch, couching for the longest sweeping strands, and a few darker backstitched hairs near the base. Let some strands overlap the body outline to create movement. |
| Face and eye | Use one strand for the eye, nostril, mouth, and cheek curves. Add a tiny 3865 catchlight after the dark eye is complete. |
| Legs and joints | Use short directional long-and-short stitches. Concentrate 898 and 3371 at the tucked joints and underside; use 739/3865 lightly on raised tendons and white socks. |
| Hooves | Use satin stitch or compact split stitch with 3371, 642, and 644. Add a pale top edge so each hoof separates from the ground shadow. |
| Ground texture | Use scattered straight stitches, seed stitch, and small running stitches in 642, 644, 422, and a touch of 898. Keep it low contrast so the horse remains the focal point. |
| Outer definition | Use selective one-strand backstitch in 801 or 3371 only where the silhouette needs clarity: muzzle, ears, belly, and lower legs. Avoid outlining every hair strand. |
Thread Count & Blending
- Body fill: 2 strands for smooth coverage; switch to 1 strand for refined facial and leg details.
- Mane and tail: 1 strand for flyaway hair, 2 strands only near the roots where more weight is needed.
- Blended needle: Pair 975 + 436 for warm coat transitions, 898 + 801 for deep chestnut shadows, and 739 + 3865 for creamy highlights.
- Final outline: Use 1 strand, not 2, for the facial features and silhouette so the horse stays realistic and soft.
Shading Plan
- Start midtone first: Lay 975 or 976 across the large body areas before placing darks.
- Reserve lights: Keep 739 and 3865 for the mane crest, lifted leg edges, cheek, and white socks.
- Deepen last: Add 898/3371 after most filling is complete, then soften edges with single-strand tan stitches.
- Follow anatomy: Angle stitches around the shoulder, ribs, haunch, and neck rather than stitching all areas vertically.
Beginner-Friendly Working Order
This horse has many fine directional details, so it is easiest to build from broad shapes toward tiny accents.
| 1. Transfer cleanly | Mark only essential anatomy lines: outline, eye, nostril, legs, mane flow, and major coat shadow shapes. Too many guide lines can show through pale thread. |
| 2. Anchor the body | Fill the chestnut body with mid browns first. Work in small curved sections and keep stitches smooth but not perfectly identical. |
| 3. Add legs and hooves | Complete each leg separately so the galloping pose remains readable. Put the darkest values under raised joints and near hoof contact points. |
| 4. Layer mane and tail | Stitch darker base strands first, then float lighter strands over the top. Leave a few irregular ends to suggest motion. |
| 5. Finish details | Add the eye, nostril, mouth, selective outline, white sock highlights, and ground texture at the very end. |
Texture & Finishing Notes
- Use a tightly hooped neutral linen or cotton-linen blend so long-and-short stitches do not pucker.
- For a painterly coat, slightly vary stitch length and direction, especially around the shoulder and haunch.
- Keep the ground shadow sparse; dense stitching below the hooves will compete with the horse.
- Use a sharp embroidery needle for one-strand facial details and a slightly larger needle for two-strand filling.
- Separate all six strands, then recombine the number needed. This helps the floss lie smoother.
- Press the finished hoop from the back over a towel to protect raised stitches and hair texture.