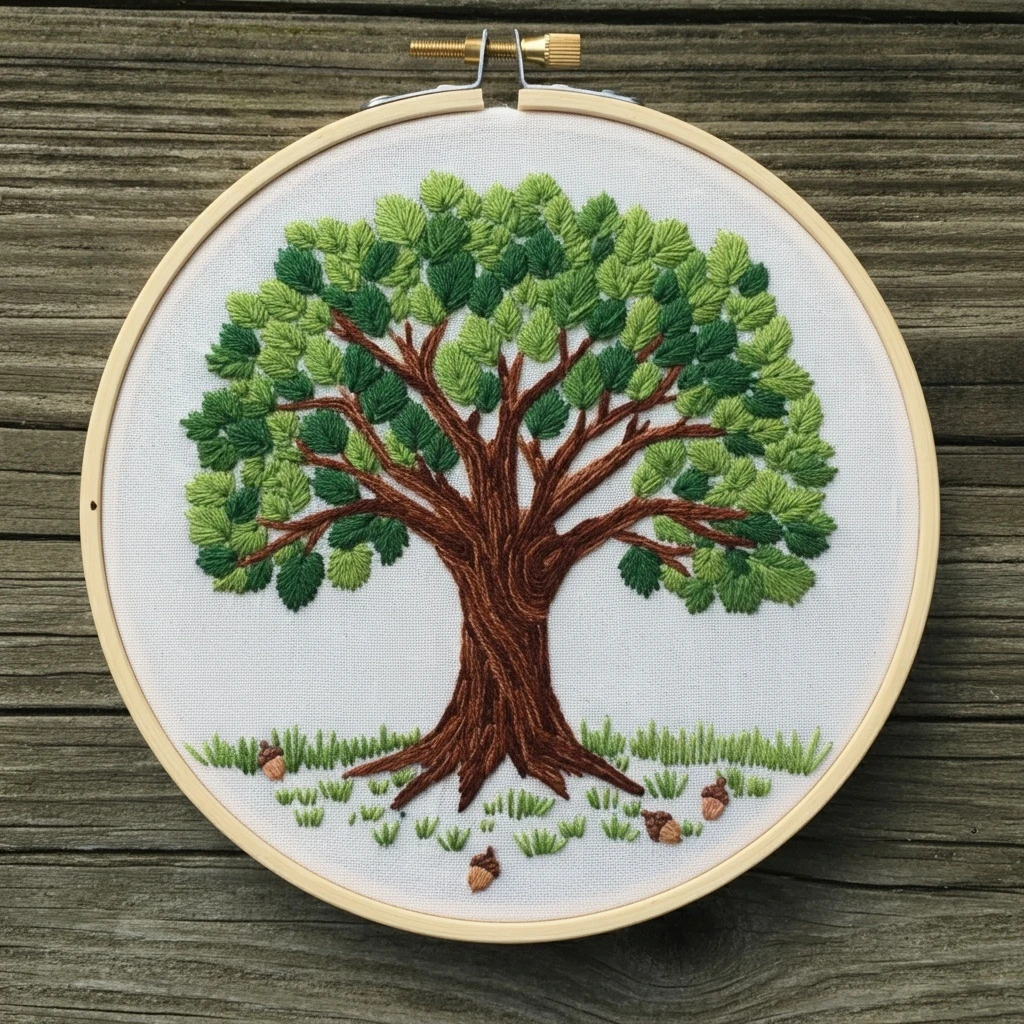
Embroidered Tree Of Life Hoop Art
A warm, earthy guide for stitching a circular Tree of Life design: strong bark and roots, layered leafy clusters, golden highlights, and a calm handmade hoop-art finish.
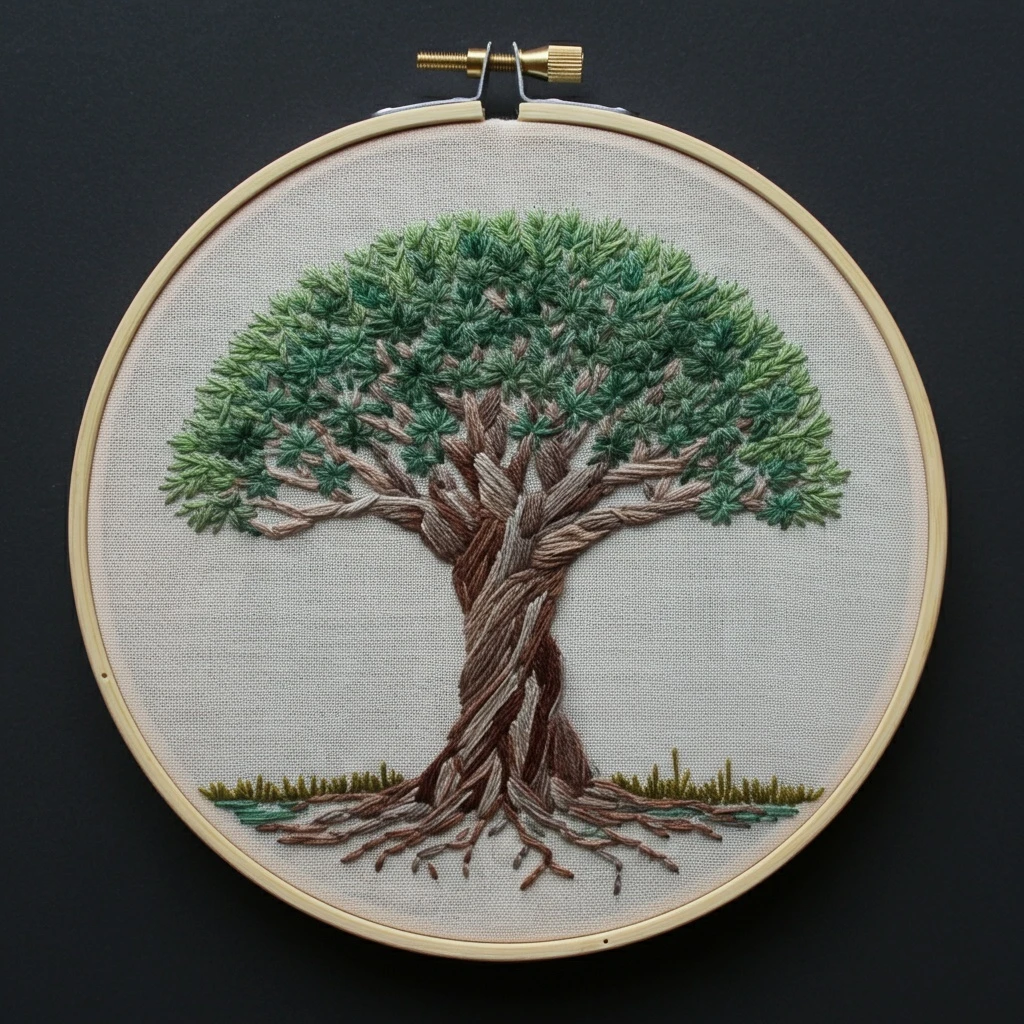
Design read
The reference centers on a symbolic tree inside a hoop: curved trunk, spreading roots, arched branches, rounded foliage, and small accent details. The best result comes from separating the design into trunk structure, leaf masses, small highlights, and fine outer details.
Best fabric & setup
- Natural linen, cotton-linen, or cream cotton in a 6–8 inch hoop.
- Use a fine water-soluble pen; keep branch lines light and clean.
- Work bark first, foliage second, highlights last, then tidy outlines.
Suggested DMC color palette
This palette is chosen for a Tree of Life composition with warm brown wood, olive and moss leaves, golden light touches, root shadows, and a soft neutral ground. Use the darker shades sparingly so the hoop keeps a graceful, airy look.
Trunk, roots & branches
- Outline with split stitch in 1 strand of 938 or 801.
- Fill thicker trunk areas with long-and-short stitch using 801, 435, and a touch of 938.
- Curve root stitches outward so they feel anchored into the fabric.
Leaf clusters
- Use detached chain, lazy daisy, fishbone leaf, and small straight stitches.
- Keep leaves irregular: mix 3051, 3052, 3053, and 733 in small groups.
- Add 3826 or 680 only at the end for sparkling balance.
Symbolic accents
- French knots make tiny fruit, seeds, or glowing dots.
- Use satin stitch for any larger heart, leaf, or moon-like focal motif.
- Finish outer detail lines with one strand to preserve the elegant hoop-art style.
Thread-count guidance
| Area | Strands | Why it works |
|---|---|---|
| Main trunk and roots | 2 strands | Gives visible bark texture without making the central form bulky. |
| Fine branch outlines | 1 strand | Keeps small twigs crisp and prevents crowded intersections. |
| Leaf stitches | 2 strands | Creates plump greenery; switch to 1 strand for distant or tiny leaves. |
| French knots | 1–2 strands | One strand for tiny seeds, two strands for berry-like accents. |
| Final highlights | 1 strand | Allows delicate shine without flattening the natural color shifts. |
Blending & shading plan
Blend the tree from dark base to warm light: use 938 only in creases, 801 for the body, 435 for raised bark, and 842/3865 as needle-thin highlights. For the canopy, place 3051 beneath branch overlaps, 3052 as the main mass, and 3053 or 733 at the tips. Scatter golds asymmetrically so the tree feels organic rather than dotted in a strict pattern.
Stitch suggestions by design element
Bark texture
Use long-and-short stitch in vertical, slightly wavy columns. Let some darker strands peek through instead of fully covering them; this gives the trunk a carved, living quality.
Roots
Work split stitch or stem stitch from the trunk outward. Taper each root by changing from 2 strands to 1 strand near the tip.
Canopy rhythm
Alternate lazy daisy leaves with short straight stitches. Keep open fabric spaces between groups so the tree does not become a solid green circle.
Outlining details
Use 1 strand of 938 or 3051 for selective outlining only: underside of branches, a few roots, and the inner curves that need definition.
Golden highlights
Add 3826 or 680 after all green leaves are stitched. A few knots near the upper canopy and branch tips create a gentle luminous effect.
Hoop finishing
Press from the back on a towel, tighten the fabric, trim excess to about 1 inch, and lace or glue the back neatly for wall-ready presentation.
Beginner-friendly workflow
Start with the central trunk because it acts as the map for the entire composition. Stitch the darkest bark lines first, add the medium brown body, then place warm highlights. Next, work leaves from the branch line outward in small clusters, rotating the hoop so each leaf is stitched comfortably. Save knots, tiny gold accents, and final outlines for last; these finishing stitches sharpen the design and hide small gaps.
Avoid bulk
Do not carry thread across open fabric behind the hoop. End and restart often so shadows do not show through light fabric.
Keep tension soft
Tree designs can pucker if roots and branches are pulled too tightly. Let each stitch rest on the surface.
Test leaf density
Stitch a small cluster first, then step back. Add more leaves only where the silhouette needs fullness.