
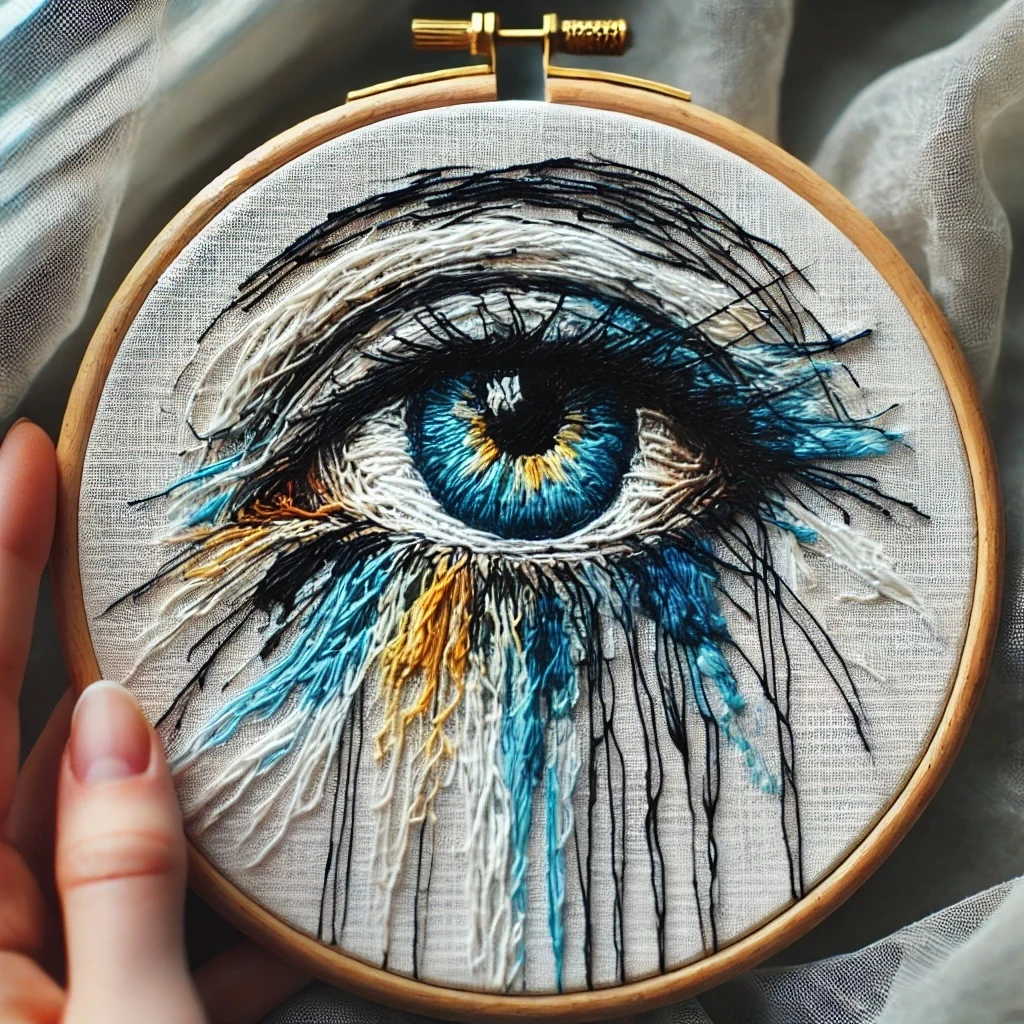
Blue Eye Textured
This design centers on a highly textured blue eye: a luminous iris with radiating stitches, deep pupil contrast, crisp lids, and subtle highlight details. The palette should move from icy blue and turquoise into medium cornflower, dark navy, charcoal, and a small warm accent for life-like sparkle.
The guide below is written for a dimensional hand-embroidered finish: clear stitch direction, layered thread counts, controlled blending, and beginner-friendly steps for building the eye from center outward.
Suggested DMC floss palette
A layered blue palette with strong darks for the pupil and gentle lights for shine.
| Swatch | DMC | Color name | Use in the design |
|---|---|---|---|
| B5200 | Snow White | Tiny eye catchlights, brightest wet-looking shine, and very small reflective points. | |
| 3841 | Baby Blue - Pale | Iris highlights and the lightest feathered strokes near the upper shine area. | |
| 3840 | Lavender Blue - Light | Soft blue bands in the iris; useful for blending between pale highlights and mid blues. | |
| 3843 | Electric Blue | Main vibrant iris tone, especially for radiating stitches around the pupil. | |
| 798 | Delft Blue - Dark | Medium-dark iris wedges, outer iris ring transitions, and cool shadow sections. | |
| 797 | Royal Blue | Deep iris rim, lower shadowing, and bolder radial lines that define the texture. | |
| 823 | Navy Blue - Dark | Outer limbal ring and deepest blue details beside the pupil. | |
| 310 | Black | Pupil, strongest lash/outline points, and the darkest crease details. | |
| 3799 | Pewter Gray - Very Dark | Softer alternative to black for eyelid shading, under-eye lines, and texture breaks. | |
| 3821 | Straw - Light | Optional tiny golden flecks near the pupil for natural iris warmth and sparkle. |
Design reading
Keep the eye dramatic, but controlled.
Primary visual idea
The iris should feel dimensional and textured, with thread direction radiating from the pupil like tiny sunbursts.
Contrast point
The pupil and outer iris ring need the strongest darks so the blue center appears luminous.
Texture balance
Use raised stitches sparingly; too much padding can make the eye look bulky instead of glassy.
Best fabric
Ivory, pale gray, or natural linen helps the blue eye stand out without competing with the cool palette.
Stitch types to use
Choose stitches that create direction and texture.
Thread-count guidance
Strand variation is the easiest way to make the eye feel detailed.
- 1 strand: fine iris rays, delicate eyelid creases, and tiny highlight accents.
- 2 strands: main iris filling, split-stitch outlines, and controlled long-and-short shading.
- 3 strands: bold outer ring, emphasized lower lid, or slightly raised dark contouring.
- 4-6 strands: use only for couching laid threads or a deliberately raised decorative texture.
Blending and shading guidance
Work from the pupil outward for the most natural iris movement.
- Anchor the center: stitch the pupil first in DMC 310, then add a neat split-stitch border in 823 or 3799.
- Create radial sections: divide the iris visually into small wedges and fill each with straight or long-and-short stitches pointing outward.
- Blend blues gradually: use 3841 at highlight points, 3840 and 3843 through the main iris, then 798, 797, and 823 near the rim.
- Try needle blending: combine one strand of 3843 with one strand of 798 for a smooth mid-shadow; combine 797 and 823 for the outer rim.
- Preserve highlights: add B5200 last, using very small stitches so the white stays crisp.
- Soften the lid: use 3799 instead of black for secondary eyelid lines so the pupil remains the darkest focal point.
Texture suggestions
Texture should enhance the eye, not overpower it.
- Use short straight stitches in multiple blues to mimic iris fibers.
- Couch one dark navy thread around the iris for a raised limbal ring.
- Add tiny golden 3821 stitches near the pupil only if the original design has warm flecks.
- Use a slightly padded satin stitch for the pupil if you want subtle dimension.
- Keep highlight stitches flat and clean for a glossy embroidered look.
Beginner-friendly stitching order
- Transfer the eye outline, pupil, highlight spots, and main iris ring clearly.
- Stitch the pupil and outer iris ring first to establish the strongest contrast.
- Fill the iris with radial stitches, alternating light, medium, and dark blues.
- Add eyelid outlines and shadow details after the iris is complete.
- Place B5200 highlights last with a clean needle and short thread length.
- Check symmetry often, especially around the pupil and eyelid curves.
Practical tips
- Use shorter floss lengths, about 12-15 inches, because dense blue stitching can tangle quickly.
- Rotate the hoop as you stitch so your iris rays always travel smoothly from center outward.
- Do not overfill the white highlight areas; one or two bright stitches are more realistic than a large white patch.
- If the iris looks flat, add a few dark 823 rays beside the pupil and rim rather than restitching the whole area.
- Press finished embroidery from the back over a towel to protect raised texture.