
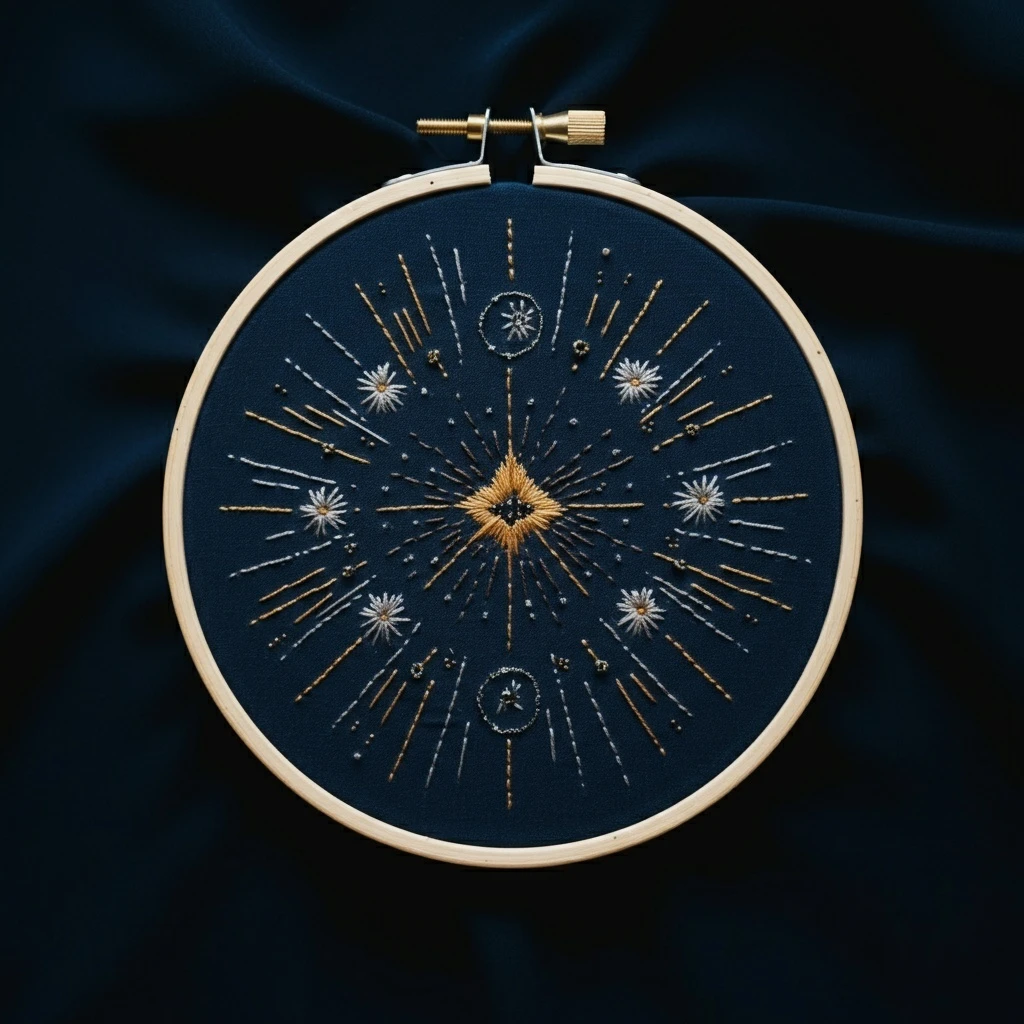
Celestial Starburst
This celestial starburst design centers on a radiant focal star with long rays, smaller sparkle points, and a warm moonlit glow. The stitched version should feel crisp and luminous: sharp straight rays, a bright golden center, subtle shadow at the ray bases, tiny surrounding stars, and enough negative space to make the burst feel expansive rather than crowded.
Polished DMC Color Palette
This palette focuses on warm golds, creams, and soft cosmic accent tones. The first six colors can carry the full beginner version; the blues, lavender, and deeper shades add optional glow, shadow, and visual depth.
Stitch Map by Design Element
Thread Count & Blending Guide
Fine sparkle
Use 1 strand for tiny star rays, outer glow stitches, small dots, and final outline corrections. One strand keeps the starburst refined and crisp.
Main rays
Use 2 strands for the central starburst rays, center fill, and larger surrounding stars. Two strands provide shine and visibility without creating bulky rays.
Raised focal points
Use 2–3 strands for French-knot stars or a raised central dot. Use three strands sparingly so only the brightest center and a few nearby dots stand proud.
Shading, Outlining & Texture Suggestions
Clean ray geometry
- Mark the center point and ray endpoints before stitching.
- Rotate the hoop as you stitch so each ray pulls straight from the center.
- Alternate long and short rays to keep the burst balanced and lively.
- Use consistent tension; pulling too tightly can pucker the center.
Golden dimension
- Keep the brightest yellow and white stitches at ray tips and the central glint.
- Use 977 or 976 only at ray bases and overlaps for warmth and depth.
- Add highlights last so they sit cleanly above the main rays.
- A few cream rays among gold rays make the burst feel more luminous.
Surrounding sparkle
- Cluster small stars close to the burst and fade them outward.
- Mix knots, straight stitches, and tiny crosses rather than repeating one motif.
- Use B5200 only for the tiniest brightest pinpoints.
- Leave open fabric around the central burst so it does not feel crowded.
Outlining approach
- Outline only selected rays; too many outlines make the burst look heavy.
- Use warm golden browns instead of black for most ray definition.
- Use back stitch for straight rays and split stitch for any curved halo details.
- Finish outlines after fills and before final sparkle knots.
Beginner-Friendly Stitching Order
- Mark the center: draw the starburst center, longest ray endpoints, shorter ray endpoints, and a few surrounding stars. Keep any guide lines very light.
- Stitch the center first: build the focal point with gold, straw, and a tiny cream or white highlight.
- Add long rays: work opposite rays in pairs to keep the starburst balanced and symmetrical.
- Add short rays: fill the spaces between long rays using lighter cream, gold, and occasional cool accents.
- Place surrounding stars: stitch larger nearby sparkles before adding tiny dots.
- Finish with glow: add scattered seed stitches, French knots, final white pinpoints, and small correction lines last.
Practical Tips for a Clean Finish
Fabric & hoop
Warm cream cotton, linen, or cotton-linen makes gold and cream rays glow. Keep the hoop drum-tight so straight stitches radiate cleanly and the starburst center does not pucker.
Needle choice
Use a sharp embroidery needle size 7–9 for one- and two-strand ray work. If making three-strand French knots, use a slightly larger needle so the wraps pull through smoothly.
Tension tip
Anchor each long ray with gentle tension. Long straight stitches can distort fabric if pulled too tight, especially near the dense center point.
Spacing tip
Stop before filling every blank area. The starburst needs open fabric around it so the central radiance feels dramatic and intentional.