
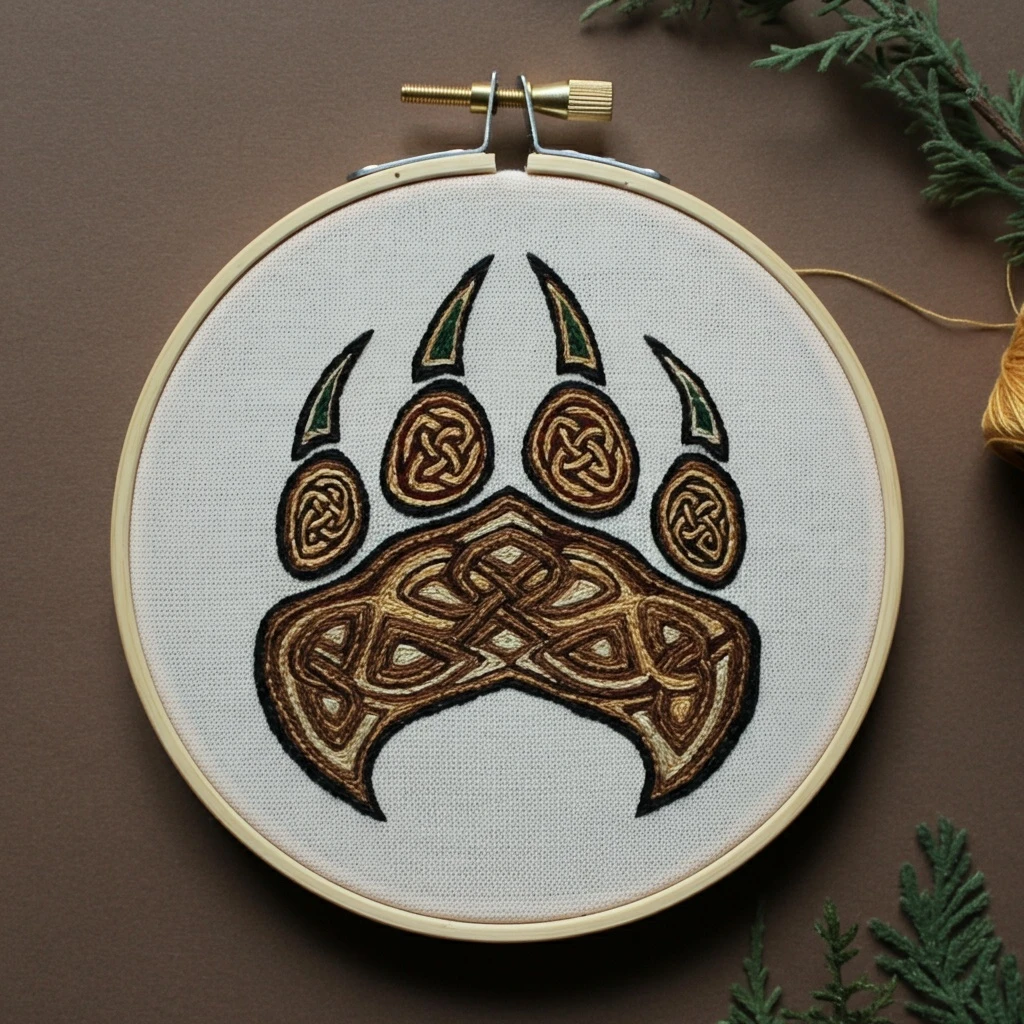
Celtic Knot Bear Paw
This design combines the strong silhouette of a bear paw with interwoven Celtic knotwork. The stitched version should feel bold, earthy, and carefully structured: rounded paw pads, crisp interlaced bands, warm brown shading, optional moss-green or gold accents, and clear over-under crossings that make the knot pattern readable at hoop scale.
Polished DMC Color Palette
This palette focuses on warm bear-brown tones, deep outline values, Celtic copper and gold accents, and muted greens that can suggest forest heritage or knotwork contrast. Use the darkest shades for small crossing shadows and the lightest shades for raised band highlights.
Stitch Map by Design Element
Thread Count & Blending Guide
Fine definition
Use 1 strand for knot crossing shadows, narrow outline corrections, tight inner corners, tiny glints, and any claw or crease details. One strand keeps the interlace readable.
Main fills
Use 2 strands for paw pads, Celtic bands, main outlines, and larger colored sections. Two strands provide strong coverage while still allowing clean curves.
Raised accents
Use 2–3 strands for padded highlights, decorative knots, or small raised accent dots. Use three strands sparingly so the design does not become bulky at crossings.
Shading, Outlining & Texture Suggestions
Interlace clarity
- Mark every over-under crossing before stitching so the knot path stays logical.
- Stitch lower bands first, then top bands, so crossings layer naturally.
- Add a tiny dark shadow at the side where one band passes underneath.
- Use highlights only on the top strand at crossings to emphasize the weave.
Rounded paw pads
- Curve stitches with the pad shape rather than filling straight across.
- Use dark brown at the bottom or inner side and lighter brown at the top.
- Avoid heavy outlines inside pads; soft shading creates a more natural paw.
- Keep toe pads consistent in size and highlight direction for a polished look.
Celtic band texture
- Keep stitch direction flowing with each band path to avoid broken-looking curves.
- Use split stitch rows for narrow bands and satin stitch for wider sections.
- Place copper or gold accents in repeated positions for visual rhythm.
- Use muted green sparingly if you want a woodland Celtic feel.
Outlining approach
- Outline after fills so edges sit cleanly above the color areas.
- Use black-brown only for the darkest outer edges and tight corners.
- Use warm brown outlines on paw pads and green-brown outlines on green bands.
- Do not thicken every line; selective contrast keeps the knot elegant.
Beginner-Friendly Stitching Order
- Transfer carefully: mark the paw outline, toe pads, central pad, knot path, and especially every over-under crossing. Accuracy matters more than speed in this design.
- Stitch lower knot bands: complete any sections that pass underneath first, adding shadow where they disappear below another band.
- Fill paw pads: work toe pads and central pad with rounded shading before final outlines.
- Stitch top knot bands: add the raised interlace sections, keeping edges clean and curves smooth.
- Add outlines: use split stitch or stem stitch to sharpen the paw silhouette and knot edges.
- Finish details: add crossing shadows, copper-gold highlights, tiny accent stitches, and final corrections last.
Practical Tips for a Clean Finish
Fabric & hoop
Warm cream, natural linen, or oatmeal cotton-linen suits the earthy Celtic palette. Keep the hoop drum-tight so satin bands and knot curves do not warp.
Needle choice
Use a sharp embroidery needle size 7–9 for one- and two-strand work. For padded accents or three-strand knots, switch to a slightly larger needle to prevent tugging.
Managing crossings
Work slowly at intersections. A single misplaced shadow can reverse the over-under logic, so compare each crossing with the reference before adding final outlines.
Keeping curves smooth
Use shorter stitches around tight Celtic curves and longer stitches on straight band sections. Rotate the hoop frequently so your needle follows the path comfortably.