
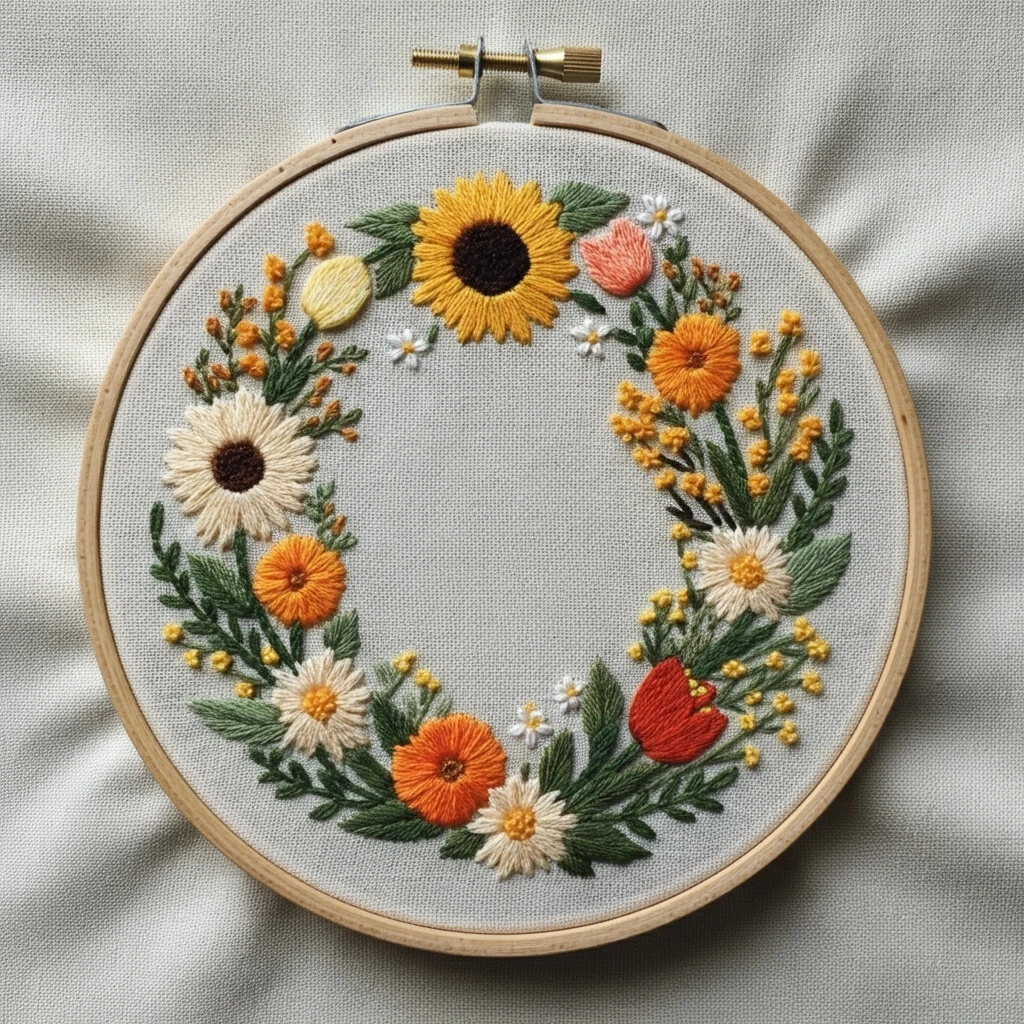
Cheerful Autumnal Floral Wreath
This bright autumn wreath design calls for a warm seasonal palette, rounded floral clusters, small berries, golden centers, and muted green leaves arranged in a cheerful circular flow. The stitched version should feel abundant but tidy: larger rust and pumpkin blooms anchoring the wreath, golden yellow accents for sparkle, burgundy berries for contrast, and soft sage foliage to keep the circle balanced.
Polished DMC Color Palette
This palette combines pumpkin orange, rust, marigold, burgundy, soft rose, and olive-sage greens. Use the warm colors for the flowers and berries, while the muted greens form the wreath structure and keep the design from feeling too heavy.
Stitch Map by Design Element
Thread Count & Blending Guide
Fine details
Use 1 strand for twig lines, small stems, petal veins, berry highlights, tiny filler flowers, and final outline corrections. One strand keeps the wreath refined and not overcrowded.
Main flowers
Use 2 strands for petals, leaves, stems, and the main wreath circle. Two strands give enough color saturation for autumn tones while keeping the design beginner-friendly.
Raised texture
Use 2–3 strands for French-knot flower centers, berries, and seed clusters. Use three strands only for focal centers and larger berries.
Shading, Outlining & Texture Suggestions
Balanced wreath shape
- Lightly mark a circle before stitching so floral clusters stay evenly spaced.
- Place larger blooms first at balanced points around the wreath.
- Use smaller flowers, leaves, berries, and sprigs to fill gaps gradually.
- Leave the center open and clean so the wreath looks intentional.
Autumn petal depth
- Put darker rust or mauve stitches near flower centers and under overlapping petals.
- Use brighter yellow and pumpkin stitches on lifted petal tips.
- Keep petal stitches radiating from the center for a natural flower shape.
- Mix flower stitch types so the wreath feels hand-gathered and cheerful.
Leaf texture
- Keep leaves muted so the orange, gold, and burgundy flowers remain the focus.
- Use fishbone stitch on larger leaves to create a natural center vein.
- Alternate leaf direction around the circle for movement.
- Add a few pale green tips only at the outside of the wreath.
Outlining approach
- Outline only where shapes need definition; too many outlines can flatten the wreath.
- Use brown or darker matching shades instead of black.
- Use split stitch for petals and leaves, back stitch for small stems and twigs.
- Add final outlines after all fills and knots are complete.
Beginner-Friendly Stitching Order
- Mark the wreath: lightly draw the circle, then mark the largest flower positions, main leaves, berry clusters, and a few stems. Leave tiny fillers for later.
- Stitch the wreath stems: work the circular stems and main sprigs in muted greens and browns.
- Add large flowers: stitch the main pumpkin, rust, rose, and yellow blooms before adding small flowers.
- Add leaves: tuck leaves behind and between blooms, using darker greens inside and lighter greens on the outer tips.
- Add berries and centers: work French knots, seed clusters, and berry dots after the petals are finished.
- Finish with fillers: add tiny white flowers, twig details, final highlights, and small outline corrections last.
Practical Tips for a Clean Finish
Fabric & hoop
Warm cream, oatmeal, or natural linen fabric enhances the autumn palette. Keep the hoop drum-tight so circular stems stay smooth and raised knots do not pucker the fabric.
Needle choice
Use a sharp embroidery needle size 7–9 for one- and two-strand work. For three-strand knots in berries or flower centers, switch to a slightly larger needle for easier pull-through.
Preventing clutter
Stop filling before every open space is covered. A cheerful wreath needs breathing room between clusters so each flower and berry remains visible.
Color balance
Repeat each warm flower color at least twice around the wreath. If one side feels too orange, add burgundy berries, muted leaves, or a few pale highlights to rebalance it.