
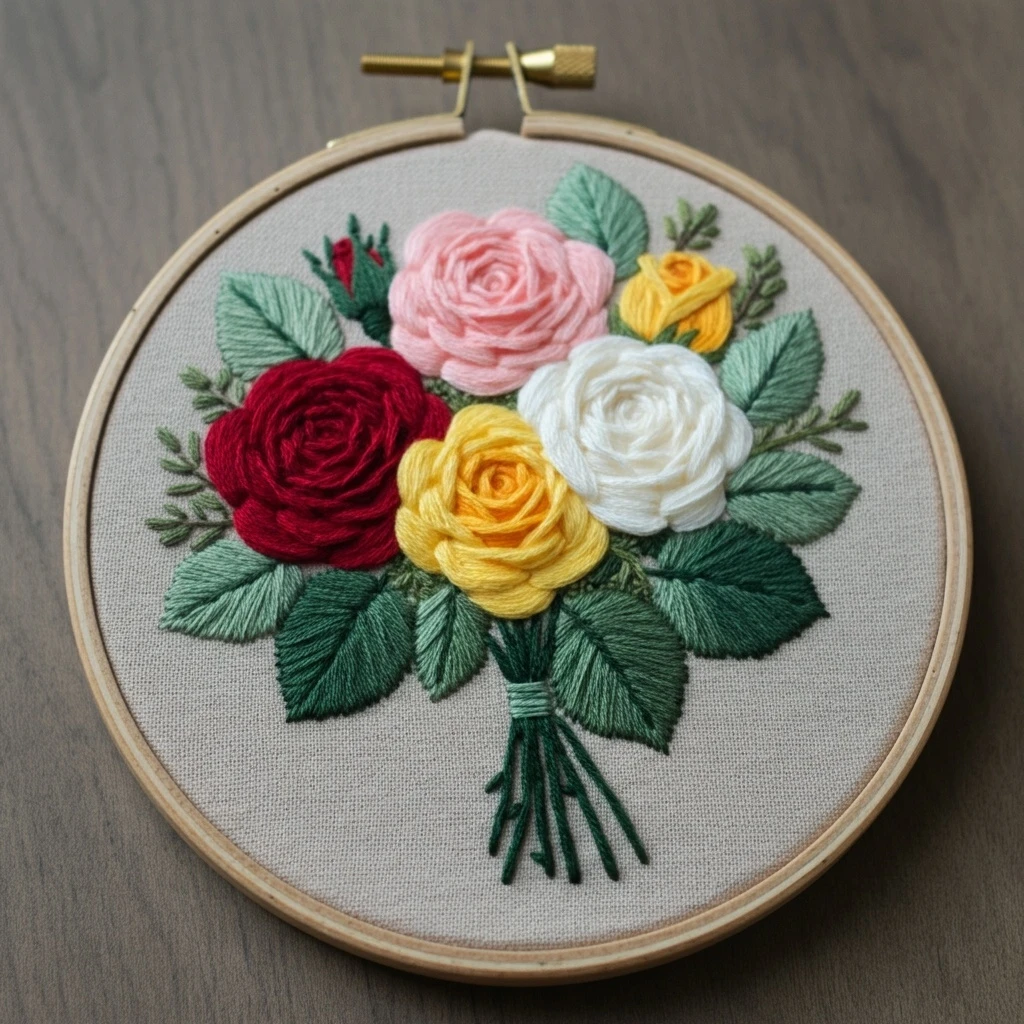
Classic Rose Bouquet
This classic rose bouquet is built around layered rose heads, curved petal folds, soft buds, supporting leaves, and a gathered stem structure. The stitched version should feel romantic and dimensional: darker rose tones tucked into the centers, pale petal tips catching the light, muted sage leaves behind the flowers, and tidy stems that make the bouquet feel arranged rather than scattered.
Polished DMC Color Palette
This palette focuses on classic pink and rose shading with warm cream highlights and muted greens. Use the deepest mauve shades only inside rose centers and under folded petals; keep the outer petals lighter so each bloom looks open and dimensional.
Stitch Map by Design Element
Thread Count & Blending Guide
Fine detail
Use 1 strand for petal-edge lines, tiny rose centers, leaf veins, bud sepals, delicate stems, and final correction stitches. One strand keeps the bouquet refined.
Main petals and leaves
Use 2 strands for most rose petals, leaves, bouquet stems, and buds. Two strands gives soft coverage while preserving the curved petal structure.
Raised centers
Use 2–3 strands for selected French knots or textured centers on larger roses. Use three strands sparingly so rose centers do not become bulky.
Shading, Outlining & Texture Suggestions
Rose petal depth
- Place the darkest rose shades inside the center and under overlapping petals.
- Use mid pink for the main petal body and pale pink or cream on lifted outer tips.
- Follow petal curves with stitch direction so each bloom feels rounded.
- Outline only selected petal folds; heavy outlines can flatten the roses.
Bouquet structure
- Stitch back leaves and stems before the main rose heads.
- Let some greenery peek between roses to separate overlapping blooms.
- Angle stems toward a shared base for a gathered bouquet effect.
- Use buds around the outside edge to soften the bouquet silhouette.
Soft highlights
- Use winter white only for the brightest petal edges and final tiny glints.
- Use off white when you want a softer highlight that does not look stark.
- Add highlights at the end so they stay clean on top of the petal shading.
- Keep highlight placement consistent with one light direction.
Outlining approach
- Use mauve, rose, or green-gray outlines rather than black.
- Use split stitch for petal curves and stem stitch for greenery.
- Break outlines where petals overlap naturally.
- Add outlines after base fills but before final centers and white highlights.
Beginner-Friendly Stitching Order
- Transfer the bouquet: mark rose centers, outer petal shapes, buds, main leaves, and stem direction. Keep tiny filler accents for later placement.
- Stitch back greenery: add darker leaves and stems first so the roses can sit visually on top.
- Build the roses: start with the darkest centers, then add mid-tone petals, then pale outer petal highlights.
- Add buds: place closed buds around the bouquet edge and add small green sepals underneath.
- Refine leaves and stems: add leaf veins, pale leaf tips, and tidy stem lines where the bouquet gathers.
- Finish details: add rose-center knots, petal-edge accents, tiny filler flowers, final highlights, and outline corrections last.
Practical Tips for a Clean Finish
Fabric & hoop
Warm cream, natural linen, pale blush, or oatmeal cotton-linen pairs beautifully with classic roses. Keep the hoop drum-tight so layered petals and small knots do not pucker.
Needle choice
Use a sharp embroidery needle size 7–9 for one- and two-strand work. For raised center knots with three strands, choose a slightly larger needle for smooth pull-through.
Keeping roses distinct
Give each rose its own shadow side and light side. If several blooms touch, separate them with a small leaf, darker petal fold, or one-strand outline.
Avoiding muddy pinks
Do not mix too many rose shades in one small petal. Choose one shadow, one main color, and one highlight per bloom for a clean classic look.