
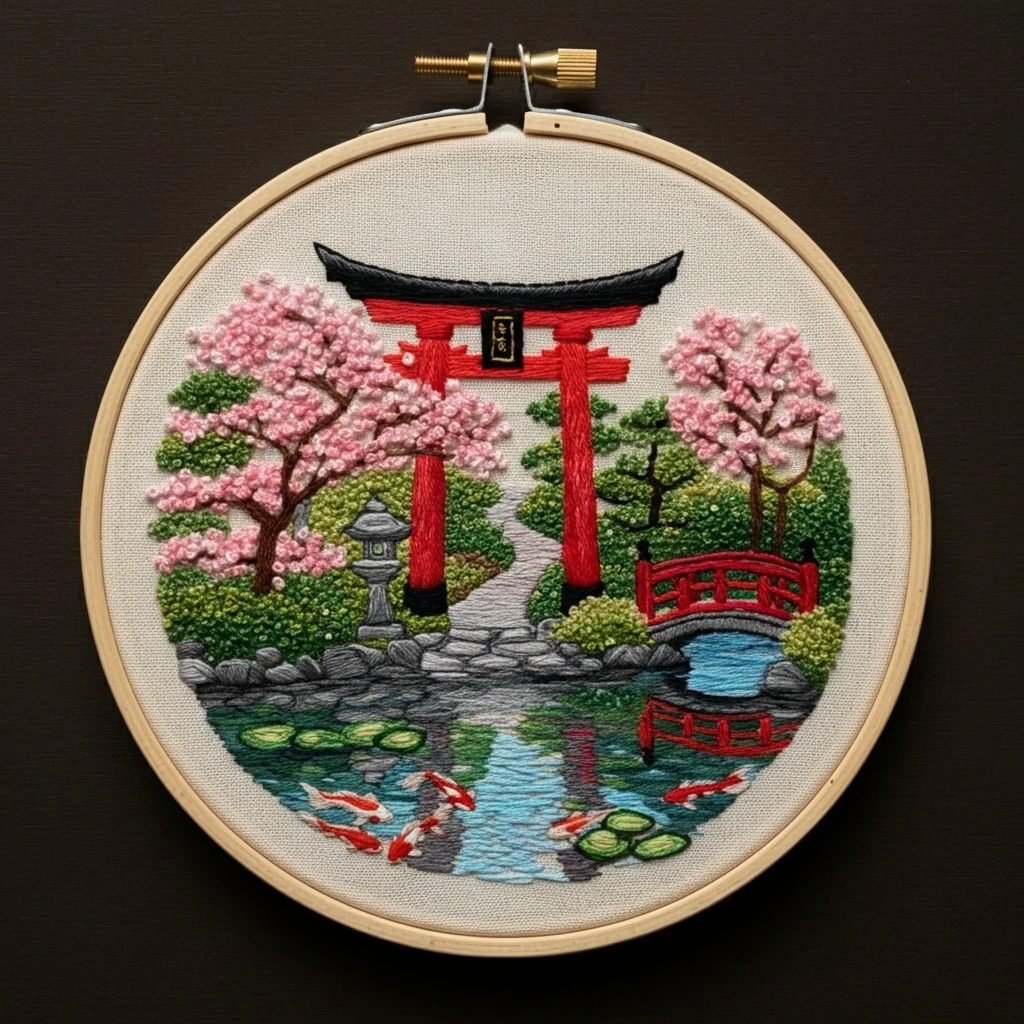
Embroidered Japanese Garden Torii Gate Scene
A calm hoop landscape with a vivid red torii gate, arched bridge, cherry blossom trees, mossy garden shrubs, stepping-stone path, pond reflections, lily pads, koi, and a soft natural-linen ground. This guide translates the image into practical DMC floss choices and stitch-by-stitch texture suggestions.
Color reading from the design
The scene is built around strong contrasts: lacquer-red architecture against soft beige fabric, black roof edges, dusty pink cherry blossoms, layered yellow-green and deep-green foliage, cool grey stonework, blue-green water, and small orange-red koi accents. Keep the torii and bridge clean and saturated, then let the garden areas become more speckled and textural.
Stitch map by design area
Torii gate and roof
- Work the red posts with long-and-short stitch or satin stitch using 2 strands for a smooth lacquered surface.
- Shade the left or underside edges with DMC 815; place DMC 666 on narrow highlight ridges.
- Use padded satin for the black roof if you want a raised architectural line, then couch one strand of 310 along the lower curve for a crisp silhouette.
- For the hanging plaque, fill with 310 and add tiny straight stitches in 729 or 3865.
Cherry blossom trees
- Use French knots, colonial knots, and tiny detached chain stitches for the clustered blossom texture.
- Mix 603 and 604 through the center of each canopy; scatter 963 around outer edges to keep the blossoms soft.
- Stitch trunks with split stitch in 938, then add a few single-strand 3799 shadow lines where branches disappear into flowers.
- Do not fill every space; small linen gaps make the bloom clusters look airy.
Shrubs, moss and background trees
- Use seed stitch and tiny straight stitches in 699, 702, 732, and 734 for speckled foliage.
- Keep dark greens low and behind objects; place 734 only on top-facing edges for sunlight.
- For distant trees, use one strand and smaller stitches so they recede behind the gate.
- Blend one strand 699 with one strand 732 to bridge dark and olive areas naturally.
Pond, koi and reflections
- Use horizontal long-and-short stitch for the water, changing direction only slightly so the pond stays calm.
- Blend 3810 with 3846 for blue-green ripples; add a few single-strand 747 highlights last.
- Mirror red bridge and gate shapes with broken horizontal stitches in 321 and 815 rather than solid blocks.
- Outline koi lightly with 3799 or a single strand of 310, then fill with 3865, 970, and 321.
Thread-count and strand guidance
| Element | Suggested strands | Why it works |
|---|---|---|
| Torii posts, bridge rails | 2 strands; 3 only for padded accents | Keeps the red areas saturated without making the architectural edges bulky. |
| Roof, bridge outline, deepest branches | 1–2 strands | One strand gives clean detail; two strands emphasize the dramatic black roof cap. |
| Cherry blossoms | 2 strands for knots, 1 strand for scattered petals | Creates dimensional blossom clusters while keeping outer petals delicate. |
| Foliage and moss | 1–2 strands mixed | Alternating strand weight makes the garden look leafy and layered. |
| Stone lantern, path and rocks | 1 strand for cracks, 2 strands for fills | Maintains fine grey separations and avoids a heavy stone mass. |
| Water and reflections | 1 strand for ripples; 2 strands for base fill | Fine horizontal stitches make the pond smoother and more reflective. |
Blending, shading and outlining notes
Blended needle ideas
- Red lacquer: one strand 321 + one strand 666 for lit areas; one strand 321 + one strand 815 for lower shadows.
- Blossoms: one strand 603 + one strand 604 for the main cherry canopy; 604 + 963 for soft edge petals.
- Foliage: 699 + 702 for rich middle greens; 732 + 734 for yellow-green highlights.
- Water: 3810 + 3846 where blue reflections meet dark pond green.
Outline strategy
- Outline the torii, bridge, roof and koi after filling, not before, so the final lines sit cleanly on top.
- Use split stitch for controlled curves and backstitch for straight rails, roof edges and path seams.
- For cherry branches, let the brown branch lines break under blossom knots instead of drawing every limb continuously.
- Use 3799 instead of 310 inside stonework when black feels too harsh.
Beginner-friendly rule: stitch from the far background forward. Complete distant trees, path, pond base and shrubs first; then add gate, bridge, trees, flowers, koi and final outlines. This prevents bulky knots and dark outlines from snagging while you fill larger areas.
Suggested stitching order
Texture tips for a polished hoop
Garden depth
- Make foreground shrub stitches slightly larger than background foliage stitches.
- Cluster light greens in small patches rather than evenly sprinkling them everywhere.
- Leave a thin fabric breathing line around the red gate where possible; it helps the structure stand forward.
Water realism
- Keep pond stitches mostly horizontal, even when changing color.
- Reflections should be darker and less exact than the objects above them.
- Add lily pads after the water so they sit on the surface; outline only the shadowed edges.
Blossom dimension
- Place darker pink knots first, then lighter knots on top and around the canopy edge.
- Use a few single-wrap French knots for tiny buds and two-wrap knots for fuller flowers.
- Avoid perfectly round canopies; uneven edges look more natural.
Clean finishing
- Use shorter thread lengths for 310 and 321 to reduce fuzz on high-contrast areas.
- Railroad satin stitches on the torii posts if the strands twist.
- Press face-down on a towel after stitching to protect knots and raised details.