
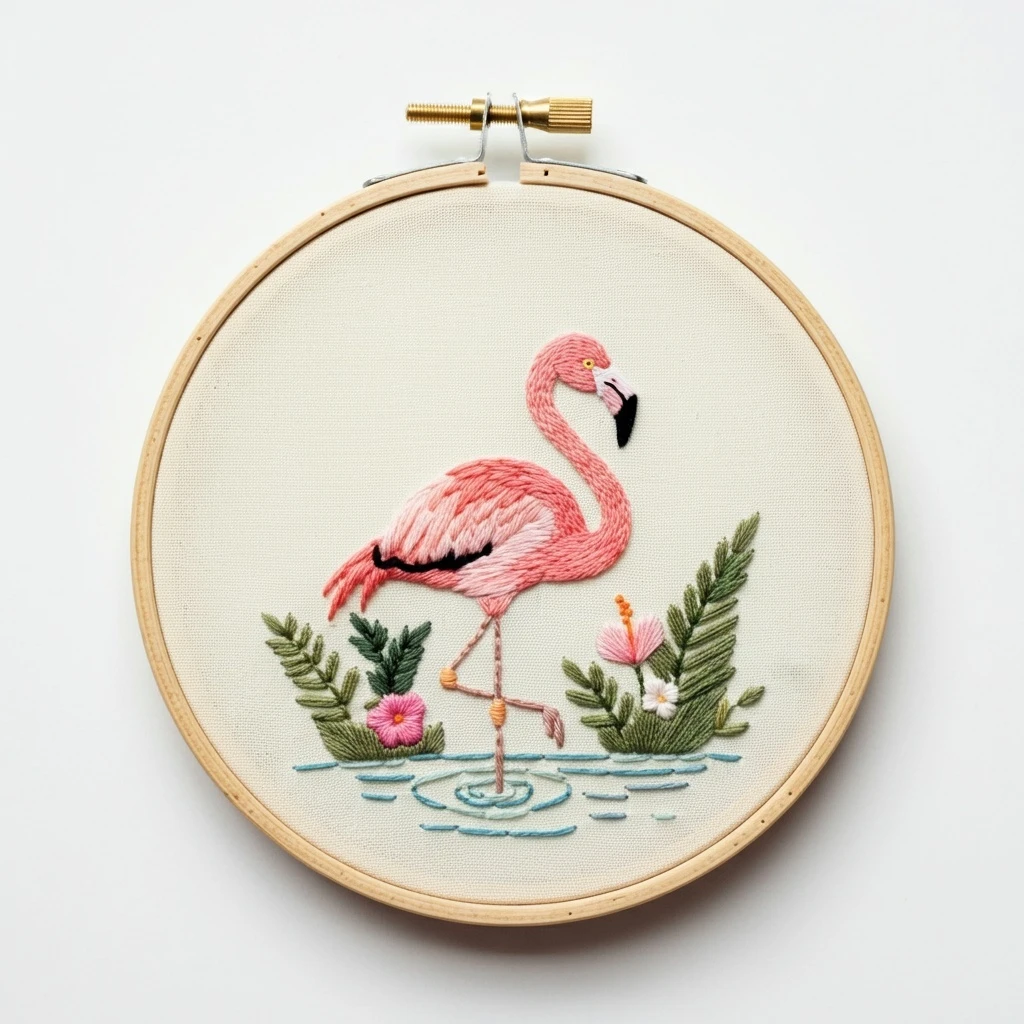
Flamingo In Water
A bright hoop design with a curved pink flamingo, layered feather texture, tropical greenery, small flowers, and calm blue water ripples. The palette balances warm coral-pinks with cool aqua lines and olive foliage for a clean, summery finish.
Likely DMC Color Palette
Colors are estimated from the visible hoop preview and matched to close DMC embroidery floss shades. Use the pink family for feather direction and the blue-green family sparingly so the water stays light and airy.
Stitching Suggestions
Work the flamingo with directional stitches first, then add greenery and water. The design reads best when the bird is smooth and the surrounding plants and ripples are lighter, looser, and more textured.
| Element | Recommended stitch | Practical notes |
|---|---|---|
| Flamingo neck | Stem stitch or split stitch | Follow the S-curve with 2 strands. Alternate 761 and 3713, then add 3706 along the outer curve for gentle shadow. |
| Body and wing fill | Long and short stitch | Angle stitches in the same direction as the feathers. Keep light pink on the upper body and build deeper melon tones under the wing. |
| Feather tips | Straight stitch and fly stitch | Use single directional strokes in 3706 and 3801 to suggest individual feathers without overfilling the shape. |
| Black wing stripe and beak | Satin stitch with backstitch edge | Use short, controlled satin stitches in 310. Outline first if needed so the black stays sharp against the pink. |
| Eye and stamens | French knots | Use one strand of 742 for the eye and two strands for flower stamens. One wrap is enough for a tiny clean dot. |
| Legs and feet | Whipped backstitch | Start with 407 backstitch, then whip with a pale pink or tan if you want rounded legs. Add darker knots only at joints. |
| Fern greenery | Fishbone stitch and detached straight stitch | Use 1 strand for fine fronds and 2 strands for larger leaves. Mix 3362, 3052, and 3053 so the foliage has depth. |
| Flowers | Lazy daisy, satin stitch, French knots | Use 963 and 761 for soft petals, 3801 for stronger pink flower centers, and 742 for raised yellow-orange centers. |
| Water ripples | Backstitch, stem stitch, couching | Keep ripple lines broken and uneven. Use 3846 for most lines and reserve 3845 for the underside of the central rings. |
Thread Count, Blending & Texture
Thread-count guide
Use 2 strands for the flamingo body, flowers, large leaves, and the main ripple lines. Use 1 strand for facial details, fern tips, tiny outlines, and delicate water highlights. Use 3 strands only for a few raised flower centers or bold tail accents.
Pink blending recipe
Blend one strand 761 with one strand 3713 for soft feather highlights. Blend 3706 with 761 for mid-tone areas, and add 3801 as individual shadow strokes rather than a heavy block of color.
Water texture
Do not fill the water solidly. Leave fabric showing between ripple lines, vary stitch length, and make the central rings slightly darker under the standing leg to create the illusion of reflection.
Where to Start
Beginner-Friendly Practical Tips
- Trace ripple lines lightly so they remain thin and do not dominate the lower half of the hoop.
- Shorten stitches around curves; long stitches can flatten the neck and distort the body edge.
- Use a laying tool or needle tip to smooth satin stitches on the beak and black wing stripe.
- For dimensional feathers, stitch a few darker straight stitches over the finished pink fill instead of blending every shade.
- Save French knots until the end so they do not catch thread while you work surrounding leaves and petals.