
DMC Palette & Hand Embroidery Notes
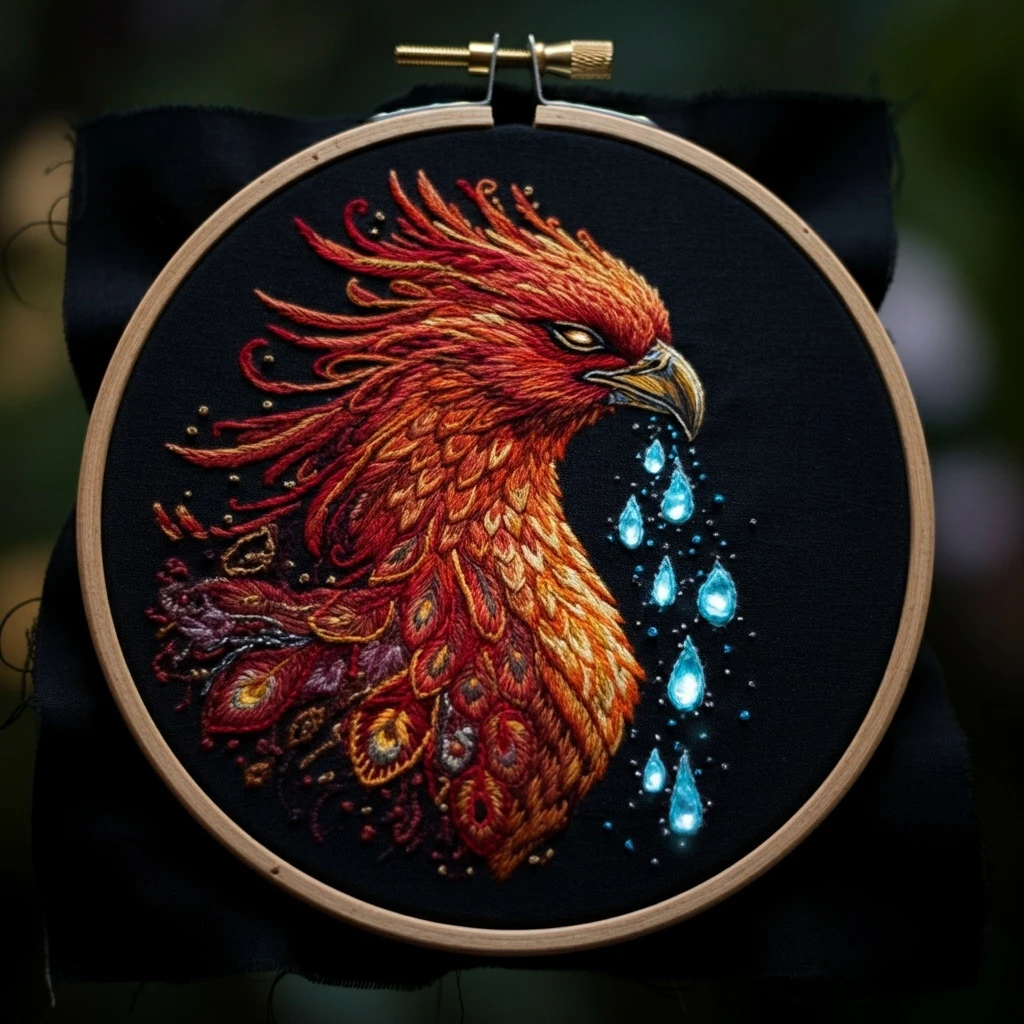
Phoenix With Crystalline Tears
A dramatic hoop on black fabric with a flame-colored phoenix head, layered scale-like neck feathers, sweeping red plumes, a golden beak, and bright aqua crystal tears falling into a field of tiny sparkles.
The design succeeds through high contrast: hot reds and oranges against a dark ground, controlled golden highlights for feather edges, and icy blue tears that feel faceted and luminous.
Design read
This image is built like a miniature thread painting. The face and crest use directional red, orange, and gold stitches that radiate backward from the beak and eye. The neck feathers are smaller and scale-like, with warm outlines and darker inner shadows. The falling tears create the cool focal contrast, so they should be stitched cleanly and brightly rather than overworked.
Suggested DMC floss palette
Use a warm red-orange family for the phoenix, deeper burgundy for shadow, golden yellows for feather rims and beak highlights, and clean aqua-blue shades for the crystalline tears.
Primary bright red for crest strokes, cheek feathers, and lively plume tips.
Deep red feather shadows, undersides of plumes, and dramatic outline accents.
Darkest maroon pockets in the tail, lower feathers, and under the beak.
Hot orange feather centers, glowing neck strokes, and transitions from red to gold.
Brighter flame highlights along the crest, throat, and outer feather ridges.
Golden-orange tips on neck scales and small flashes inside the wing-like plume shapes.
Beak highlights, feather rims, tiny golden dots, and warm sparkle accents.
Beak base, browned feather shadows, and separating lines between orange layers.
Eye glint, sharp beak edge, and the brightest warm feather glints.
Main crystal-tear fill and vivid blue specks around the falling drops.
Mid-tone tear shading, lower edges of droplets, and blue sparkle clusters.
Icy highlights on tears, tiny dots, and reflective facets near the upper edge of each drop.
Pinpoint highlights in the eye, tears, and selected star-like specks.
Soft dark separation around the beak, eye socket, and shadowed feather gaps.
Optional edge correction, pupils, and reinforcing shadows if the fabric is not dense black.
Subtle beak shine and cool grey accents where black outlines need softening.
Stitch map by design element
| Area | Best stitches | Thread count | Practical notes |
|---|---|---|---|
| Phoenix head and cheek | Long and short stitch, split stitch outline | 1-2 strands | Follow the feather direction from beak toward crest. Use 815/902 underlayers, then 321, 741, 740, and 742 as flame highlights. |
| Crest and sweeping plumes | Stem stitch, split stitch, fly stitch, detached chain | 1 strand for curls, 2 strands for bold plumes | Keep the tips tapered by ending with a single strand. Add gold stitches only on the top edges so the plumes keep movement. |
| Scale-like neck feathers | Fishbone stitch, long and short stitch, small satin stitch | 1-2 strands | Work each feather separately: darker base, orange middle, and a small 742 or 783 highlight at the upper rim. |
| Beak | Satin stitch, split stitch, back stitch | 1-2 strands | Use 976 at the base, 783 along the curve, 3823 on the upper highlight, and 3799/310 for the sharp lower separation. |
| Eye | Tiny satin stitch, back stitch, single straight stitch | 1 strand | Outline in 310 or 3799, fill with 3823, then place one tiny B5200 glint to make the bird feel alive. |
| Crystalline tears | Padded satin stitch, long and short stitch, split stitch | 1-2 strands | Outline in 3845, fill with 3846, place 747/B5200 highlights on the upper side, and deepen the lower point with 3845. |
| Blue sparkles and golden dots | French knots, colonial knots, seed stitch | 1 strand for tiny dots, 2 strands for larger knots | Scatter dots irregularly. Use aqua near the tears and a few 783/3823 dots near the phoenix feathers. |
| Tail and lower ornamental feathers | Lazy daisy, fishbone, stem stitch, satin accents | 1-2 strands | Combine burgundy shadows with orange centers and gold rims. Leave small black spaces between motifs for clarity. |
Blending & shading
- Flame transition: blend one strand 815 with one strand 321 for red midtones, then 321 + 741 where feathers turn orange.
- Golden heat: blend 740 + 742 for glowing feather centers; add single-strand 783 only as a final rim or dot.
- Deep ember shadows: use 902 sparingly under the crest, at feather bases, and in the lower tail to avoid flattening the red areas.
- Crystal depth: blend 3846 + 747 for bright tear faces, and 3845 + 3846 for the shaded lower halves.
- Clean black separation: use 3799 instead of pure 310 when you need a softer shadow line that still reads on black cloth.
Outlining details
- Outline the beak, eye, and leading face curve before filling; these details define the phoenix expression.
- Use split stitch for feather outlines because it accepts additional stitches neatly and creates a smooth edge.
- Keep aqua tear outlines very narrow. Heavy dark outlines will make the droplets look cartoonish rather than crystalline.
- For long curling tendrils, stitch a single-strand stem stitch first, then add tiny gold or orange highlights along the outside curve.
- Do not carry pale blue or gold thread across open black spaces; it may ghost through the fabric or catch light from behind.
Beginner-friendly stitching order
Prepare dark fabric
Hoop black fabric tightly and add a lightweight stabilizer if the weave shifts. Use a white transfer pencil or water-soluble stabilizer for the detailed outlines.
Anchor the face
Stitch the beak, eye, and main head outline first. These small features set the scale and make later feather placement easier.
Build red shadows
Place 902 and 815 in the deepest feather bases and undercurves. Keep these strokes directional rather than blocky.
Add flame layers
Work 321, 741, 740, and 742 over the dark base using long and short stitches. Let neighboring colors overlap slightly for a painterly effect.
Define feathers
Use split stitch and fishbone stitch for the neck and tail feathers. Add 783 or 3823 highlights only after the main fill is complete.
Finish with tears
Stitch the aqua droplets and surrounding sparkle dots last so they remain bright, clean, and visually separate from the warm phoenix.
Texture suggestions
For feather movement
Vary stitch length and angle. The crest should feel wind-swept, so let some stem-stitch curves extend beyond the filled head area. On the neck, keep feathers tighter and more repetitive to contrast with the wild upper plumes.
For faceted tears
Think of each droplet as a tiny gemstone: darker turquoise at the lower point, bright turquoise through the body, pale blue on the upper side, and a tiny white highlight. Leave a few slivers of dark ground between blue stitches for sparkle.
Practical finishing notes
- Use a size 7-9 embroidery needle for two-strand areas and a finer needle for single-strand tendrils and sparkle dots.
- Keep the back tidy around the tear field; pale turquoise carried across black cloth can show as faint lines from the front.
- If the phoenix begins to look too orange, add a few single-strand 815 strokes back into the feather bases to restore red depth.
- If the tears look flat, add one B5200 straight stitch near the top curve and one 3845 stitch at the lower point of each drop.
- Before framing, remove lint from the black fabric and steam only from the back with a towel underneath to protect raised knots.