
DMC palette & embroidery guide
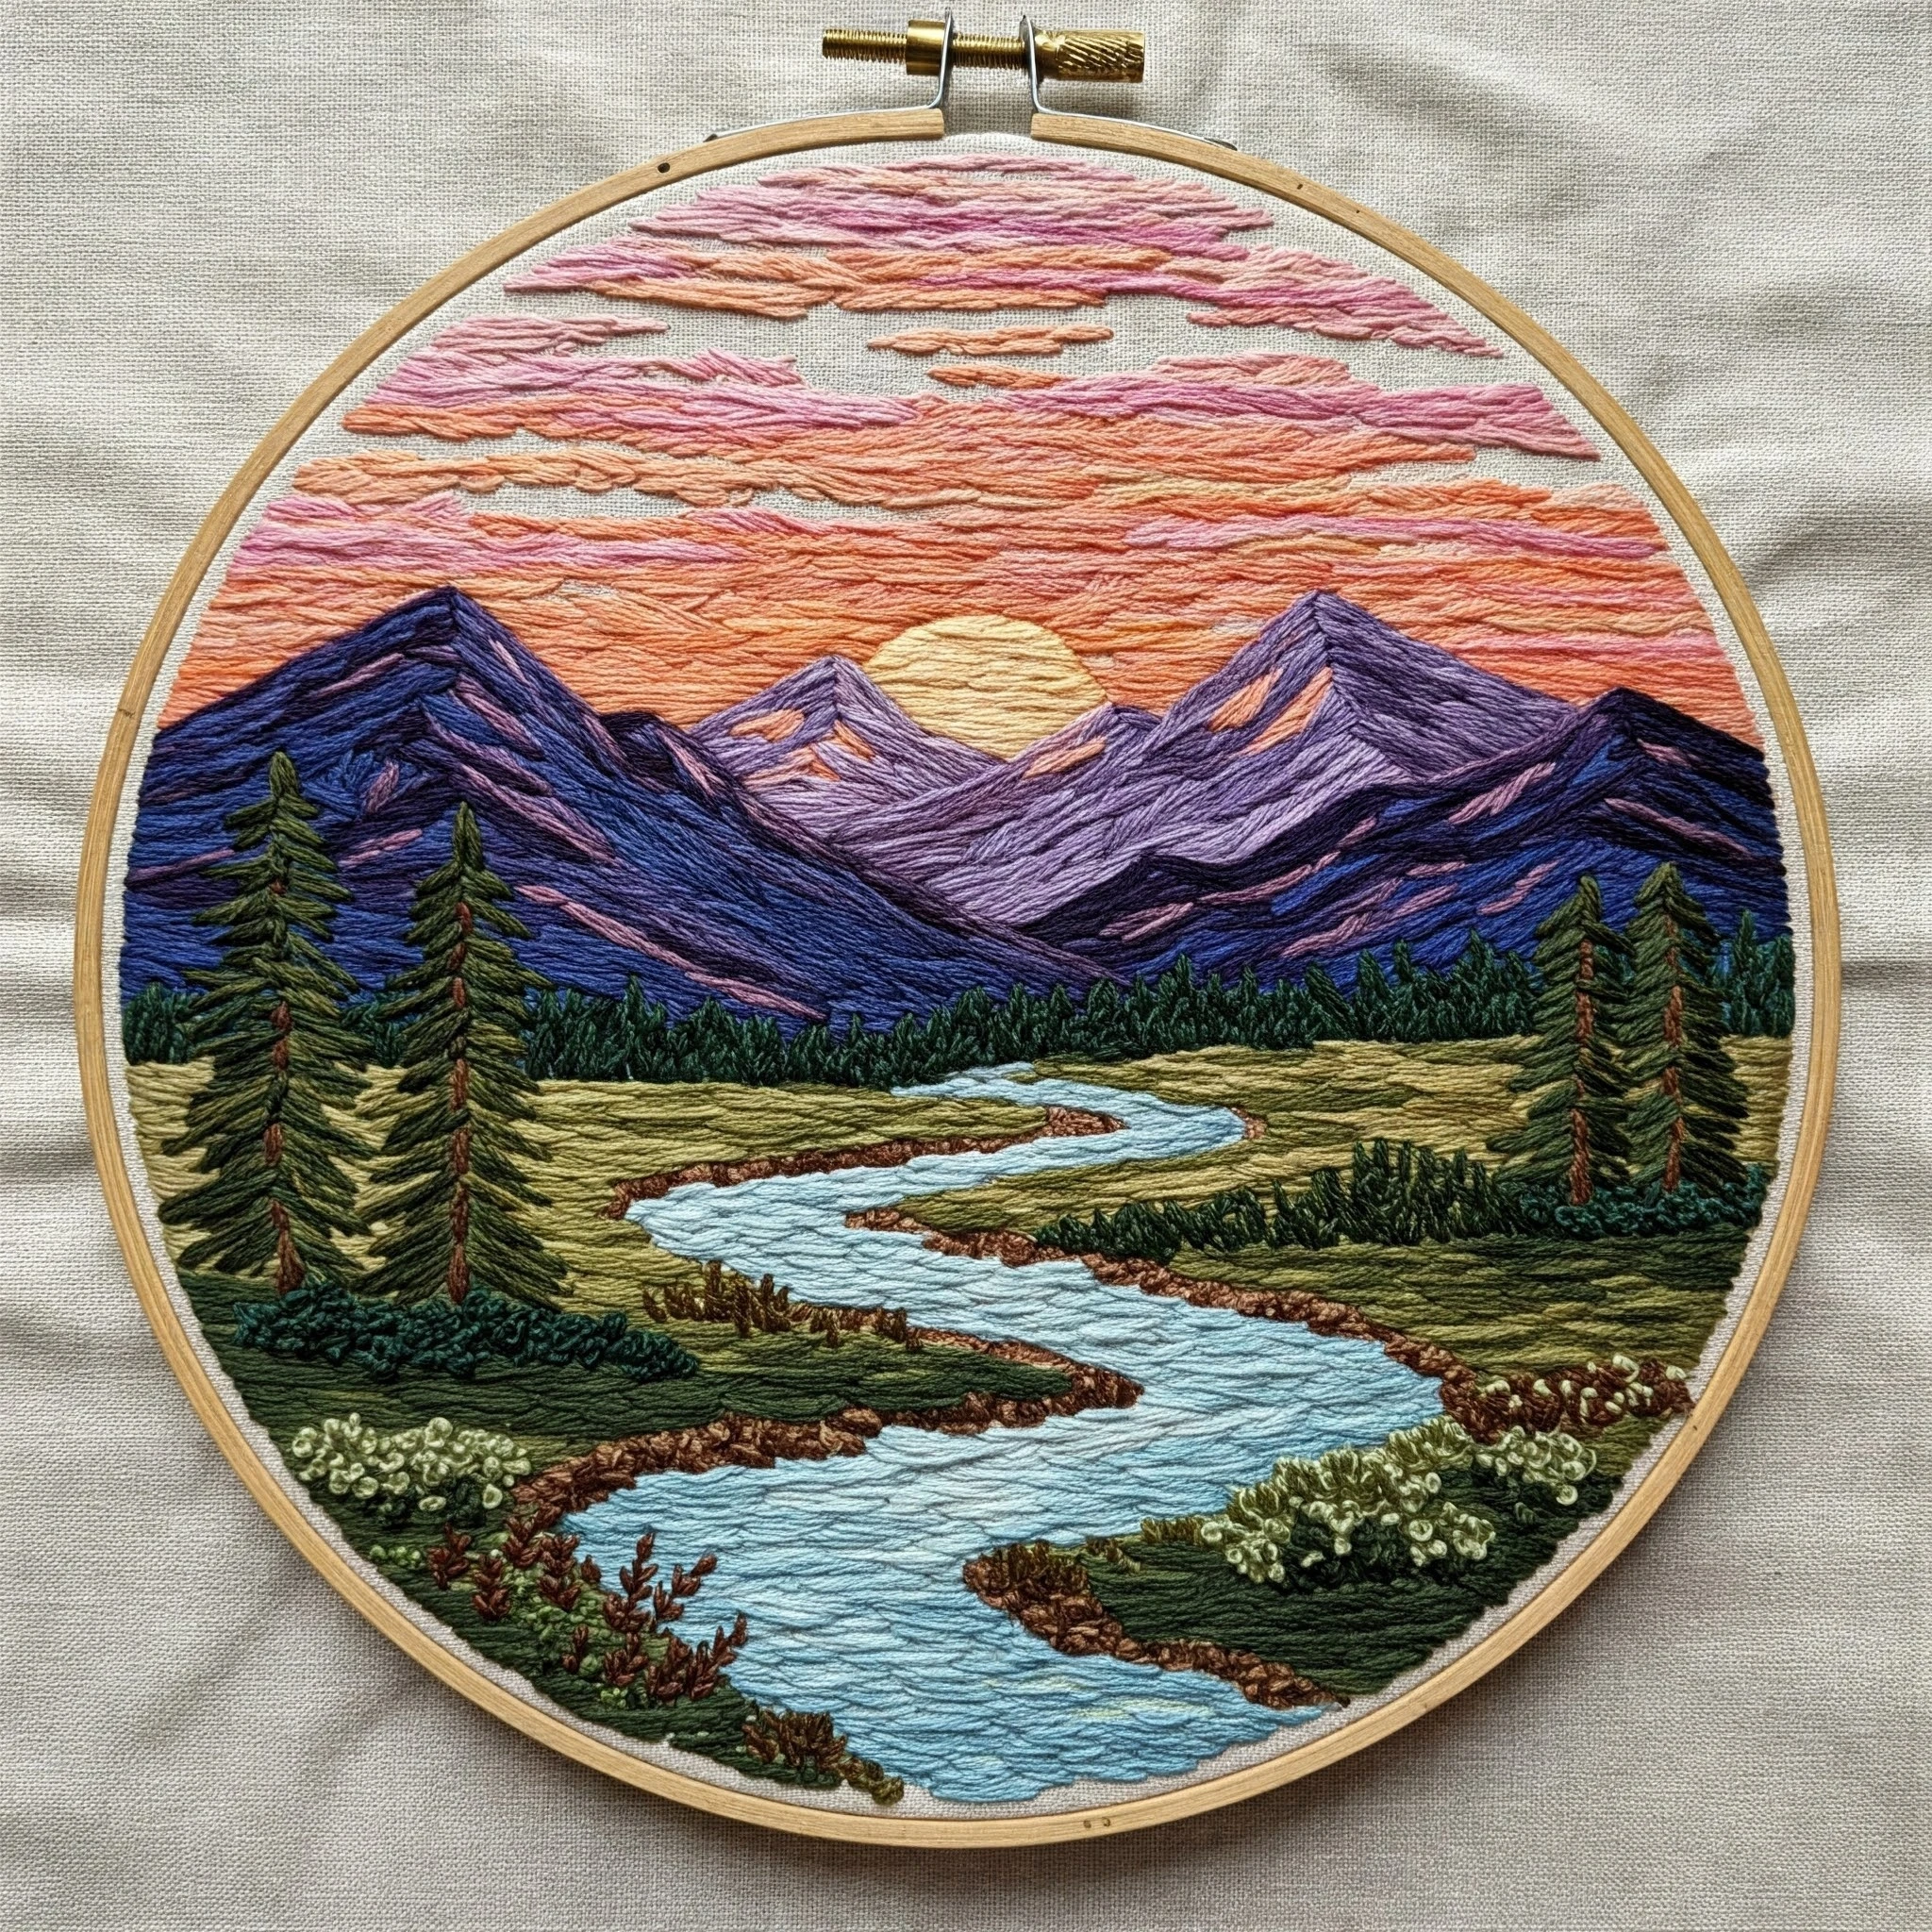
Sunset Mountain Landscape
A polished color and stitch-planning page for a hoop landscape with rosy sunset clouds, a glowing low sun, layered purple-blue mountain ridges, evergreen forest, meadow banks, and a winding pale blue river.
Preview
Preview image from the linked design reference. Colors below are visual estimates matched to close DMC floss shades.
Color Story
This design depends on contrast: warm peach and rose clouds glow above cool violet mountains, while the foreground uses olive greens, dark pines, brown riverbanks, and icy blue water. Keep the sky soft and horizontal, the mountains directional and angular, and the river smoother so the eye travels naturally from the foreground into the distance.
Likely DMC Color Palette
The palette emphasizes sunset warmth, dusky mountain shadows, conifer greens, earthy bank texture, and clean river highlights. Coverage percentages are visual planning estimates, not exact thread usage.
Stitching Suggestions
| Element | Recommended stitches | How to use them |
|---|---|---|
| Sunset sky | Long and short stitch, horizontal satin stitch | Work in loose horizontal rows. Blend peach, coral, dusty rose, and violet-pink by alternating short runs instead of making hard stripes. |
| Cloud streaks | Split stitch, seed stitch, irregular straight stitch | Keep cloud edges uneven. Use one strand for wispy upper edges and two strands for stronger lower bands. |
| Setting sun | Satin stitch or padded satin stitch | Use 2 strands of pale yellow, laying stitches horizontally or slightly curved. Add a few peach stitches at the edge so it sits inside the sky. |
| Distant mountains | Directional long and short stitch | Follow the slope of each mountain plane. Use lighter violet toward lit areas and darker navy-violet in the bases and creases. |
| Sharp ridgelines | Split backstitch or fine stem stitch | Outline only the strongest peaks and shadow seams with 1 strand so the mountains stay defined without becoming cartoonish. |
| Forest band | Short straight stitch, fly stitch, tiny detached chain | Layer dark green first, then add mid-green tips. Vary stitch heights to avoid a flat hedge line. |
| Tall foreground pines | Stem stitch trunk, fly stitch branches, straight stitch needles | Work trunk first in brown, then branch outward with dark green. Add a second mid-green pass on branch tips for dimension. |
| Meadow and banks | Long and short stitch, seed stitch, couching accents | Use khaki and pine greens in shallow horizontal lines. Add tiny brown seed stitches near the river edge for rocky texture. |
| Winding river | Smooth satin stitch, split stitch ripples | Fill the river with pale blue following the curve. Add darker blue ripple lines after the fill, spacing them wider in the foreground. |
| Shrubs and flowers | French knots, colonial knots, seed stitch | Cluster pale knots over dark green bases. Keep knots uneven in size for a natural wild shrub effect. |
Thread Count & Blending
- Sky: 1–2 strands. Use 1 strand for wispy cloud edges and 2 strands for fuller sunset bands.
- Mountains: 2 strands for fill; 1 strand for ridge outlines and fine shadow seams.
- River: 2 strands for the pale fill, then 1 strand for curved ripple lines and edge definition.
- Trees: 2 strands for major branches, 1 strand for needle tips and small forest silhouettes.
- Foreground texture: 1 strand for seed stitches, knots, grasses, and tiny rock marks.
Blending ideas
For smoother transitions, combine one strand of 353 with one strand of 961 in the sky, one strand of 340 with one strand of 333 in the mountains, and one strand of 3811 with one strand of 3761 for the river bends.
Outlining & Shading Guidance
- Reserve the darkest navy and hunter green for the final 20% of stitching so the contrast stays controlled.
- Use broken outlines rather than continuous heavy outlines around mountains; let the stitch direction create most of the shape.
- Shade the mountain bases darker than the peaks to make the valley recede.
- Place the lightest river color down the center of the water path and darker blue near bends and banks.
- Add brown bank texture after the river is stitched, not before, so the edges remain clean.
Beginner-Friendly Work Order
Helpful Notes for a Polished Finish
- Use shorter stitches in the mountain peaks and longer stitches in the sky and river for a pleasing texture contrast.
- Keep floss tension light; tight stitches can pucker the open areas of sky and water.
- When working the river, follow the curve instead of stitching straight across; this creates movement and depth.
- Do not overfill every shrub. Leaving small gaps lets the dark green base show through and creates realistic foliage shadow.
- Step back often. Landscape embroidery reads best when values and large shapes are balanced before tiny details are added.