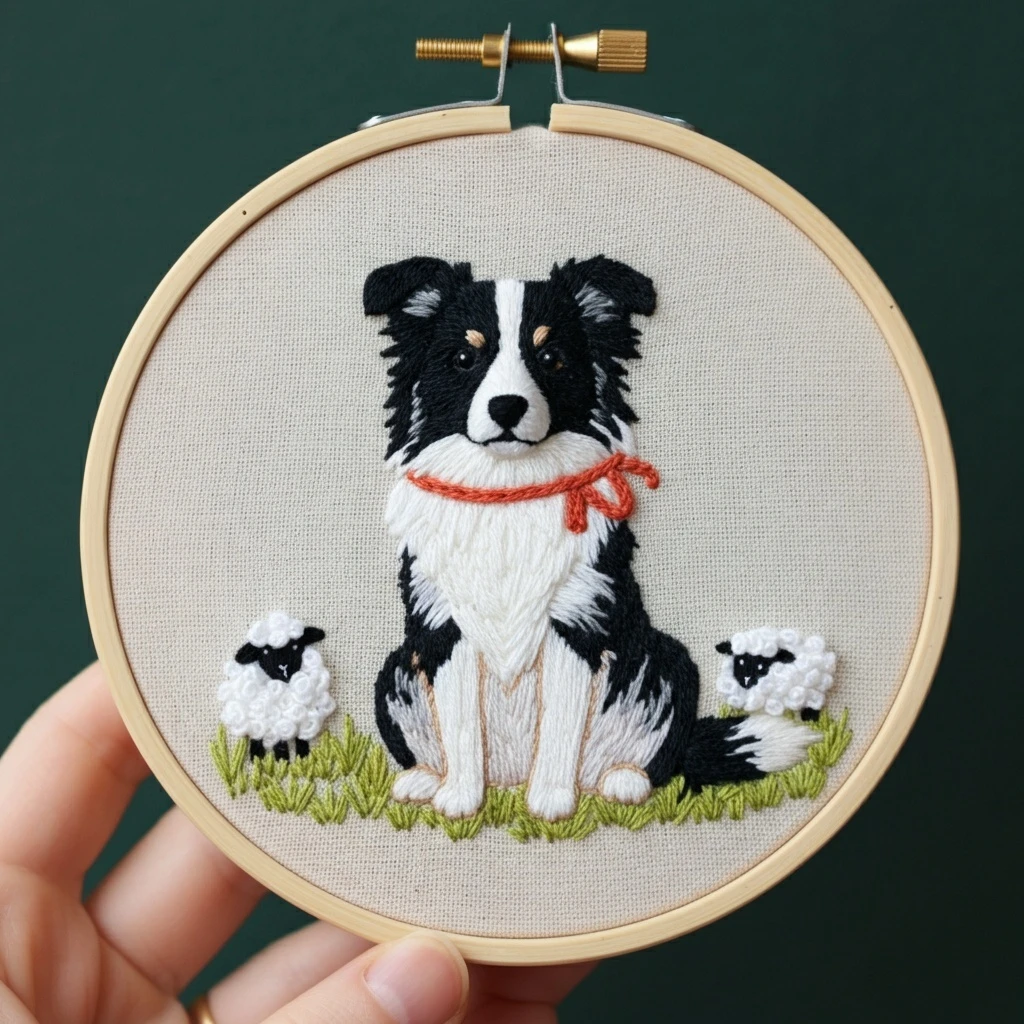
Border Collie and Sheep
A cozy farmyard hoop with a black-and-white Border Collie, two woolly sheep, fresh grass tufts, a warm wooden hoop, and a small rust-red neck cord as the brightest accent. The design depends on clean contrast, soft fur direction, fluffy sheep texture, and lively grass movement rather than a large number of colors.
Polished DMC Color Palette
The palette below is designed for a faithful stitched look: deep black and blue-gray shadows for the dog, creamy whites for the chest and sheep fleece, warm browns for tiny facial accents, rusty orange for the cord, and layered olive greens for grass.
Stitch Map by Design Element
Thread Count & Blending Guide
Fine details
Use 1 strand for eyes, nostrils, mouth line, individual whisker-length fur marks, eyebrow dots, paw seams, and the thinnest outlines. This keeps the animal expressions clean instead of cartoon-heavy.
Main fills
Use 2 strands for most fur, muzzle sections, collar, and grass. Two strands give good coverage on medium cotton or linen without hiding the directional texture.
Raised wool
Use 2–3 strands for sheep French knots or colonial knots. Three strands give plumper curls; two strands look neater on smaller hoops or tighter fabric weaves.
Shading, Outlining & Texture Suggestions
Make the Border Collie expressive
- Keep the central white blaze crisp and symmetrical; it is the visual anchor of the face.
- Use tiny tan eyebrow stitches in 738 above the eyes, then outline only the underside with one strand of 3371.
- For glossy eyes, stitch 310 or 3371 first and add a single B5200 dot last.
- Feather cheek edges with uneven long-and-short stitches instead of a hard satin edge.
Build convincing sheep wool
- Place knots irregularly, not in rows, so the fleece looks naturally curly.
- Cluster knots more tightly on the sheep backs and loosen them near face edges.
- Add a few 762 knots low on each sheep to make the white fleece dimensional.
- Keep black legs minimal with straight stitches so they do not compete with the wool texture.
Grass movement
- Angle grass blades outward at the left and right sides to frame the animals.
- Use darker green behind the dog and lighter green in front for depth.
- Vary blade lengths from short seed stitches to longer straight stitches.
- Leave tiny fabric gaps between groups so the base stays airy.
Outlining approach
- Outline after filling, not before, so the line sits cleanly on top.
- Use split stitch for the face and paws; use back stitch for the sheep faces.
- Avoid outlining every white fur section; shadow lines in 762 often look softer.
- For the tail tip, let white stitches overlap the black base for a fluffy edge.
Beginner-Friendly Stitching Order
- Transfer lightly: mark the main animal shapes, face divisions, collar curve, sheep silhouettes, and grass line. Avoid drawing every single fur strand.
- Stitch background elements first: grass and sheep legs can go in before the larger dog body so overlaps are easier to control.
- Fill the sheep faces and dog dark patches: use short, directional stitches and keep edges slightly ragged where fur should look fluffy.
- Add white fur and fleece: stitch the dog chest in long-and-short strokes, then add sheep knots so the raised wool stays clean.
- Work the collar last: the copper cord sits on top of the chest fur and should look crisp and raised.
- Finish with details: eyes, highlights, eyebrow dots, mouth line, paw shadows, stray grass blades, and final outline corrections.
Practical Tips for a Clean Finish
Fabric & hoop
A natural linen or cotton-linen ground is ideal because the neutral weave supports the black-and-white contrast. Keep the fabric drum-tight; long fur stitches and sheep knots look much neater when the tension does not sag.
Needle choice
Use a sharp embroidery needle sized 7–9 for one- and two-strand detail work. For three-strand knots, move to a slightly larger needle so the thread passes through without shredding.
Managing black floss
Black thread can look bulky and linty. Use shorter lengths, strip and recombine strands, and let the floss relax before stitching. A few gray or brown-black stitches will show fur direction better than solid black alone.
Avoiding white-thread shadows
Keep carry threads short behind white areas. Dark floss carried across the back can show through pale fabric and white chest stitches, especially under bright light.