
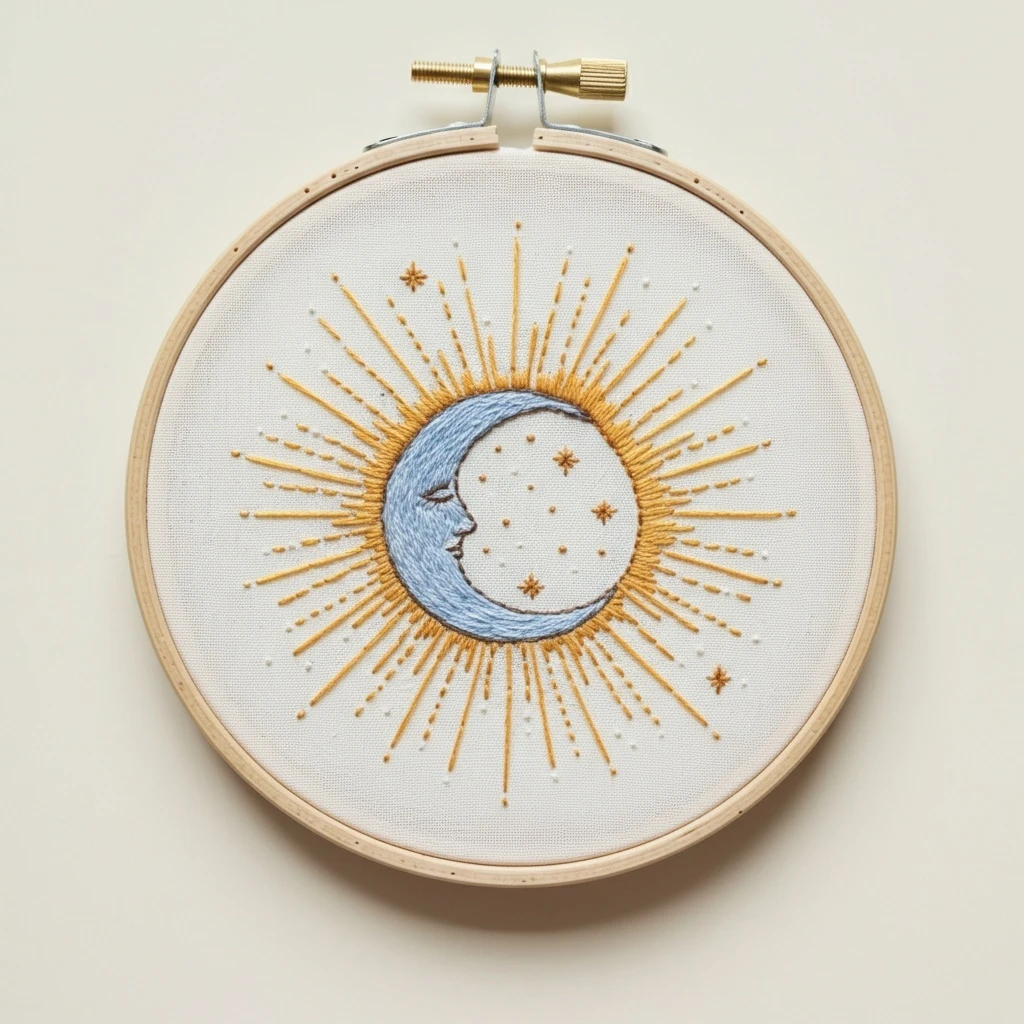
Celestial Crescent Moon Sunburst Beginner
This beginner-friendly celestial design combines a graceful crescent moon, radiating sunburst lines, tiny stars, and warm golden details. The embroidery should feel clean, luminous, and approachable: smooth crescent stitching, straight confident rays, small sparkle knots, and simple shading that adds polish without making the project difficult.
Polished DMC Color Palette
This palette centers on warm golds and moonlit creams, with a few muted cool tones for celestial depth. It is intentionally beginner-friendly: the main look can be stitched with just the first six colors, while the remaining shades add optional shading and sparkle.
Stitch Map by Design Element
Thread Count & Blending Guide
Fine lines
Use 1 strand for moon details, tiny star rays, small dots, and delicate outline corrections. One strand keeps the celestial accents refined and beginner-friendly.
Main shapes
Use 2 strands for the crescent fill, main sunburst rays, larger stars, and visible decorative accents. Two strands give clean coverage without too much bulk.
Raised dots
Use 2–3 strands for larger French knots or focal golden dots. Three strands should be reserved for only a few prominent sparkles near the moon.
Shading, Outlining & Texture Suggestions
Smooth crescent finish
- Use shorter satin stitches on tight curves to prevent gaps along the crescent edge.
- Keep the brightest stitches on the outer curve and the softest shadow on the inner curve.
- Outline after filling if the crescent edge needs sharpening.
- Use 3799 only for the smallest high-contrast details; too much can overpower the moon.
Even sunburst rays
- Mark ray endpoints before stitching so the burst stays balanced.
- Alternate long and short rays for a classic beginner-friendly sunburst rhythm.
- Use the same stitch direction and tension for every ray.
- Add a few 3821 highlights after the main rays are finished.
Sparkle texture
- Mix French knots, tiny crosses, and single seed stitches for variety.
- Cluster a few dots near the crescent, then fade them outward.
- Use cool blue and lavender dots sparingly so the warm gold remains dominant.
- Leave open fabric around bright stars to make them feel luminous.
Outlining approach
- Use 822 or 414 for gentle moon outlines instead of harsh black.
- Use split stitch for the crescent curve and back stitch for straight rays.
- Outline only after the fill stitches are complete.
- For a softer beginner finish, outline just the inner crescent and leave the outer highlight edge clean.
Beginner-Friendly Stitching Order
- Transfer cleanly: mark the crescent outline, center point of the sunburst, ray endpoints, and the largest stars. Add tiny dots later by eye.
- Stitch the crescent: fill the moon first so the main focal shape is established.
- Add sunburst rays: work from the center outward, rotating the hoop as needed to keep your hand position comfortable.
- Add larger stars: stitch the main star shapes before placing smaller dots around them.
- Work decorative dots: add French knots and seed stitches gradually, checking spacing as you go.
- Finish with highlights: add 3865 and 3821 sparkle stitches, final outline corrections, and any soft blue or lavender glow last.
Practical Tips for a Clean Finish
Fabric & hoop
Warm cream cotton, linen, or cotton-linen makes the moon and gold rays look soft and luminous. Keep the fabric drum-tight so straight rays stay crisp and satin stitches lie smooth.
Needle choice
Use a sharp embroidery needle size 7–9 for one- and two-strand work. If French knots feel tight, switch to a slightly larger needle for the knot areas.
Beginner tension tip
Do not pull rays or satin stitches too tightly. Gentle tension keeps the fabric flat and prevents puckering around the sunburst center.
Keeping it polished
Limit the palette on your first pass: moon cream, gold, bright highlight, and one shadow color. Add optional blue or lavender only after the main design feels balanced.