
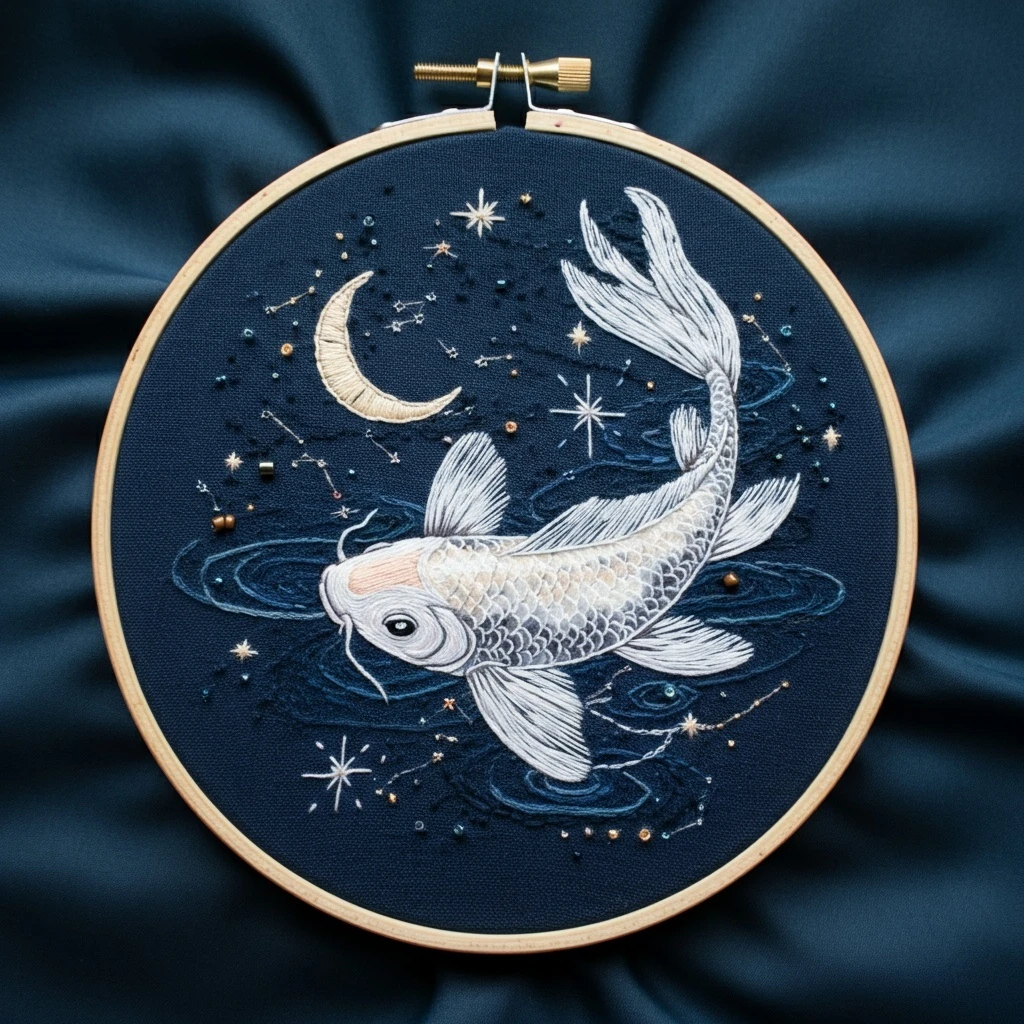
Celestial Koi Fish
This celestial koi design blends flowing fish movement, delicate fins, scale texture, water-like curves, and starry cosmic accents. The stitched version should feel graceful and luminous: a softly shaded koi body, coral-gold scale highlights, translucent fins, cool teal water movement, and tiny celestial dots that echo the fish’s curved swim path.
Polished DMC Color Palette
This palette is designed for a mystical koi with warm coral-orange body accents, creamy highlights, cool teal shadows, and celestial gold details. Use the dark blues and teals sparingly for contour and water depth; let cream, coral, and gold carry the luminous focal areas.
Stitch Map by Design Element
Thread Count & Blending Guide
Fine details
Use 1 strand for scale lines, eye detail, whiskers, fin veins, tiny stars, and final outline corrections. One strand keeps the koi elegant and prevents the scale pattern from overpowering the body.
Main fills
Use 2 strands for the koi body, coral patches, fins, water swirls, and larger celestial motifs. Two strands give smooth coverage while preserving the flowing shape.
Raised sparkle
Use 2–3 strands for French knots, larger celestial dots, or prominent scale glints. Reserve three strands for focal sparkles near the fish’s head or body curve.
Shading, Outlining & Texture Suggestions
Graceful koi movement
- Align body stitches with the fish’s curve from head toward tail.
- Keep the brightest highlights on the upper curve and fin tips.
- Use darker teal or gray only in the deepest underside shadows.
- Let water swirls echo the koi’s direction to make the design feel fluid.
Scale texture
- Do not stitch every scale heavily; suggest the pattern with small broken arcs.
- Use one-strand lines so the body fill remains smooth and luminous.
- Add gold glints only on selected scales near the focal curve.
- Use 822 or 928 for subtle scales on pale body sections.
Fin translucency
- Stitch fin lines outward like fan ribs to show movement.
- Keep fin tips pale and lightly filled so they look delicate.
- Add a few 3809 or 932 strokes near the base for depth.
- Use 3865 sparingly as a final shine on the edges.
Outlining approach
- Outline after filling so body and fin edges stay crisp.
- Use 924, 3810, or 822 instead of harsh black for most outlines.
- Reserve 3799 for the eye and the smallest deep contour points.
- Use split stitch for curved body edges and back stitch for tiny scale details.
Beginner-Friendly Stitching Order
- Transfer lightly: mark the koi outline, eye, major fin shapes, coral patches, water curves, and only the largest celestial dots. Add tiny stars later by eye.
- Fill the body first: work the pale cream base and coral patches before adding scale lines.
- Add fins and tail: stitch from base to tip, keeping the direction consistent and the outer edges light.
- Work water swirls: use curved stem stitch or whipped back stitch to frame the koi’s motion.
- Add scales and details: use one-strand scale arcs, eye detail, whiskers, and fin vein lines.
- Finish with celestial sparkle: add gold knots, tiny stars, pale highlights, and final outline corrections last.
Practical Tips for a Clean Finish
Fabric & hoop
Warm cream or pale natural cotton-linen works beautifully for celestial koi because it supports both watery blues and warm coral-gold tones. Keep the fabric drum-tight so fin stitches stay smooth.
Needle choice
Use a sharp embroidery needle size 7–9 for one- and two-strand details. If adding three-strand French knots, switch to a slightly larger needle to avoid tugging.
Avoiding over-detail
The koi needs flow more than density. If the body starts looking crowded, stop adding scale lines and use a few highlight stitches instead.
Color balance
Repeat coral, teal, and gold in small amounts across the fish and surrounding sparkle so the celestial theme feels unified rather than separated into fish and background.