
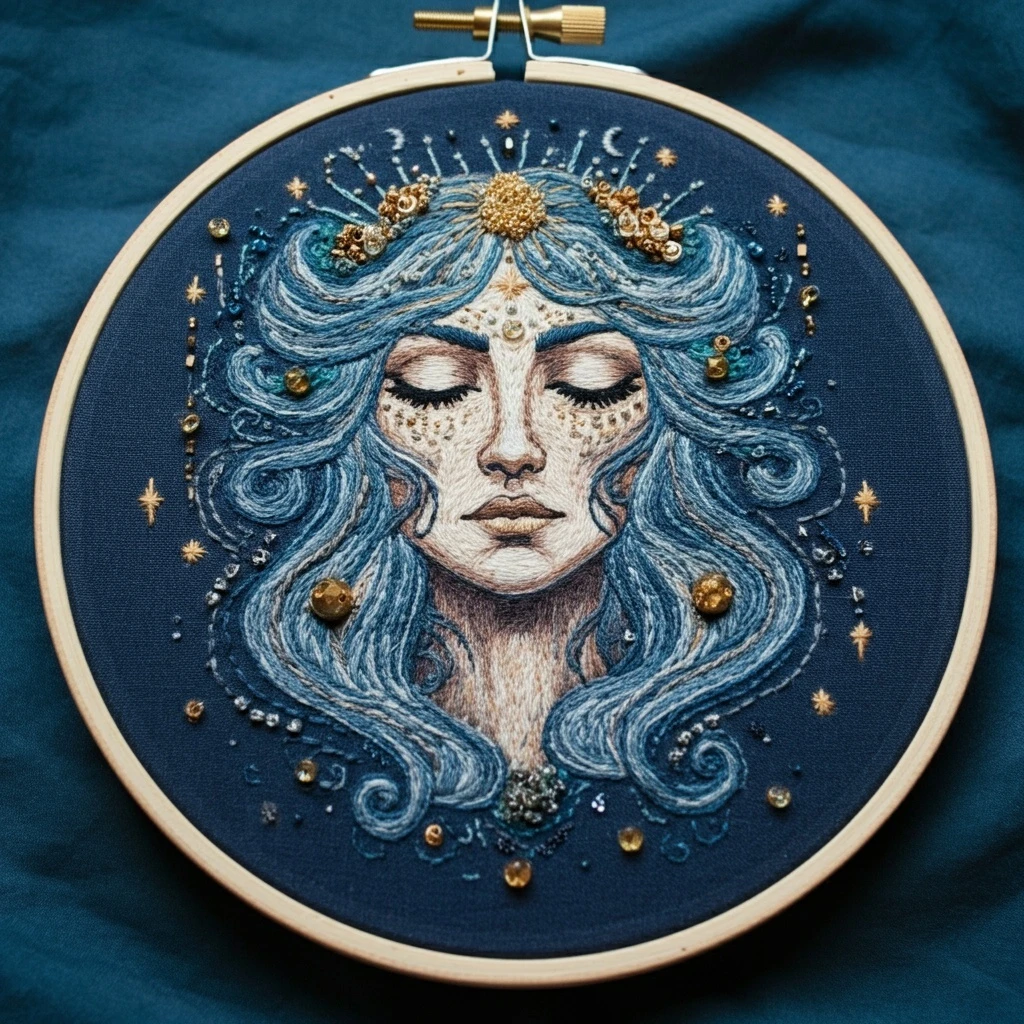
Celestial Maiden
This ethereal portrait-style design combines a graceful maiden figure with moonlit details, flowing hair or fabric, soft facial features, and starry celestial accents. The stitched version should feel delicate and luminous: smooth skin shading, directional hair strands, gentle garment folds, warm gold stars, and pale moon highlights that frame the figure without overwhelming her expression.
Polished DMC Color Palette
This palette balances warm skin tones, soft rose accents, lavender-blue celestial shadows, creamy moon highlights, and golden stars. Use the deepest colors only for hair, lashes, and selective outlines so the overall portrait remains light and graceful.
Stitch Map by Design Element
Thread Count & Blending Guide
Portrait details
Use 1 strand for eyes, brows, lips, nose contour, face outline, hair strand accents, and tiny celestial dots. This keeps the maiden’s expression refined and not heavy.
Main fills
Use 2 strands for skin shading, hair masses, garment sections, moon fills, and larger stars. Two strands provide coverage while still allowing smooth blending.
Raised sparkle
Use 2–3 strands for selected French-knot stars, jewelry dots, or halo accents. Reserve three strands for only the brightest focal sparkles.
Shading, Outlining & Texture Suggestions
Soft portrait shaping
- Keep facial stitches short and smooth so the expression remains delicate.
- Place the lightest skin tones on forehead, nose bridge, cheek, and chin.
- Use 356 sparingly; too much warm shadow can make the face look harsh.
- Add final facial lines after all skin fills are complete.
Flowing hair
- Follow the hair direction exactly; stitch curves are what create movement.
- Group hair into sections rather than filling the whole area in one direction.
- Use the darkest tones under overlaps and near the neck or crown.
- Add moonlit highlights last with single strands so they sit on top.
Celestial glow
- Cluster stars near the face or moon, then fade them outward.
- Use 3865 and 3821 only for the brightest star points.
- Place lavender and blue around gold accents for a cool night-sky contrast.
- Leave open fabric between sparkles so the portrait does not become crowded.
Outlining approach
- Use split stitch for facial curves and stem stitch for hair or garment lines.
- Use 3371 or 154 instead of harsh black for most outlines.
- Outline after filling so the details stay clean and visible.
- Skip some garment outlines for a softer, flowing silhouette.
Beginner-Friendly Stitching Order
- Transfer carefully: mark the face outline, hair flow lines, garment folds, moon shapes, largest stars, and only the key facial features. Keep transfer lines faint around skin areas.
- Stitch the face first: fill skin tones, then add facial details only after the shading is complete.
- Add hair sections: work from the deepest strands to highlighted strands, following the drawn flow.
- Stitch garment or veil: use soft lavender-blue values and curved stitch direction to suggest drape.
- Add moon and large celestial motifs: complete moons and larger stars before tiny dot accents.
- Finish with sparkle: add French knots, tiny stars, jewelry dots, hair highlights, and final outline corrections last.
Practical Tips for a Clean Finish
Fabric & hoop
Warm cream cotton, linen, or cotton-linen complements the portrait palette and lets pale moon details glow. Keep the hoop drum-tight so facial stitches and long hair lines stay smooth.
Needle choice
Use a sharp embroidery needle size 7–9 for one- and two-strand portrait work. For three-strand knots, move to a slightly larger needle so the wraps pull through cleanly.
Portrait patience
Stitch the eyes, mouth, and nose with one strand and pause often. A single misplaced stitch can change the expression, so details should be built slowly and lightly.
Prevent show-through
Do not carry dark hair floss behind pale skin, moon, or garment areas. End dark threads cleanly and restart nearby so the lighter sections remain fresh.