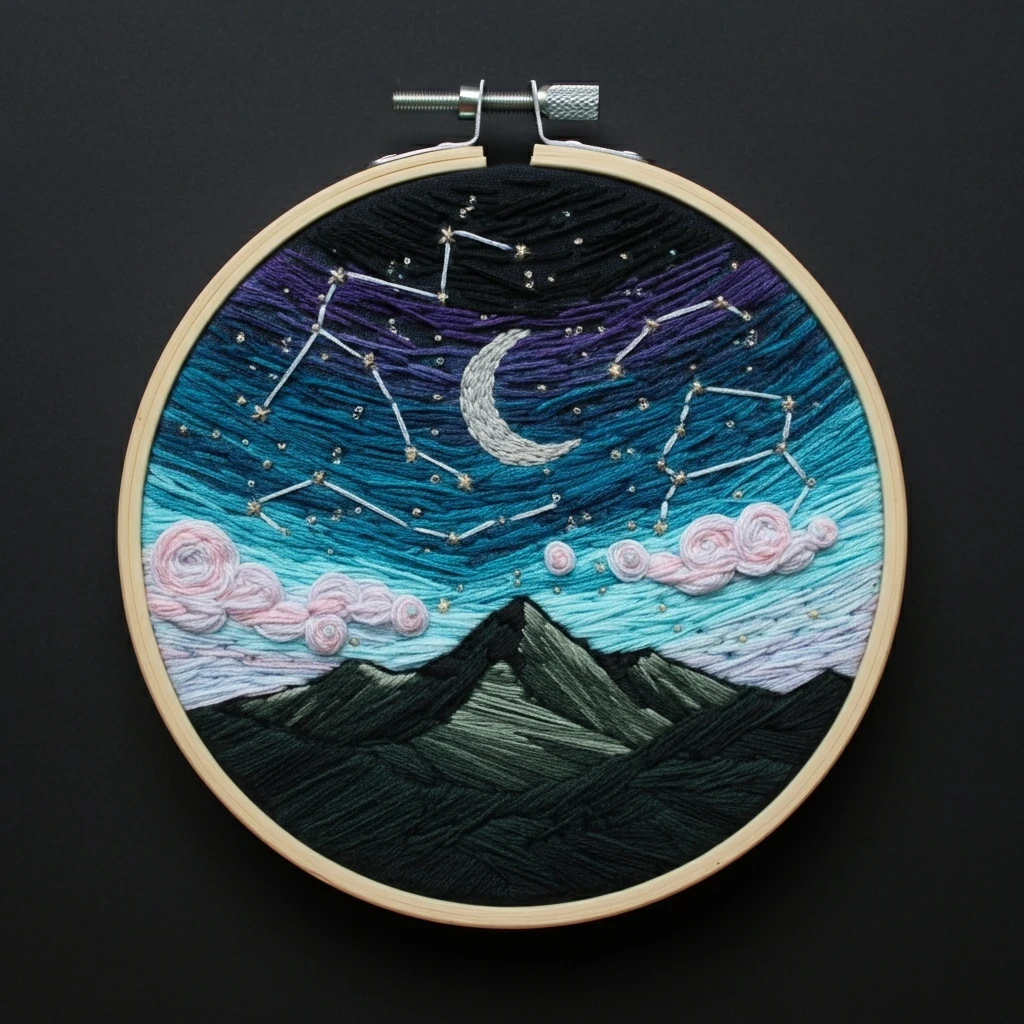

Celestial Night Sky and Mountain
This landscape design combines layered mountains, a deep celestial sky, moonlit peaks, pine silhouettes, and small starry details. The stitched version should feel calm and atmospheric: dark-to-light sky shading, crisp mountain ridges, soft snowy highlights, textured evergreen foregrounds, and tiny gold-white sparkles that keep the night sky magical.
Polished DMC Color Palette
This palette balances deep blue-violet sky tones, cool mountain grays, pine greens, and warm celestial sparkle. Use the darkest colors in the upper sky, tree silhouettes, and ridge shadows; reserve pale cream and gold for stars, moon glow, and snowy peak highlights.
Stitch Map by Design Element
Thread Count & Blending Guide
Fine details
Use 1 strand for star rays, ridge lines, small pine tips, moon halo stitches, and final outline corrections. One strand keeps celestial and mountain details crisp.
Main fills
Use 2 strands for sky bands, mountain faces, pine boughs, moon fill, and larger foreground areas. Two strands provide rich color without making the landscape bulky.
Raised sparkle
Use 2–3 strands for French-knot stars or textured foreground knots. Use three strands sparingly near the brightest stars or closest tree texture.
Shading, Outlining & Texture Suggestions
Atmospheric sky
- Keep stitch direction mostly horizontal or gently curved across the sky.
- Use the darkest blues at the top and lighter tones near the moon or horizon.
- Place lavender only in small transitions so the sky stays deep and calm.
- Leave tiny gaps or use single-strand stitches around stars to suggest glow.
Mountain dimension
- Follow each mountain slope with stitch direction for realistic planes.
- Use darker gray on one side of each ridge and pale cream on the light side.
- Keep snow highlights thin and angular so they read like ridgelines.
- Add final dark ridge lines only where the peaks need extra clarity.
Pine texture
- Use short angled stitches to build layered evergreen boughs.
- Keep background trees darker and less detailed than foreground trees.
- Add moonlit green highlights only to outer tree edges.
- Let some tree silhouettes overlap the mountain base for depth.
Starfield balance
- Cluster stars near the moon or upper sky, then fade them outward.
- Mix tiny knots with straight-stitch crosses for varied sparkle.
- Use gold sparingly for warmth; too much gold can overpower the mountain mood.
- Keep open sky space so the night feels expansive.
Beginner-Friendly Stitching Order
- Transfer main shapes: mark the moon, mountain ridge, major tree silhouettes, horizon line, and a few largest stars. Add tiny star dots later by eye.
- Stitch the sky first: work from darkest upper sky into lighter horizon or moonlit areas.
- Add moon and halo: stitch the moon shape, then place a few pale halo stitches around it.
- Work mountains: fill shadow planes, light planes, and snowy ridge highlights before adding outlines.
- Layer pines and foreground: stitch back trees first, then foreground trees and ground texture.
- Finish with stars: add French knots, tiny crosses, gold dots, and final ridge or tree highlights last.
Practical Tips for a Clean Finish
Fabric & hoop
Warm cream, oatmeal, or pale gray-blue cotton-linen works beautifully for this night landscape. Keep the hoop drum-tight so sky bands and mountain ridges stay smooth and precise.
Needle choice
Use a sharp embroidery needle size 7–9 for one- and two-strand work. If making raised star knots or dense tree texture, keep a slightly larger needle nearby.
Avoiding a heavy sky
If the sky begins to look too dense, switch from filled bands to scattered single stitches near the stars. This keeps the celestial area light and atmospheric.
Depth control
Use sharper contrast in the foreground and softer contrast in the distance. This makes the mountains recede while the trees and stars remain clear.