
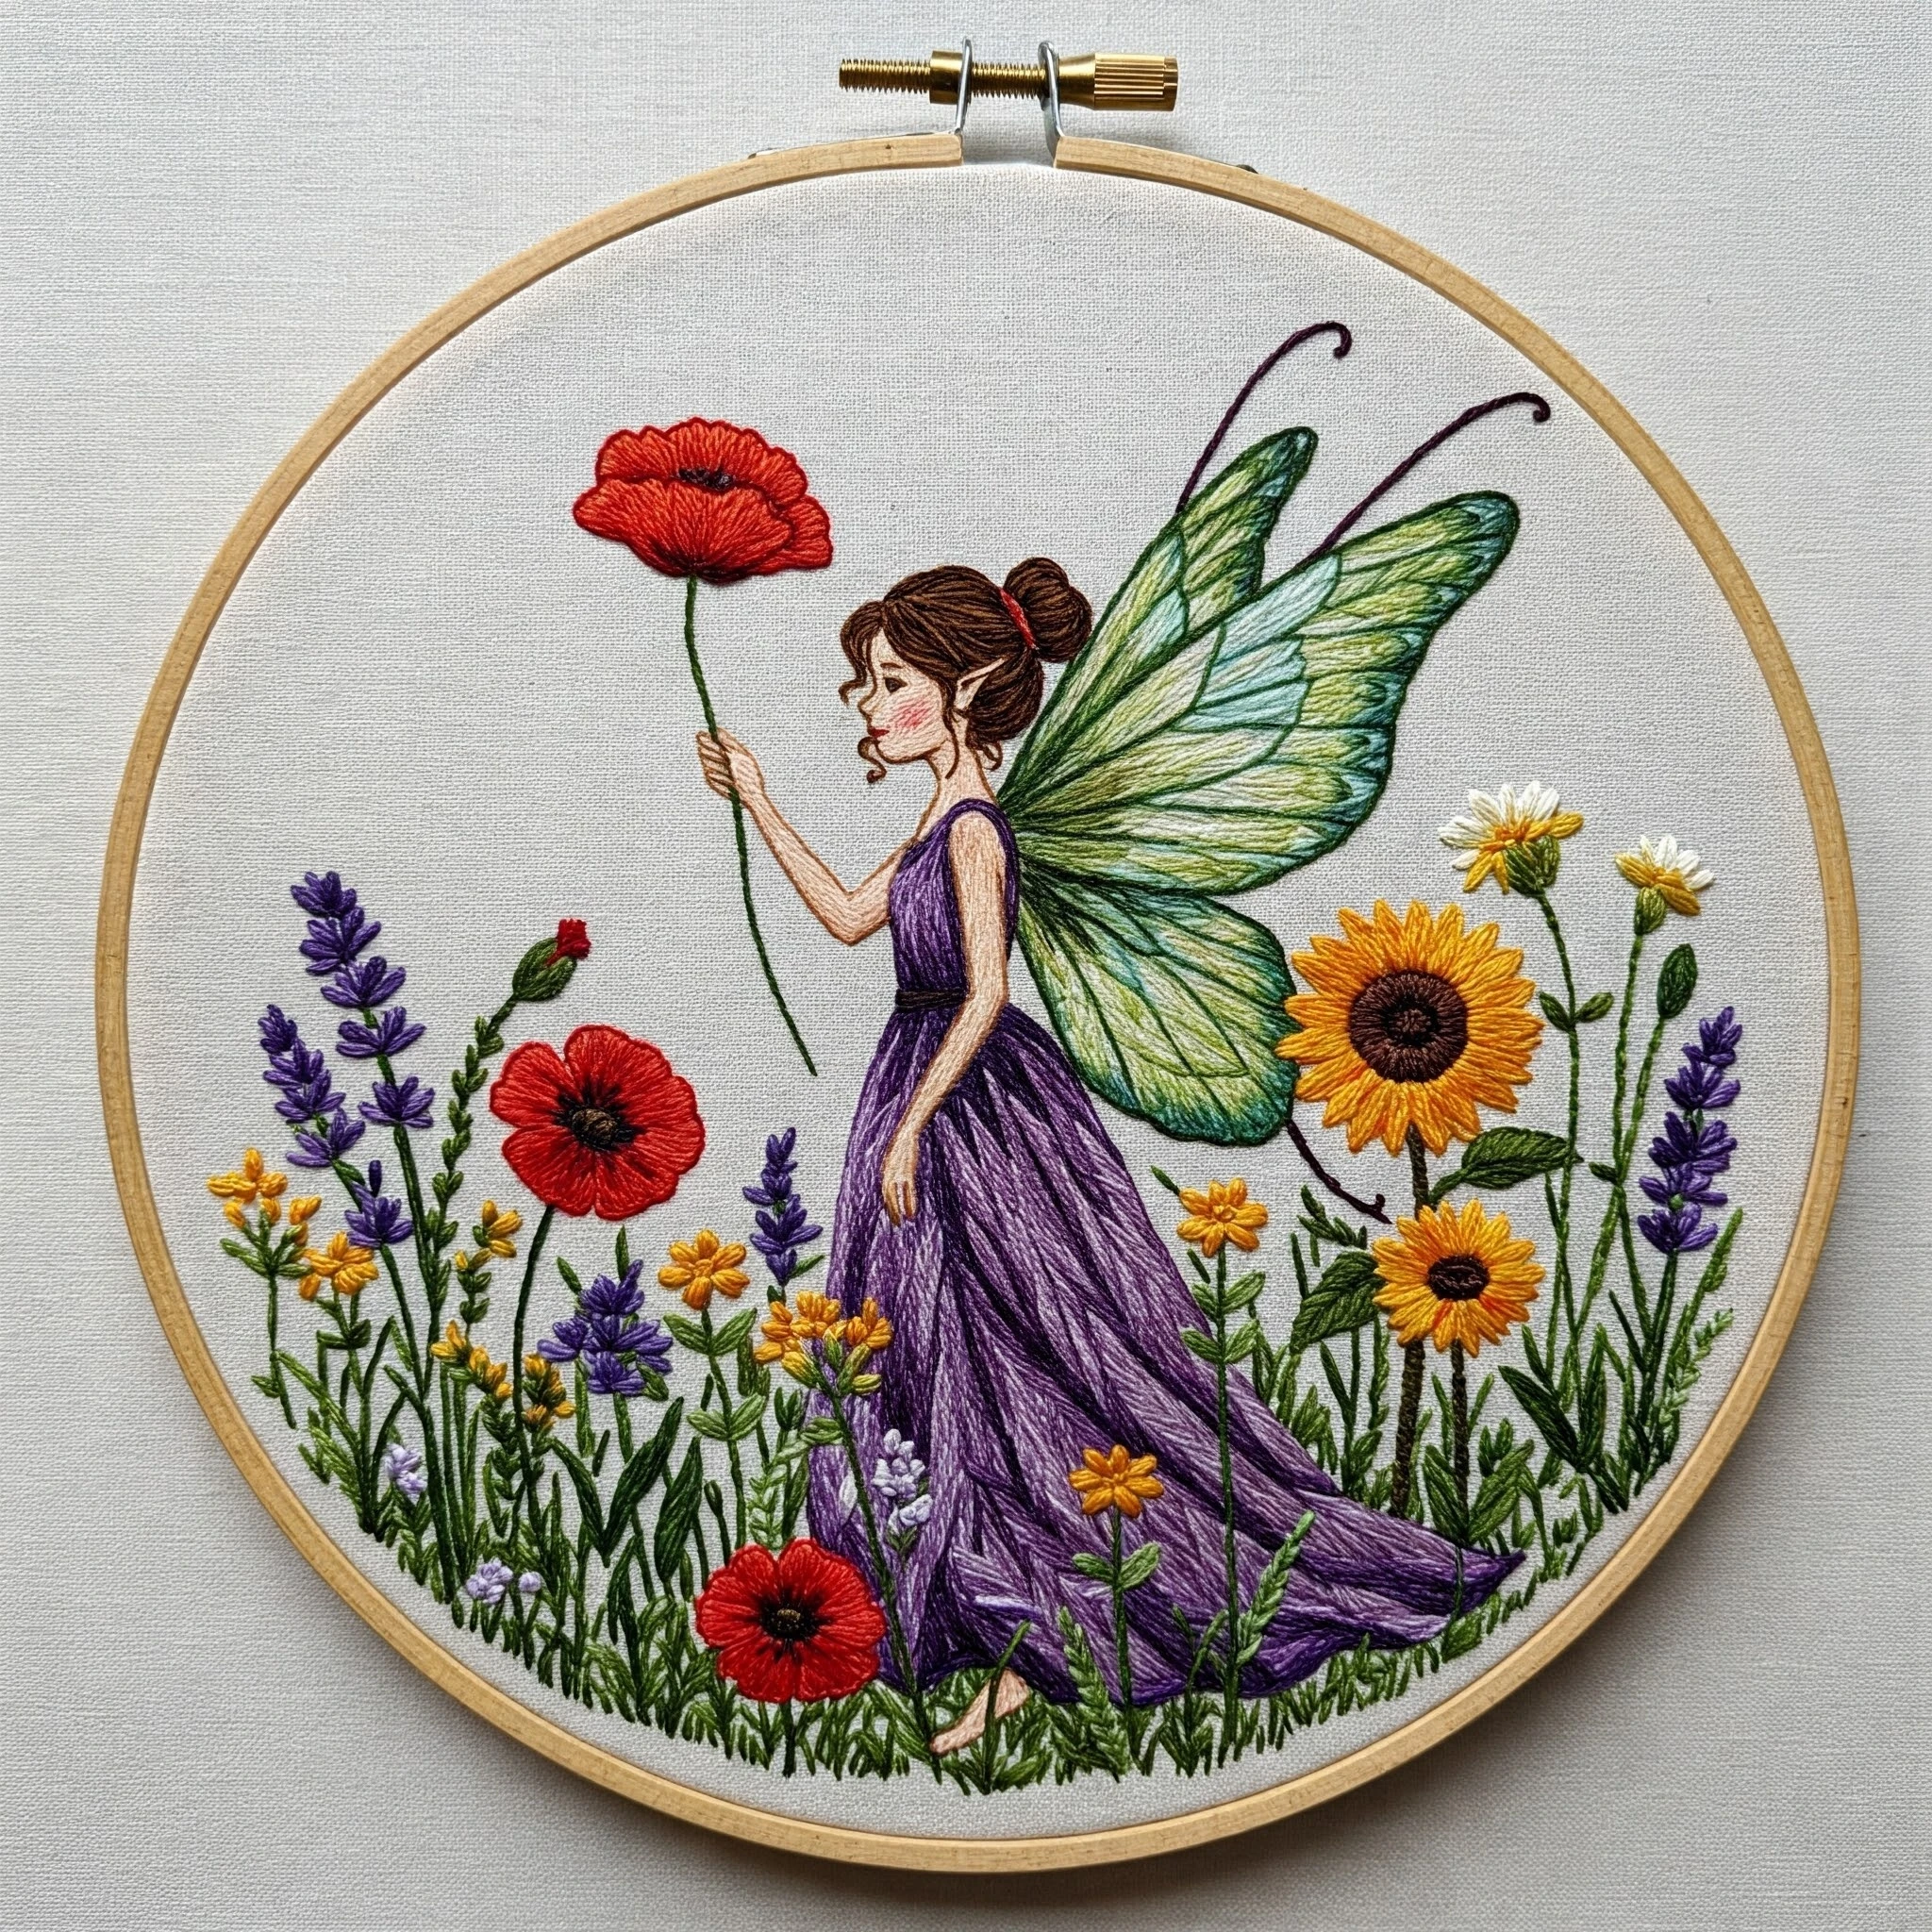
Embroidered Fairy With Poppy In A Wildflower Meadow
A polished DMC floss palette and practical stitching plan for the fairy’s violet dress, translucent green wings, bright red poppies, golden meadow flowers, purple sprigs, daisies, grasses, and delicate skin-and-hair details.
Likely DMC Color Palette
Colors are estimated from the visible hoop preview and matched to close DMC embroidery floss shades. The design relies on strong red poppies, deep violet clothing, layered green wings, golden meadow flowers, dark leafy stems, warm brown hair, and soft peach skin tones.
Stitching Suggestions
| Design Element | Recommended Stitch | Practical Notes |
|---|---|---|
| Fairy dress and skirt folds | Long and short stitch, split stitch, fine backstitch | Build the skirt with directional strokes following the fall of the fabric. Use 550 in the deepest pleats, 209 for body color, and 210 sparingly along raised fold edges. |
| Bodice and waistband | Satin stitch with backstitch outline | Keep the bodice smoother and denser than the skirt. A dark violet or near-black backstitch at the waist helps separate dress layers. |
| Transparent fairy wings | Split stitch veins, long and short fill, seed stitch highlights | Work the dark outer wing edge first, then stitch vein lines. Fill lightly between veins with 3052 and 472 so the wings stay airy instead of heavy. |
| Wing veins | Stem stitch or whipped backstitch | Use one strand of 3818 or 500. Keep curves graceful and do not over-thicken the veins; the transparency effect depends on negative space. |
| Large red poppies | Long and short stitch, satin stitch, French knots | Shade petals from 816 at the base to 666 across the main petal face, adding tiny 721 strokes for warmth on lifted ridges. Cluster dark knots for the centers. |
| Sunflowers and golden wildflowers | Lazy daisy, straight stitch, satin stitch, French knots | Point petals outward from the center. Use 742 on tips and 783 closer to the center for a sunlit, dimensional flower head. |
| White daisies | Lazy daisy or detached chain | Use 3865 for petals with 742 or 783 knots in the center. Keep the stitches small and open so the daisies feel light. |
| Purple flower spikes | Detached chain, fly stitch, small straight stitches | Use 333 for deep buds and add small 209 accents if you want a lavender effect. Stitch upward along the stem so each bloom stacks naturally. |
| Meadow grasses and stems | Stem stitch, straight stitch, couching for long curves | Use one strand for background grasses and two strands for larger flower stems. Vary 3818, 500, and 3052 to avoid a flat green band. |
| Hair, bun, and curls | Stem stitch, split stitch, single-strand backstitch | Follow the direction of each lock. Use 801 for the darkest hair sections and 433 for warm highlights across the bun and loose curls. |
| Face, arms, hands, and foot | Long and short stitch, tiny straight stitches, single-strand backstitch | Keep skin stitches smooth and minimal. Use 948 as the base, 758 for shadow at joints and cheek, and one strand of brown for facial features. |
| Fine outlines and antennae | Single-strand backstitch or stem stitch | Use 550 or a very dark brown-purple. Stitch slow, curved lines and finish the antenna tips with a tiny French knot or curled backstitch. |
Thread Count, Blending & Shading Guidance
Two strands suit the dress, wings, poppy petals, large flowers, and stronger leaves. Keep tension relaxed so the fabric does not pucker inside the hoop.
One strand is best for the fairy’s face, fingers, hair wisps, antennae, wing veins, distant grasses, and small flower stems.
Reserve three strands for raised French knots in sunflower centers, poppy centers, and a few meadow seed heads. Too many thick stitches can crowd the design.
Where to Start
- Begin with the fairy’s skin and hair using one-strand detail stitches; these small areas are easier before the dress and meadow become crowded.
- Stitch the dress next, placing the darkest pleat lines first and filling between them with violet mid-tones and highlights.
- Outline the wing shapes and veins, then add light interior fills so the wings look translucent and layered behind the figure.
- Add the large poppies and sunflowers, working from darker petal bases toward brighter outer tips.
- Fill the meadow with stems and grasses from back to front, varying greens and stitch lengths for natural movement.
- Finish with French knots, tiny buds, daisy centers, final outlines, and any small highlight stitches needed to sharpen the composition.
Beginner-Friendly Practical Tips
Do not fill every gap. A few open spaces between grasses help the fairy and larger flowers remain the focal point.
For wing edges, antennae, curls, and flower stems, use short backstitches rather than long ones so the curves stay smooth.
Avoid carrying dark thread behind the fairy’s face, arms, or pale wing sections; traveling threads may show through light fabric.
Fill poppies, dress, and wings first, then add final backstitch. This prevents outlines from being buried under fill stitches.
Mix short and tall straight stitches around the hem. Let some grass overlap the dress edge for a planted meadow feel.
French knots catch thread easily while you stitch nearby areas, so add flower centers and tiny buds during the final pass.
Encouraging Finish
This fairy meadow design will look best when the stitching contrasts soft transparency with lively texture: smooth shaded skin, flowing violet fabric, delicate wing veins, crisp poppy petals, raised flower centers, and varied grasses. Work slowly from the figure outward, keep the background airy, and let the red poppies and golden flowers provide the final sparkle.