
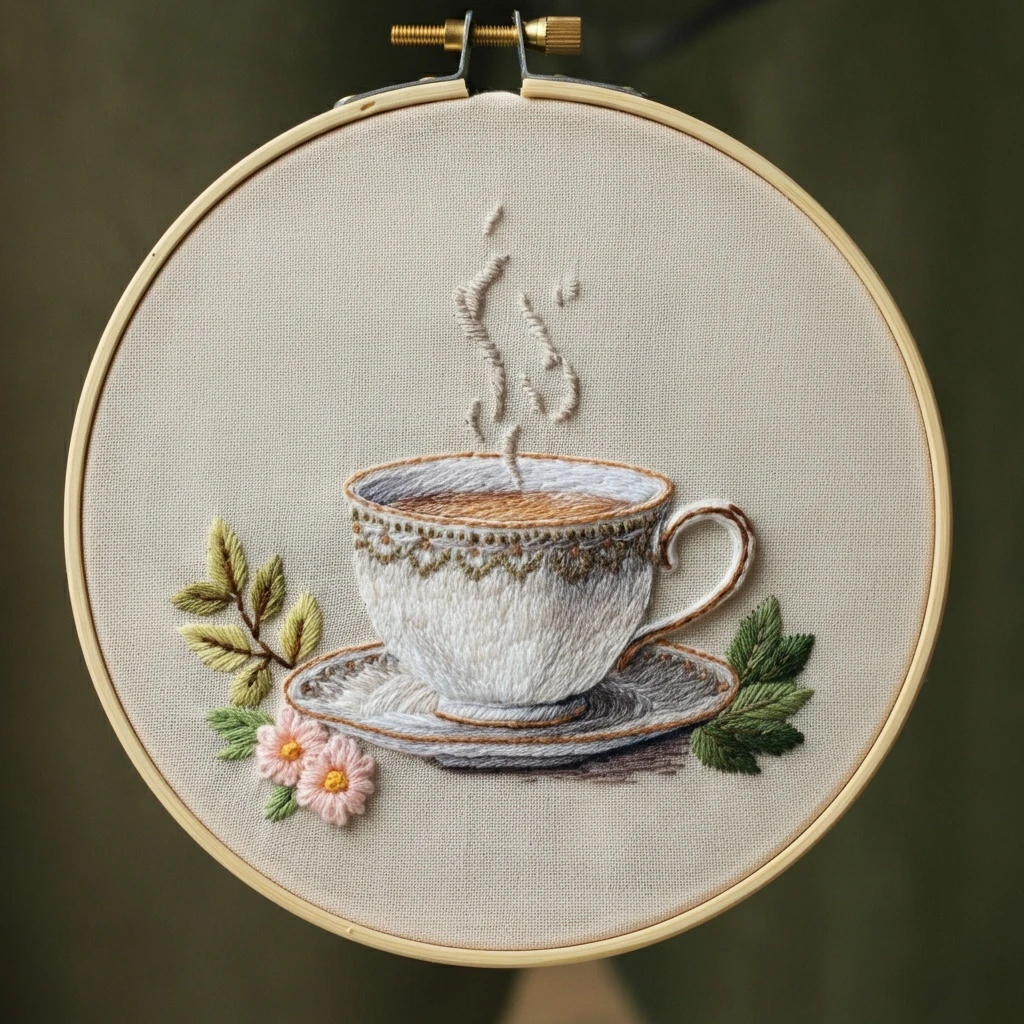
Exquisite Embroidered Teacup And Floral Arrangement
A refined hoop design featuring a porcelain teacup and saucer, warm tea surface, curling steam, delicate trim, soft pink daisies, and layered olive-green foliage. This guide keeps the teacup luminous, the saucer shaded, and the small florals sweet without overpowering the quiet tea-time mood.
Suggested DMC Color Palette
The reference image is built around creamy whites and cool gray shadows for the teacup, honey-brown tea and rim accents, muted green foliage, brown stems, blush-pink flowers, golden centers, and soft taupe steam. Keep the cup mostly pale, then use small controlled shadows to describe the curved bowl and saucer.
Stitch Map by Design Element
Work from the pale porcelain outward, then finish with flowers, foliage, steam, and tiny trim. This prevents dark leaf or brown rim threads from being dragged through the white cup areas.
Long & short stitch
Use 1 strand in small overlapping strokes: 3865 for light, 822 for the mid plane, 762 for curves, and a few 318/645 shadows under the rim and base.
Split stitch outline
Outline with short split stitches in 434, then add 435 highlights on the upper rim. Use 801 sparingly where the handle curls back.
Horizontal satin stitch
Fill the tea with smooth horizontal stitches in 434 and 435. Add a thin darker 801 line at the far edge to make the liquid sit inside the cup.
Directional satin stitch
Follow the oval curve with 3865, 822, 762, and 318. Keep stitches short near the front rim so the saucer stays crisp and rounded.
Fishbone stitch
Use 3011 or 3051 along the vein and base, then 3052 and 3347 toward the edges for soft botanical dimension.
Lazy daisy + French knots
Make each petal as a detached chain in 761, add 760 at the base if desired, and finish centers with clustered French knots in 3821.
Thread-count guidance
- 1 strand: porcelain shading, steam wisps, fine rim lines, decorative trim dots, and delicate flower stems.
- 2 strands: most cup fill, saucer satin stitches, leaves, flower petals, and brown branch stems.
- 3 strands: raised daisy centers, a bolder front saucer edge, or extra texture in the lower leaf cluster.
- For the pale cup, separate strands and recombine them before stitching so the surface looks smooth rather than rope-like.
Blending ideas
- Blend one strand DMC 3865 with one strand DMC 822 for the main porcelain body when you want gentle coverage.
- Blend DMC 762 with DMC 318 for the saucer's deepest gray arcs without making them too harsh.
- Blend DMC 434 with DMC 435 across the tea surface for warm reflective movement.
- Mix DMC 3052 with DMC 3347 on left-side leaves, then use DMC 3011 for the darker right-side greenery.
For the porcelain, shade with tiny broken strokes rather than large blocks. Let a little ground fabric show through in the lightest areas; it will make the white cup feel airy and hand-rendered.
Outlining, Shading & Texture Notes
Outlining details
- Use DMC 434 for the warm cup rim, handle, trim band, and saucer edge; keep each stitch short around curves.
- Use DMC 645 only for the narrowest lower saucer shadow and the darkest cup underside. Too much dark gray will dull the porcelain.
- Back stitch the stems in DMC 801 with 1 strand, then couch a few longer stems if you want smoother branches.
- Steam should be stitched last in DMC 3033 with loose stem stitch or tiny split stitches, leaving gaps so it appears transparent.
Shading guidance
- Place the brightest white on the left-center cup bowl, top of the handle, and front saucer highlights.
- Add gray shadows under the cup rim, at the base of the bowl, and along the lower saucer oval to create depth.
- Shade leaves from dark stem base to lighter tips; alternate green tones so the foliage does not look flat.
- Keep the pink flowers soft: use darker salmon near centers and light salmon on petal tips.
Beginner-Friendly Working Order
Practical Tips for a Polished Finish
Hoop and tension
- Keep the fabric drum-tight so the long cup and saucer stitches do not pucker around the oval shapes.
- Rotate the hoop frequently; the smoothest porcelain shading follows the curve of the cup rather than one fixed hand angle.
- Avoid carrying brown, green, or gray thread behind the white cup because it can shadow through light fabric.
Clean stitching habits
- Use 14 to 16 inch lengths for white and gray floss so the cup stays clean and lint-free.
- Park darker threads away from pale stitched areas, and wash hands before working the porcelain section.
- Press the finished embroidery face-down on a thick towel to preserve French knots, leaf ridges, and the raised rim texture.