
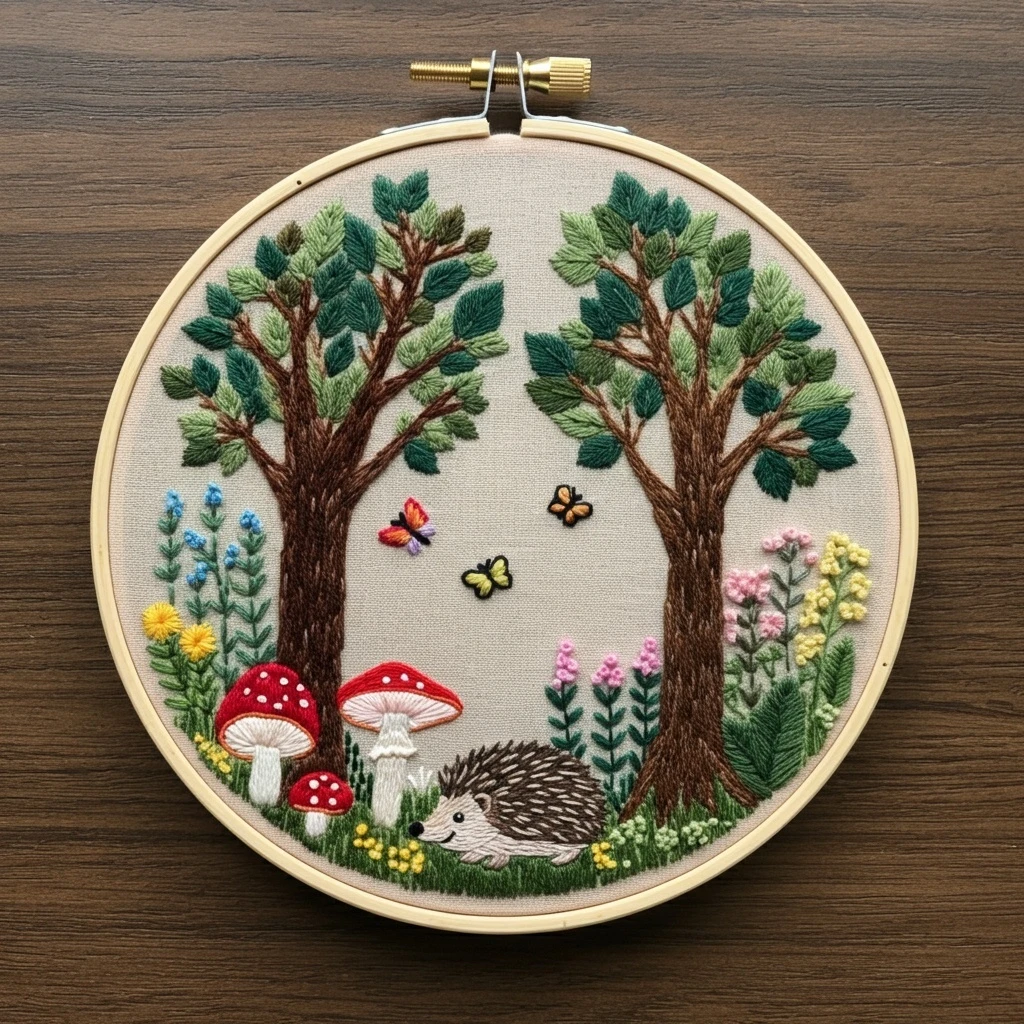
Forest Hedgehog And Mushroom
A cheerful woodland hoop with two leafy trees, bright red fly agaric mushrooms, a curled hedgehog, blue and yellow wildflowers, pink and lemon blossoms, butterflies, and a soft natural-linen background.
Color Story
The artwork is a balanced woodland scene: deep brown tree trunks frame the hoop, layered cool and warm greens build the canopy and forest floor, and the hedgehog sits low among red mushrooms and scattered wildflowers. Let the greens create most of the atmosphere, then use the mushroom red, blue flowers, pink blossoms, and yellow knots as small clear focal accents.
Stitch Plan by Design Area
| Area | Recommended stitches | Practical guidance |
|---|---|---|
| Tree trunks and branches | Stem stitch, split stitch, whipped backstitch, seed stitch | Lay the trunks in 2 strands of 839, then add irregular 938 ridges and 3860 highlights. Follow the branch direction and leave tiny gaps so the fabric shows like bark texture. |
| Canopy leaves | Fishbone stitch, lazy daisy, detached fly stitch | Stitch the darkest leaves first in 500/501, then place 469 and 3348 on top. Vary leaf angles so the canopy feels hand-grown rather than patterned. |
| Hedgehog quills | Long-and-short stitch, straight stitch, split stitch | Use short strokes that angle backward from the face toward the rump. Mix 938, 839, and 3860 randomly for a bristly coat, keeping the belly and face smoother. |
| Hedgehog face and feet | Tiny satin stitch, split stitch, French knot | Use 1 strand of 3860 or 842 for the face. Add the black eye and nose at the very end with one tiny knot or a single satin stitch. |
| Red mushrooms | Satin stitch, split stitch outline, straight stitch gills | Outline cap curves with 321, fill with angled satin, then use 3865 for white spots and gills. Shade under caps with 758 or 3860 if you want extra depth. |
| Grasses and ground cover | Straight stitch, fly stitch, seed stitch, couching | Start with darker green grass along the hoop edge and layer lighter strokes upward. Keep grass uneven in height so it frames the hedgehog naturally. |
| Wildflowers and blossom clusters | French knots, colonial knots, lazy daisy, pistil stitch | Use blue detached chains for taller flowers, yellow knots for round blooms, and pink one-wrap knots for clustered blossoms. Add green stems before the knots. |
| Butterflies | Satin stitch, backstitch, tiny straight stitch | Use 1 strand for wing outlines and bodies. Keep wings light and simple so they float between the trees without competing with the mushrooms. |
Thread Count, Blending & Shading
Thread-count guide
- 1 strand: hedgehog eye, nose, face lines, butterfly bodies, mushroom spots, fine flower stems.
- 2 strands: tree trunks, leaf fills, mushroom caps, main hedgehog quills, most flowers.
- 3 strands: optional for the dense bottom grass only if the hoop is larger than 7 inches.
Blending ideas
- For quills, combine one strand 938 with one strand 839 for a natural dark-brown bristle.
- For fresh leaves, blend 469 + 3348 and use it only on the outermost canopy tips.
- For mushroom shadows, place a few stitches of 321 + 815 near the cap underside, then brighten the center with 666.
Outlining details
- Use dark brown instead of black for tree and mushroom outlines; black should be reserved for tiny facial and butterfly marks.
- Break outlines around leaves and grass. Small gaps make the scene look softer and more embroidered.
- Outline mushroom caps after filling so the curved edge becomes crisp and rounded.
Shading approach
- Build trunks dark-to-light with vertical ridges, then add branch highlights only on one side.
- Shade the hedgehog with darker quills on the top and lighter face/belly stitches below.
- Keep flower colors clean and separate; the tiny blooms should read as dots of color, not blended masses.
Texture Suggestions
Bark texture
Use uneven stitch lengths and slightly different browns. Whip a few darker stem-stitch lines with lighter cocoa to suggest ridges, but avoid filling the entire trunk with one smooth block.
Quill texture
Layer straight stitches like small arrows across the hedgehog back. Let the stitch tips overlap but not align; this gives the animal a bristly, soft silhouette.
Mushroom texture
Fill each cap with satin stitches that follow the dome curve. Add white spots as tiny satin stitches or French knots, and use cream straight stitches under the cap for gills.
Flower texture
Make yellow and pink flowers raised with knots, while blue flowers can be flatter detached chains. This contrast keeps the meadow lively without making every area bulky.
Beginner-Friendly Working Order
- Transfer the major shapes first. Mark trunks, mushroom caps, hedgehog body, tall flower stems, and the ground line. Add tiny leaves and flower dots by eye as you stitch.
- Complete trunks and branches before leaves. The canopy stitches should sit on top of the brown limbs for a natural layered look.
- Work the hedgehog before the grass covers its feet. Stitch the face and quills, then tuck grass stitches around the body.
- Fill mushrooms next. Red caps are strong focal points, so finish their outlines and white spots before adding surrounding small flowers.
- Save knots and butterflies for last. Raised knots can snag, and butterflies are easier to place once the empty spaces between trees are visible.
Clean stitching habits
Keep white mushroom stems and spots until late in the project. Red thread can shed tiny fibers, so wash hands or wipe the needle before switching to 3865.
Practice first
On scrap fabric, test one fishbone leaf, one mushroom cap curve, and a cluster of French knots. These three samples will prepare you for most of the design.