
Realistic Grape Cluster Hoop Art
A clean, practical embroidery guide for a dimensional bunch of purple grapes with wine-red depth, satin leaves, curling tendrils, warm stems, and a small cut-grape accent on neutral linen.
Design Read
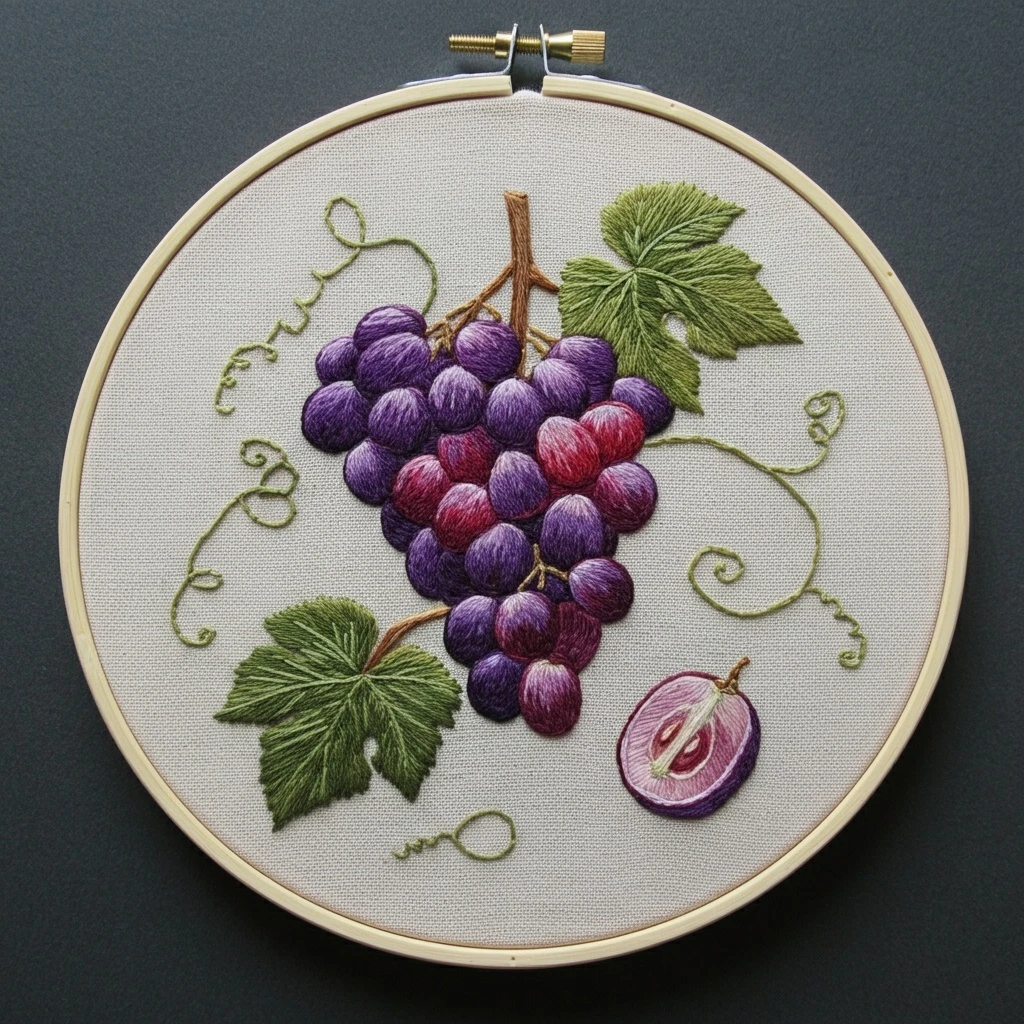
The reference design shows a realistic grape cluster stitched in a hoop. The cluster is built from rounded, glossy berries in deep violet, lavender, burgundy, and plum. Two textured grape leaves frame the composition, fine olive tendrils curl across the linen, brown stems connect the fruit, and a sliced grape accent adds pale pink flesh, ivory seed highlights, and a dark purple rind.
Core DMC Palette
Use the violet family for most berries, then add selective burgundy berries and pale lavender highlights so the cluster reads rounded and dimensional rather than flat.
Round Grape Texture
- Use padded satin stitch for individual grapes: lay a small underlayer first, then cover with smooth curved top stitches.
- Shape every berry with a dark lower edge, a mid-tone body, and a small crescent of lavender or ivory highlight.
- Change stitch direction slightly from grape to grape so the cluster looks natural and dimensional.
Leaves & Veins
- Fill leaf sections with long-and-short stitch or fishbone stitch, always radiating from the center vein toward the serrated edge.
- Use DMC 3345 for dark folds and DMC 3052 for light vein tips; keep the brightest green narrow and selective.
- Work the final main veins in split stitch or stem stitch so they sit cleanly on top of the leaf fill.
Tendrils & Stems
- Use 1 strand for tendrils in stem stitch, couching, or whipped backstitch to keep the curls fine and elegant.
- Build woody stems with 2 strands of DMC 975, then add DMC 898 on one edge for bark-like depth.
- At grape joins, add tiny brown stitches first, then place the berry satin stitch over the base for a tucked-in look.
Suggested Stitch Map
Transfer lightly
Mark only grape circles, leaf outlines, main veins, tendril paths, and the sliced-grape details. Avoid heavy transfer lines inside the pale cut fruit.
Stitch leaves first
Use directional long-and-short or fishbone stitch before the grapes. This lets the fruit overlap the leaves cleanly and gives the cluster more depth.
Add stems and tendrils
Work stems in brown stem stitch or split stitch. Tendrils should be one strand so they stay airy against the linen background.
Build berries in layers
Start with the back grapes, then move forward. Use padding only where you want a raised, bead-like effect.
Finish with glints
Add final lavender and winter-white strokes last. A few controlled highlights are more realistic than outlining every grape.
Thread-Count Guidance
| Area | Strands | Practical note |
|---|---|---|
| Grape satin fill | 2 strands | Use smooth tension; for small grapes switch to 1 strand so circles stay neat. |
| Berry highlights | 1 strand | Place short curved strokes over the satin, following the round form. |
| Leaves | 1–2 strands | Use 2 strands for broad fill and 1 strand for veins and serrated points. |
| Tendrils | 1 strand | Stem stitch, whipped backstitch, or couching keeps delicate curls crisp. |
| Cut grape and seeds | 1 strand | Use tiny satin stitches and pin-prick highlights; avoid bulky knots in the small detail. |
Blending & Shading Ideas
- Purple blend: combine one strand DMC 552 with one strand DMC 554 for mid-light grapes that sit between shadow and shine.
- Wine blend: combine one strand DMC 915 with one strand DMC 3685 for red-purple berries near the center of the cluster.
- Leaf blend: combine DMC 3012 with DMC 3052 for soft olive highlights along raised leaf veins.
- Depth trick: keep the bottom and inner grapes slightly darker than the top-left grapes, matching the reference’s dimensional lighting.
Outlining Details
- Use split stitch in DMC 550 only where grapes touch; do not outline the entire cluster with one heavy border.
- For the sliced grape, outline the rind in DMC 550 or 552 and soften the flesh with DMC 210, 3685, and 3865.
- Leaf edges can be sharpened with short angled stitches instead of a continuous outline, preserving the natural serrated look.
- Use brown seed and stem marks sparingly so the delicate cut-grape accent does not become too dark.
Texture Suggestions
| Texture goal | Recommended stitch | How to use it |
|---|---|---|
| Plump 3D berries | Padded satin stitch | Add one small layer of straight stitches under the top satin fill, keeping padding inside the grape outline. |
| Soft grape sheen | Long curved straight stitches | Place 2–4 light strokes on each berry, curved with the form rather than straight across. |
| Leaf ribbing | Fishbone or long-and-short stitch | Stitch outward from the central vein to create the fan-like texture visible in the reference. |
| Fine curling vines | Stem stitch or whipped backstitch | Use one strand and slow, small stitches around tight curls for clean loops. |
| Woody branch | Split stitch plus straight stitch accents | Layer warm brown with darker strokes on one side for bark texture. |
Beginner-Friendly Practical Tips
- Number the grapes on your printed pattern and stitch from the back layer to the front layer. This prevents accidental crowding.
- Keep satin stitches short enough to control; for larger grapes, divide the shape into gentle curved sections instead of spanning the whole circle.
- Use a sharp embroidery needle and do not pull tightly. Over-tight satin stitch can pucker linen around each grape.
- Test one grape on scrap fabric first with your chosen padding thickness. Raised grapes look beautiful, but too much padding can distort small circles.
- Step back often. Realistic grape clusters rely on value contrast more than perfect outlines.