
Design #679 · Woodland & Fantasy
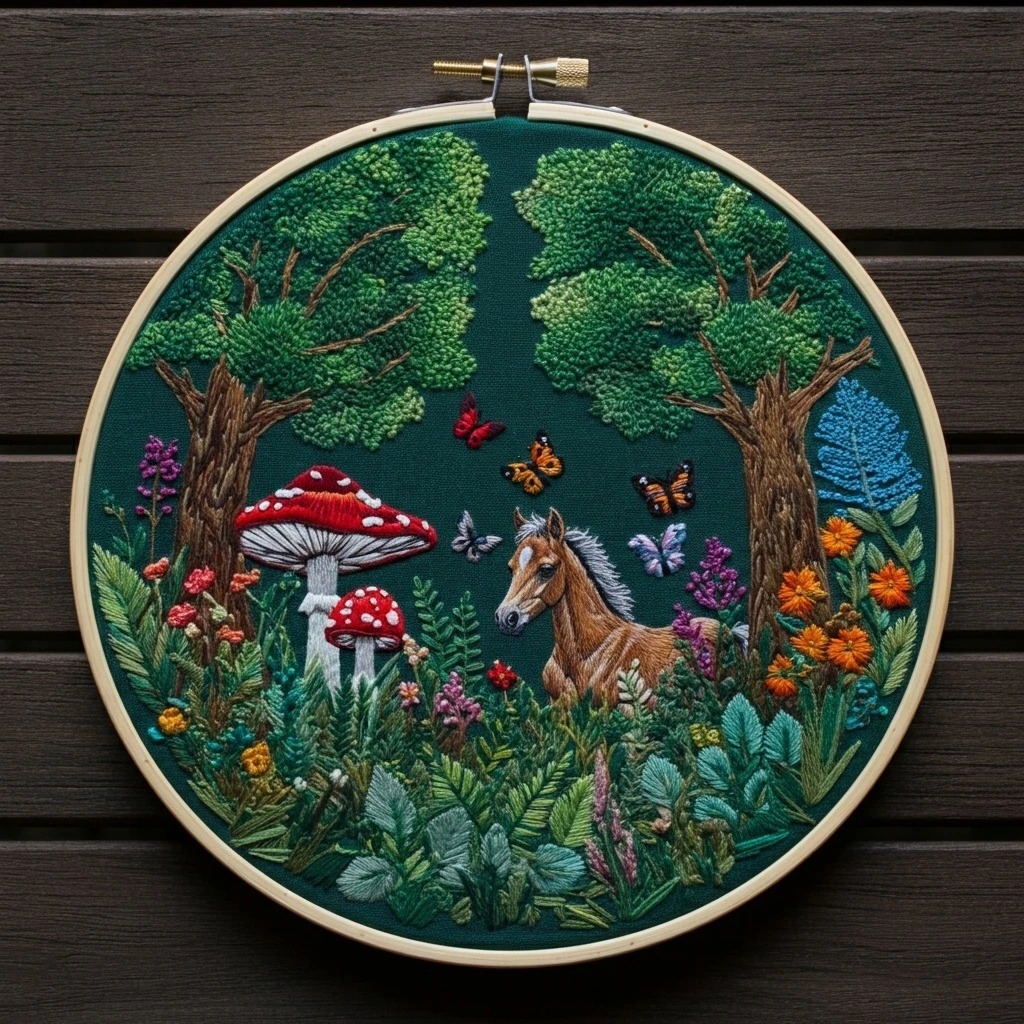
Enchanted Forest
A storybook forest hoop with a gentle horse, red amanita mushrooms, mossy ground, leafy greenery, and small magical accents. The design depends on warm horse browns, saturated mushroom reds, cream-white cap spots, deep forest outlines, and layered greens that make the woodland feel shaded but inviting.
Likely DMC Color Palette
The image reads as a warm woodland scene: a chestnut horse as the focal point, red-and-white amanita mushrooms in the foreground, dark stitched outlines, layered moss greens, and a few golden or cream highlights. Coverage percentages are visual estimates, not exact thread quantities.
DMC 938 · Coffee Brown Ultra Dark
Use one strand for the crispest contour lines around the horse, tiny facial features, hoof edges, and deepest forest shadows.
8% visual coverageDMC 898 · Coffee Brown Very Dark
Work along the belly, neck underside, legs, and mane roots. It gives the horse structure without making the body too black.
10% visual coverageDMC 433 · Brown Medium
Use as the primary horse fill. Long-and-short stitching follows the muscle direction and keeps the body rounded.
14% visual coverageDMC 435 · Brown Very Light
Add short highlight stitches on the shoulder, rump, cheek, and leg fronts. Blend with 433 for a natural chestnut coat.
7% visual coverageDMC 321 · Red
Use for the saturated mushroom caps. Satin stitch gives the caps a smooth, glossy fairy-tale look.
8% visual coverageDMC 349 · Coral Dark
Place curved highlight strokes near the top or outer cap edges, then let 321 stay dominant in the shadowed areas.
4% visual coverageDMC 3865 · Winter White
Use for amanita spots, small flower centers, and any pale horse marking. One strand keeps spots round and controlled.
7% visual coverageDMC 739 · Tan Ultra Very Light
Use for mushroom stems and underside gills. Add a few darker beige stitches at the base for contact shadow.
6% visual coverageDMC 895 · Hunter Green Very Dark
Best for the darkest foliage, ground breaks, and background branches. Use sparingly so the scene stays magical rather than muddy.
10% visual coverageDMC 3346 · Hunter Green
This is the core woodland green. Combine with darker and lighter greens to build depth behind the horse and mushrooms.
13% visual coverageDMC 470 · Avocado Green Light
Use in short straight stitches for bright moss, leaf tips, and small plants catching light near the mushroom caps.
8% visual coverageDMC 3821 · Straw
Add tiny knots or short stitches for glowing pollen, seed heads, and warm magical details around the forest floor.
3% visual coverageStitching Suggestions
Stitch the background foliage first, then the horse, then mushrooms and foreground texture. Save the black-brown outlines, cap spots, eye, and tiny accents for last so the finished hoop looks clean and dimensional.
| Element | Stitch type | Practical notes |
|---|---|---|
| Horse body | Long and short stitch | Use 2 strands of 433 as the main fill. Angle the stitches with the body: horizontal over the barrel, downward on legs, and curved around shoulder and rump. |
| Horse shading | Layered long and short stitch | Add 898 under the belly, neck, and leg joints; add 435 to the cheek, shoulder, flank, and leg fronts. Blend by alternating short stitches rather than striping. |
| Mane and tail | Stem stitch, split stitch, and straight stitch | Use 898 and 938 with a few 433 highlights. Let the stitches flow in the direction of the hair for movement and texture. |
| Horse outline and features | Single-strand backstitch | Use 938 after the body is filled. Keep the eye, nostril, mouth, and hoof marks tiny; oversized dark stitches can make the horse look cartoonish. |
| Amanita caps | Satin stitch or padded satin stitch | Use 321 for the cap base and 349 for small curved highlights. Stitch from cap edge toward the center so the cap keeps its rounded shape. |
| Mushroom spots | French knots or tiny satin dots | Use 1 strand of 3865. One-wrap knots give raised white speckles; tiny satin dots look flatter and neater for very small caps. |
| Mushroom stems and gills | Split stitch fill and fine backstitch | Use 739 for the stem with small 842 or brown shadow strokes if needed. Add gill lines with one strand to avoid crowding. |
| Forest foliage | Seed stitch, detached chain, and lazy daisy | Layer 895 behind 3346, then add 470 on top. Vary stitch length and spacing so leaves feel organic rather than patterned. |
| Mossy ground | Short straight stitch and couching | Use mixed greens in irregular rows. A few horizontal couching stitches can suggest soft moss without filling every millimeter. |
| Magical dots and tiny flowers | French knots and single straight stitches | Use 3821, 3865, and small touches of red or green. Keep knots scattered around the mushrooms to guide the eye without overwhelming the horse. |
Thread Count, Blending & Shading Plan
Use 2 strands for filled shapes
The horse coat, large mushroom caps, main moss, and broader leaves will cover well with two strands while still looking hand-stitched.
Use 1 strand for facial details
The horse eye, nostril, mouth line, hoof edges, cap spots, and gills need a single strand for clean scale and beginner-friendly control.
Blend the horse in three values
Start with 433, place 898 in shadow, then feather 435 into highlight areas. Avoid hard borders by overlapping stitch tips.
Keep red caps dimensional
Stitch caps in curved satin rows. Put 349 highlights on the light-facing edge and reserve the darkest brown only for the cap underside or outline.
Layer greens from dark to light
Set the forest depth with 895 first, fill foliage with 3346, then add 470 as small top stitches. This prevents the background from looking flat.
Outline at the end
Final backstitch tidies the horse silhouette, separates mushroom caps from stems, and sharpens leaves after all textured fills are complete.
Texture & Dimension Notes
Make the horse feel soft
- Use long-and-short stitches rather than solid satin over the horse body; this gives a fur-like surface and hides small direction changes.
- Keep the muzzle and lower legs slightly darker with 898 so the lighter chestnut highlights have somewhere to shine.
- For a flowing mane, stitch several long dark lines first, then add shorter medium-brown strokes between them.
- Do not over-outline the coat interior. A few shadow seams are enough to show form.
Make the mushrooms look magical
- Padded satin stitch on the largest cap gives a raised, rounded fairy-ring effect.
- Scatter white dots unevenly; natural amanita spots should not form perfect rows.
- Add a few golden French knots near the forest floor for a subtle enchanted glow.
- Use darker green stitches tucked under the caps to create contact shadows.
Practical Embroidery Tips
Fabric and hoop
A medium-weight cotton or linen in natural cream works well. Tighten the hoop firmly before starting large fills so long-and-short stitches stay even.
Needle choice
Use a size 7 or 8 embroidery needle for two-strand areas and a size 9 needle for single-strand outlines and tiny mushroom spots.
Control thread length
Cut floss to about 14-16 inches. Shorter lengths reduce fuzzing, which matters on dark browns and saturated reds.
Prevent red bleed visually
Keep white mushroom spots until after the red cap is complete. If the cap looks too bold, soften it with small coral highlights rather than adding white too early.
Use a resting stitch map
Before stitching the horse, lightly mark the direction of shoulder, back, belly, and leg stitches with an erasable pen so the fill follows the animal’s form.
Finish with a lint check
Dark browns and reds collect pale lint. Use clean tape or a soft brush before mounting so the final hoop looks crisp in photos.